Update: 23rd March 2020 Hey thanks for coming and reading this. Did you know this review is over a year old, crazy huh ! Well a lots happened in a year and my rig has gotten seriously sick (you know, the good sick, not the bad sick) in the process. It’s grown, gotten more screens, added a second controller, more servo drives and even got a G-Seat project up and running – all thanks in part to the SFX-100 project. I’ve updated this review with any 2020 relevant parts. The SFX crew liked my writing so much I ended up joining the official core team, yeah and I think my other half finally accepts my hobby. Here’s some important links to go to after you’ve read this review.
High end motion simulators are really freaking expensive. Like not a little bit expensive but insanely expensive.
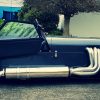
See this engine bay?

*That* was expensive. It had lots of custom work done to fit things where they shouldn’t fit. That *should* be expensive. It was a bit of an adventure into the unknown. The invoices still put me into a cold sweat.
Now let’s turn around to the other toy in the garage – I wanted to add motion to it. Let’s look at the top end of the market.
| Brand | Type (Actuator) | Vertical Acceleration | Vertical Movement | Cost (not including shipping, customs, GST ie. add a good 25%) |
|---|---|---|---|---|
| A | Seat Mover (SCN-6) | 200mm/sec | ? | $70’000 NZD Complete rig – just in here for the craziness aspect. |
| B | Platform Mover (DBox) | 100mm/sec | 100mm | $50’000 NZD for the actuator upgrade |
| C | Platform Mover (Inhouse design) | 280mm/sec | 100mm | $15’000 NZD for the actuators |
Okay I take my toys seriously. But that takes the cake. That’s really in the territory of “you’ve got a Veyron in the garage and have some space and can’t think of anything else to spend your money on”. Okay maybe Brand C might be viable, but even then…
If I were running one of those companies right now I’d almost be worried. Almost, in so far as at that price point I’m probably selling to people who have no DIY interest. Because DIY up to now has been fairly much a “one off” and cobbled together, requiring fabrication and a fair amount of pioneering along with trawling through forums to find answers.
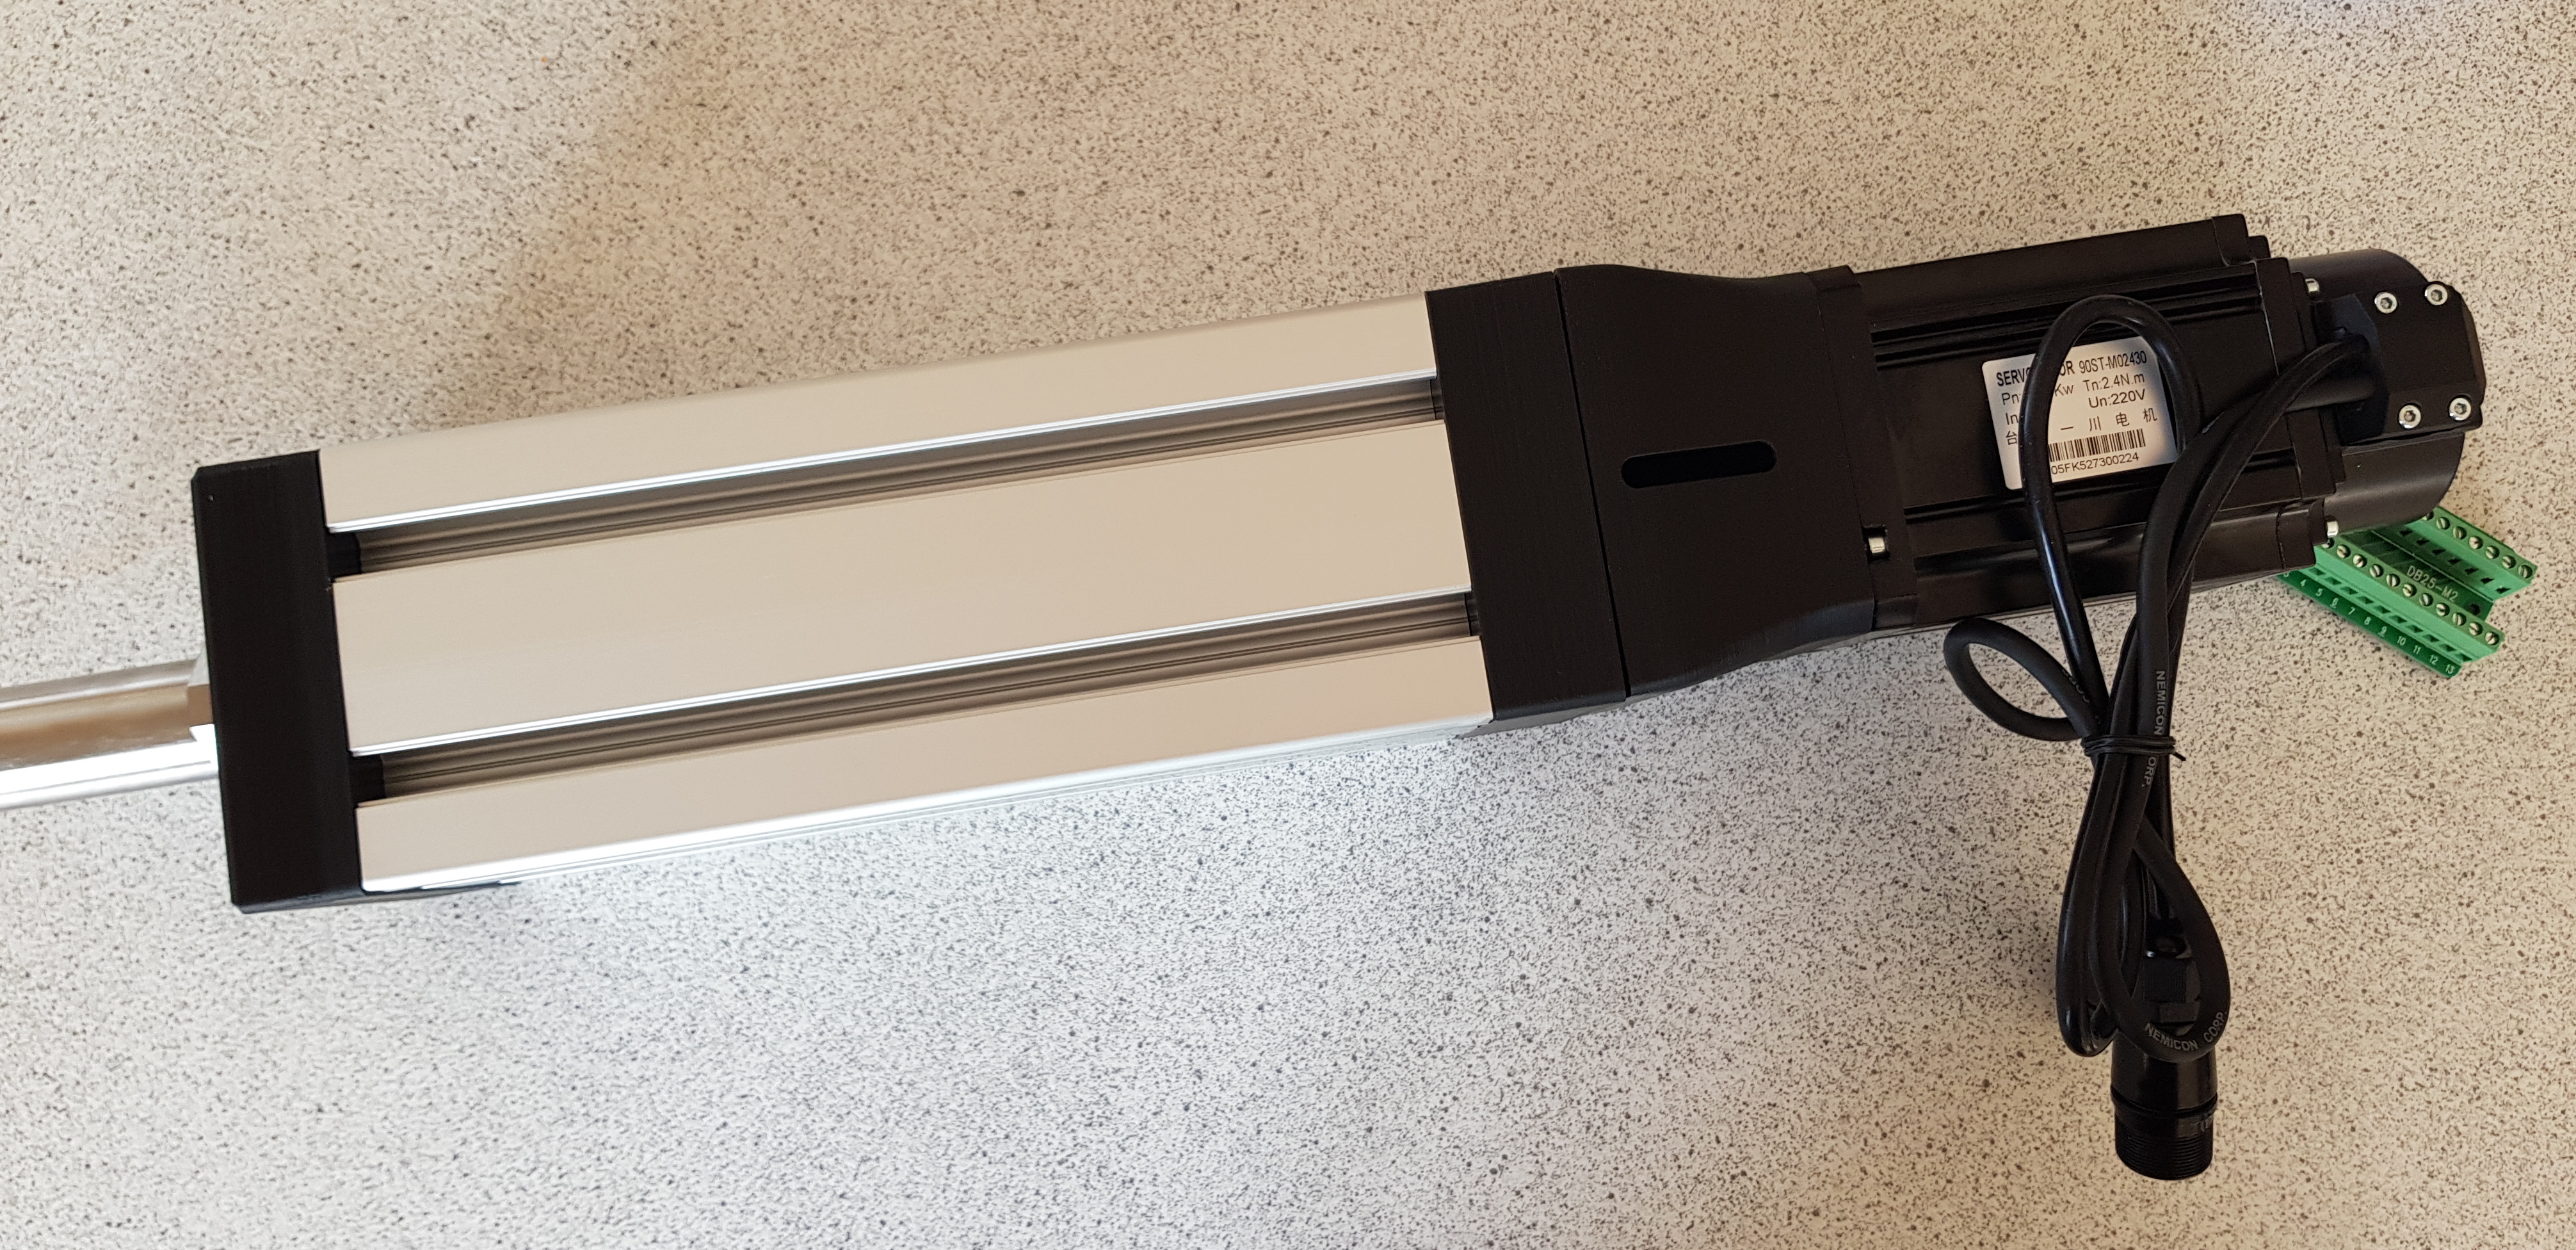
But now there’s something different in the market. It straddles the line between the two. Let me show you something that has 100mm movement, with 250mm/second max velocity, that costs a fraction of the top end. It’s this the “SFX-100”. Designed by a guy with the online name “Saxxon66” he’s released the plans & software on Github (https://github.com/SimFeedback/SimFeedback-AC-Servo)
It’s absolutely not a “ready to run” solution. You still need some DIY/maker skill, but not nearly as much as some of the other DIY type seat movers. You do need a healthy level of awareness and respect for mains voltage (some wiring is required), aside from that thanks to 3d printing (more on that later) it’s more a case of assembling parts, as opposed to fabrication. What do you need to be able to do :
- Follow along instructions
- Basic soldering/wiring for the arduino controller 2020: If you get your hands on a “SFX-Shield” this is no longer an issue.
- Understand mains wiring for the AC drives, you need to get from a mains plug to the terminals on the drives.
- Assembly, loctiting things etc
- Quick learning on 3d Printing (it’s really fun) or get someone else to do it for you.
Basically if you have the patience to learn anything that’s foreign to you via Google/YouTube you should be okay.
For the price of 1.4 RTX 2080 TI cards in NZD, you can achieve similar levels of top end performance of the big boys without needing to fabricate parts, nor sell a car to finance them.
The system comprises the SFX-100 (Actuator) + SimFeedback (PC Software + Arduino Firmware) system. You get the parts list, the spec of the critical pieces, 3d printing files, wiring diagram, vendor list is all provided and up on github. The design is open source, free for non-commercial use.
 The SimFeedback software is free & closed source for the basic variant however- this has a donationware element both for enabling expert mode and access to the “Owners club” Discord channel.
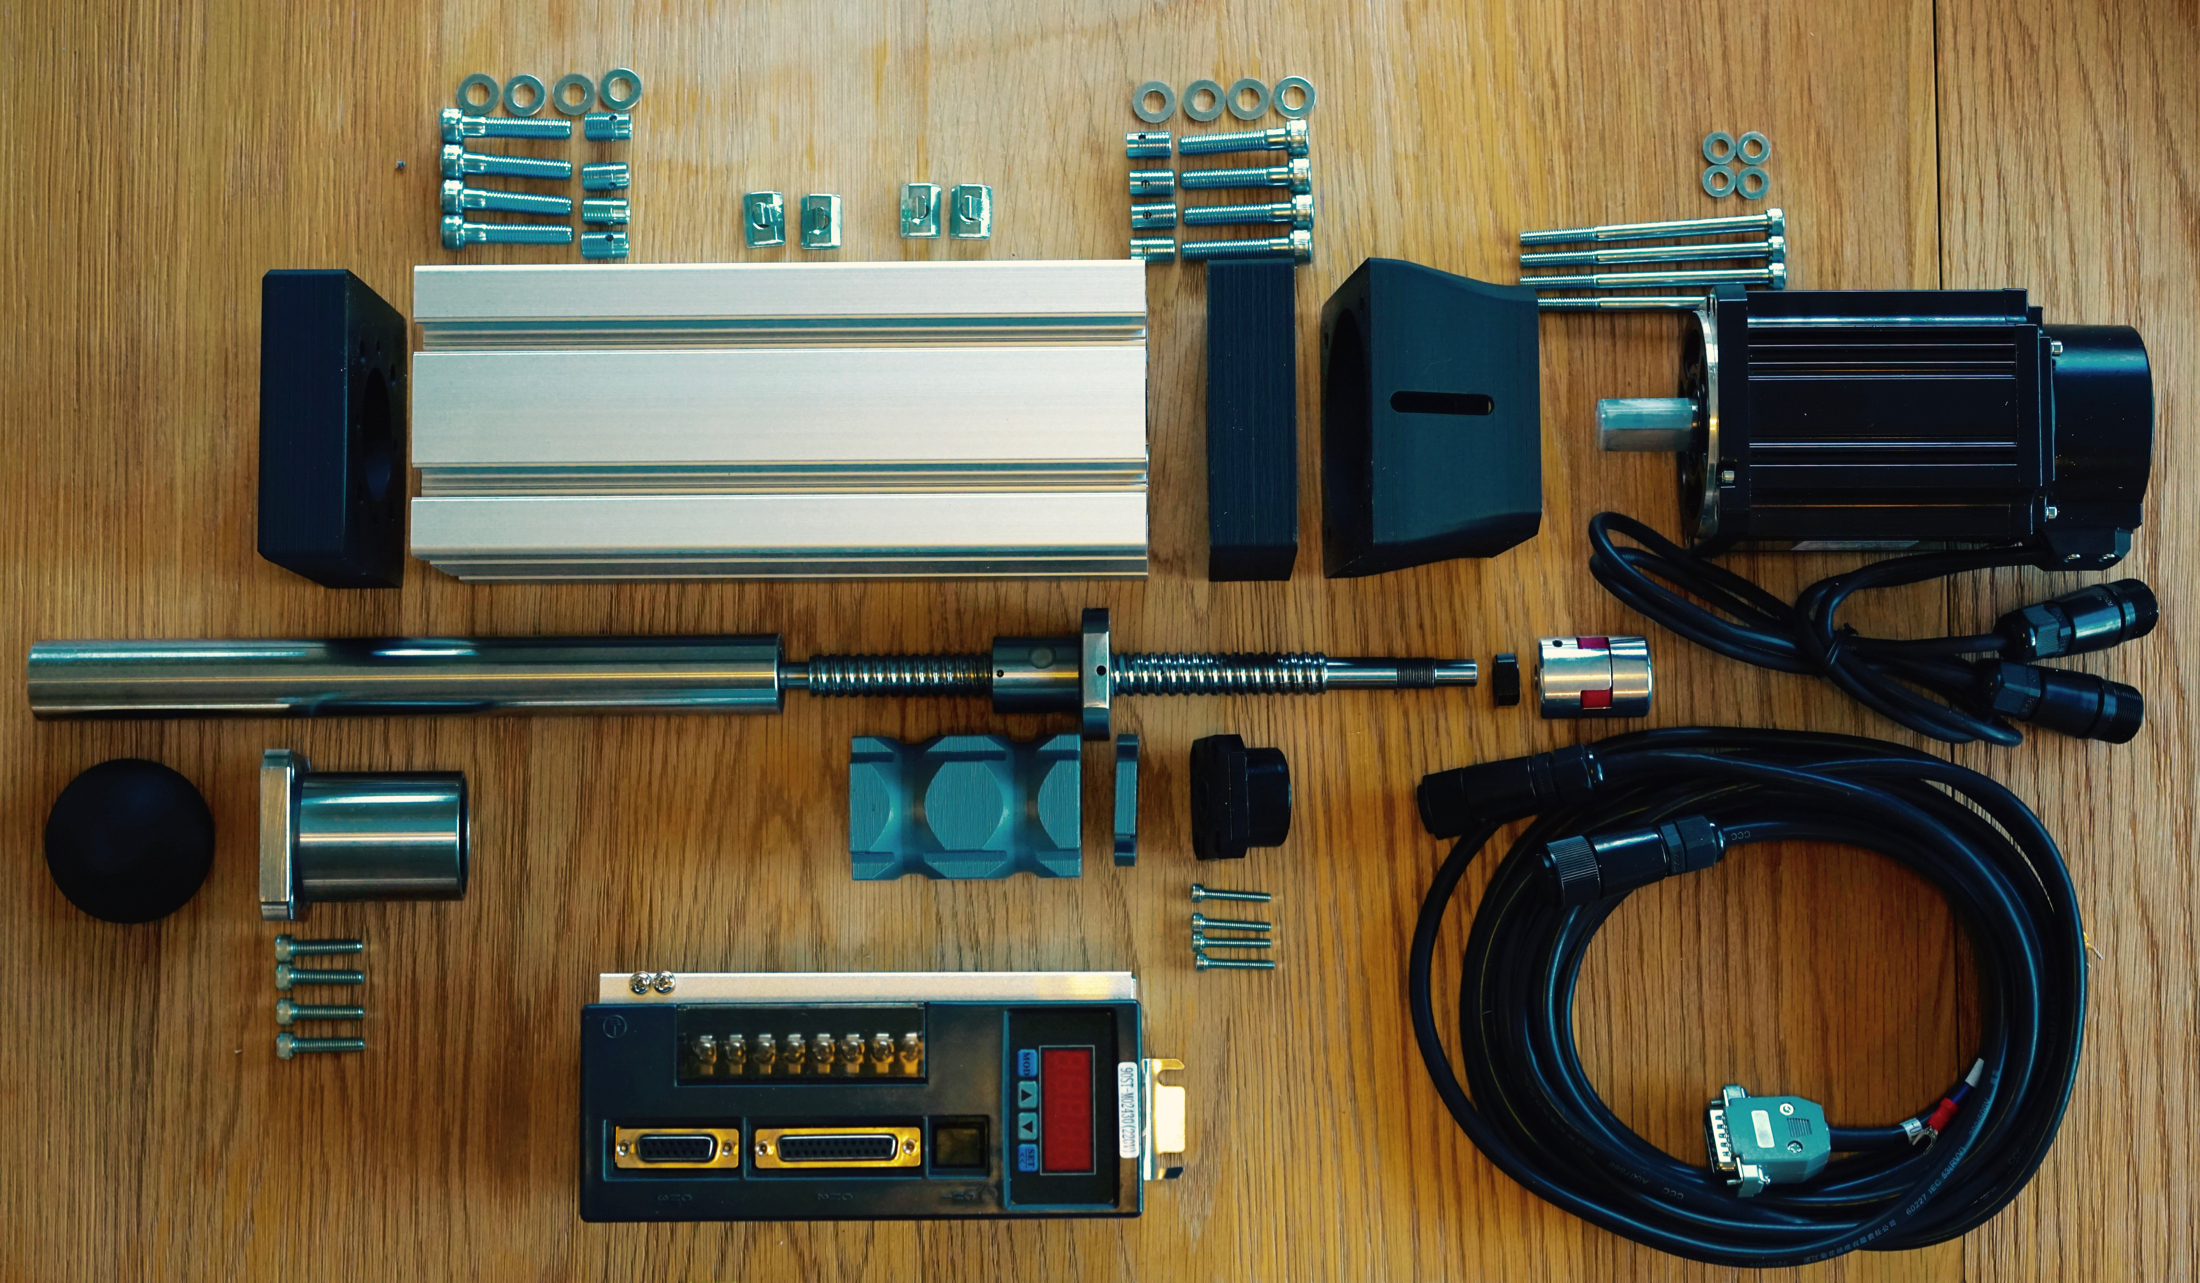
Almost all the bits to make up one actuator. Missing from photo is o-ring, six screws and some elbow grease. In summary :
- You source the parts (An hour so depending where you live and what’s available to ship to you, weeks of waiting)
- Print some components (An hour or so of work. 200 hours of printing)
- Wire up, test, and configure the motors (An hour or so)
- Assemble the actuators (6-12 hours, if you’re really fast an hour an actuator)
- Wire up the controller (2-3 hours), flash the firmware (5mins), test it (5 mins) and fit it to your rig (????) and have fun.
We’re looking at a total of around 20-30 or so hours of work. A big cautionary note – you have to wire your servo drive controllers (x4) to mains power there is no standard 3 pin IEC connector. Obviously this is your own responsibility. The servo drives come with Chinese manuals so you do have to figure this bit out for yourself and is probably the single biggest barrier to entry.
You have the benefit that dozens of others have come before you and are very keen to help out if you get stuck. Although please do RTFM, as most often the answer is there. It seems like a person a day is joining the Discord – for everyone who’s donated. Which tells you this things getting some traction. Oh and hey I wrote a build guide as I went along.
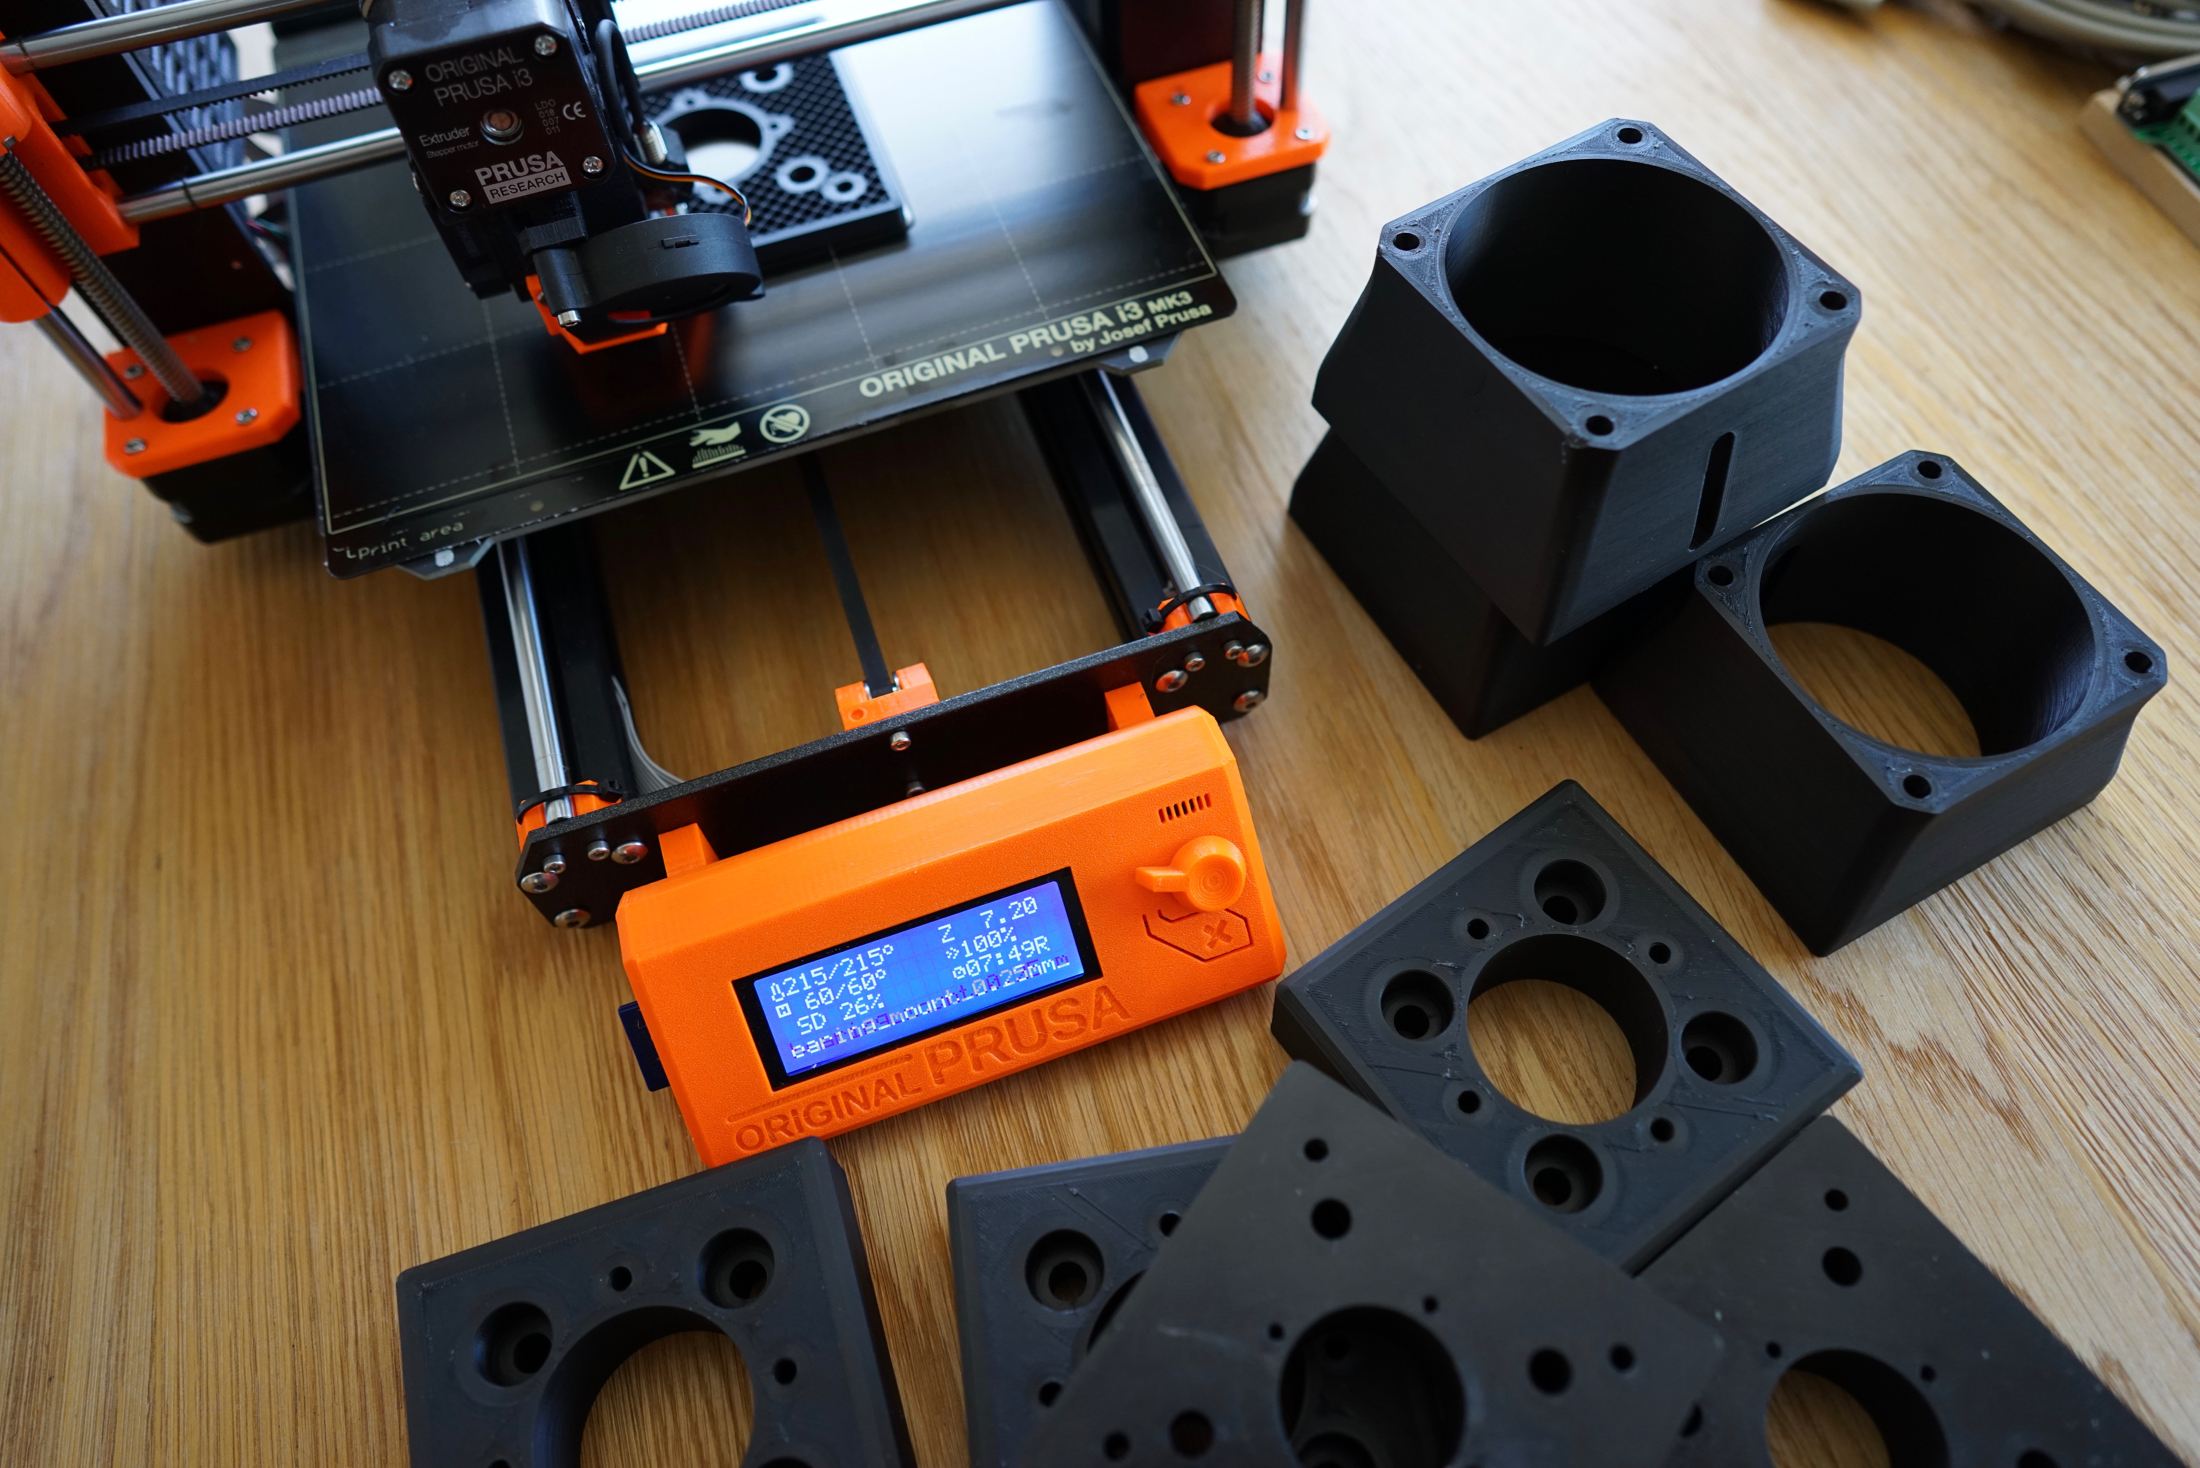
If someone had said “you’re going to buy a 3d Printer that can go down to 50 micron resolution, and you’re going to print 1.5 km worth of filament by Christmas time” in September, I would have told them they were joking.
One key aspect of this project, that makes it truly accessible, is that the major component pieces aren’t CNC machined, but 3d printed. You wouldn’t think it’s strong enough – but it is with regular old PLA (don’t worry you’ll come to know what this term is and what it smells like). You’ll then also discover this wonderful world of 3d printing. I can’t begin to think how expensive/time consuming/problematic it would be to get this stuff made via CNC for Joe Public. Whereas Joe Public, with a bit of methodical work can get a good functional 3d print.
My advice – if you can afford it, get a 3d Printer. If you’re anything like me you’ll find a bunch of other things to print…
Now of course to get some good output, you need a good physics engine and track mesh data. To this end the videos and review I’ll refer to using my favourite sims – Assetto Corsa, and Assetto Corsa Competizione. I’ll save comparisons with other sims for another post as they can be quite different.
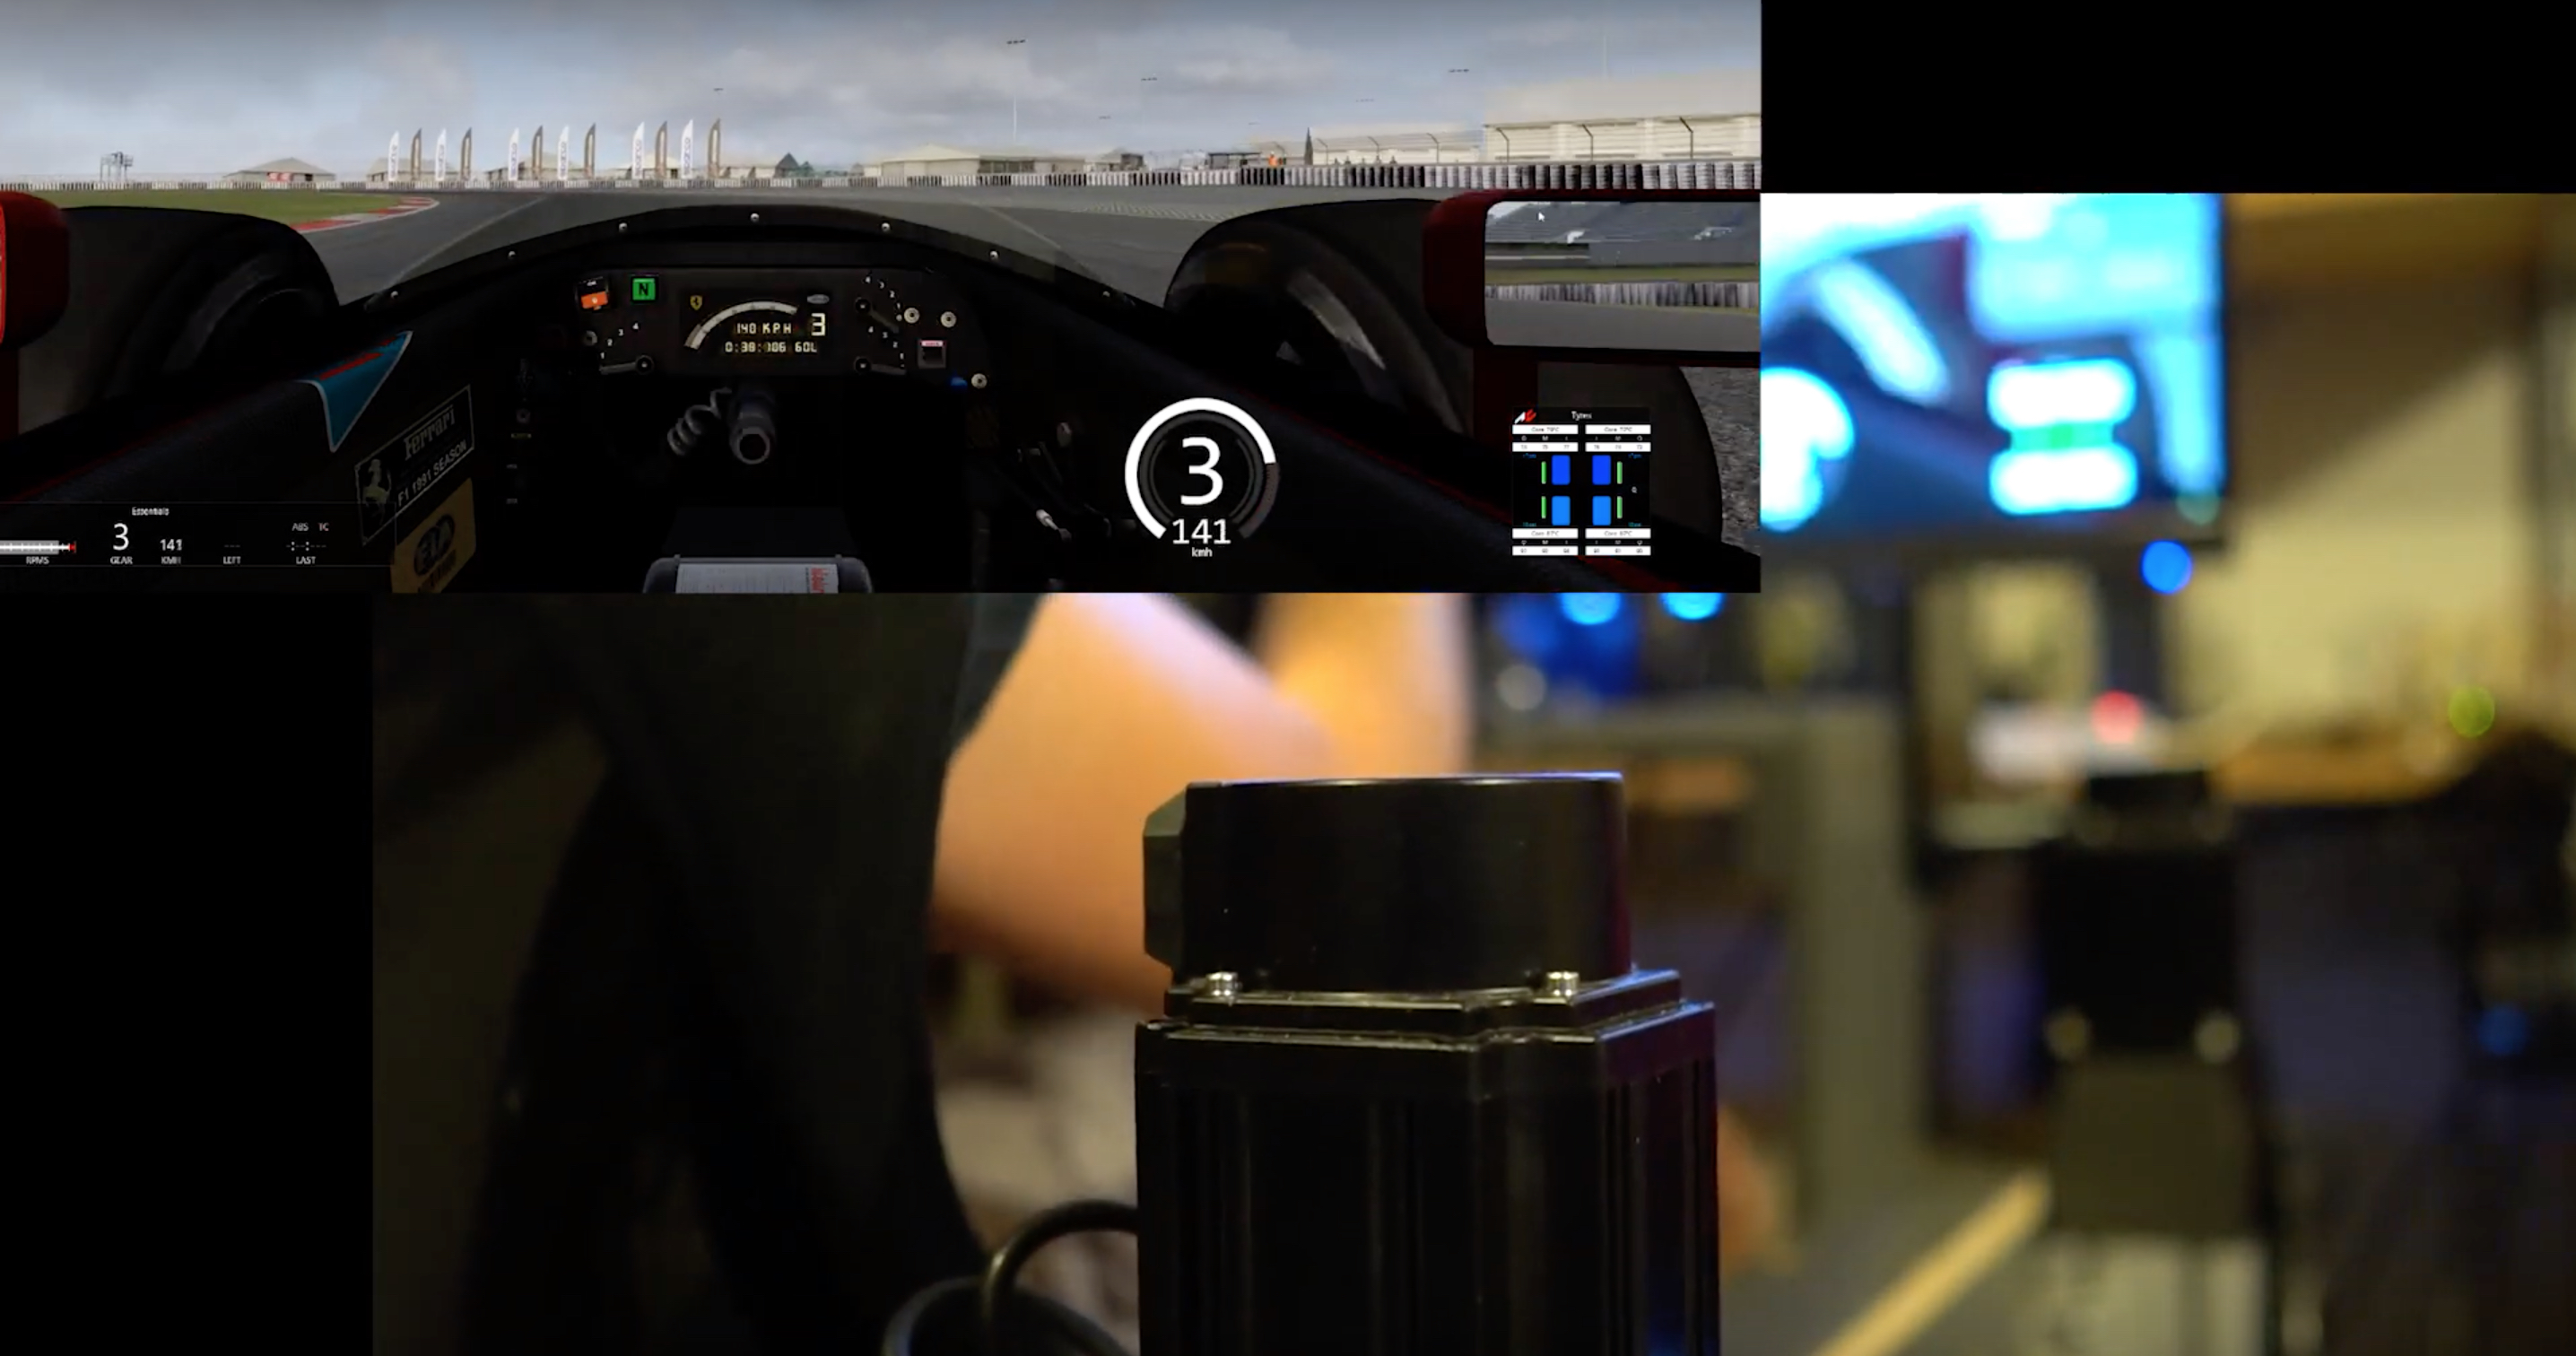
First of all tracks come alive. You thought you got feedback with that Direct Drive wheel didn’t you? This is taking it up a notch or 10.
2020: Updated video – The crowd favourite, Dirt Rally 2.0 with servo drive speed maxed out 😉
Firing down the front straight at Hungaroring in the Ferrari GT3 car, the reason why you want heave becomes very apparent – the rig starts cycling through up/down motion following the contours of the laser scanned road. Not the pitch of the road – no, but the actual race track surface – hollows, crests, that are in the laser scan mesh – the better the sim is at representing this and outputting to telemetry, the more you’ll feel.
Below: Exaggerated levels for demo purposes, definitely wouldn’t use this setting all the time :
Get out of the GT3 into an F1 car and those seemingly gentle oscillations turn into brutal vibrations. Don’t believe me? Let’s compare the two….
Hit a kerb and you expect to move around a bit. This you can tell the difference from a flat painted surface, through to a solid car launching sausage kerb.
Traction control hunkering the car down for it scrabbling for grip. You’ll feel that too.
Pitch as the track surface goes up a hill or down a hill. Yep
Hit the brakes and feel that ‘surge’ forward. Yep. Hit the accelerator you go backwards Yep. How quickly will you find out your braking to the apex is untidy? Oh about Turn 1 I reckon. If you’ve picked up bad habits the motion platform will tell you about them.
What happens when you go off track – well, it’s a basic math equation – if on track you’ve got the rig tuned to give you a good amount of sensation, go off track and you’re hitting sand traps, walls, etc. They’re easily 2-3 x what a kerb would be like. If your sim racing game of choice models that effectively – you’re *really* going to feel it in the platform. Whilst it’s not “whiplash” consequence it is uncomfortable being jolted around violently. So you kinda get that extra emphasis to be a better driver.
Essentially anything that the simulators output in telemetry SimFeedback picks up and translates into movement. The better the physics engine of the title, modelling of the track surface/conditions, the better your experience. The best way to put it is there’s not an output from the game to say “I’m changing up a gear” there’s a series of values for all of the car velocity/pitch/direction that represents what’s happening so many times a second. Eg velocity longitudinally along the car 0, 0, 0 [clutch in], -2, [engage gear], [clutch out], 3, 2, 1, 0 [back to steady speed]. For instance, lets go crash sideways into a barrier…
How is it for “power”? Well it has more than enough headroom. Would you believe me that I only run it at 50% intensity level with the motors set to max speed. No? Well if I turn it up to full intensity level (a) it’s really hard to see/concentrate going through kerbs in corners and (b) I’m just waiting for something on my rig to break. It’s honestly *too* much. Great to show off to people. Too much to lap with.
How about noise? Check out the videos.. it is definitely quieter than SCN-6 style actuators. In my case there’s actually more noise as a result of what the actuators are doing to the rig, the MDF is twisting/squeaking in various places that I’ve got to address. You don’t hear the motors, and you hear a slight noise from the ball screws/sliding. That’s it. There is a high pitch electrical ‘whine’ from the motors when they’re holding the rig at a static starting position. Most of the time I have open back headphones on and nothing noise wise breaks the immersion.
One thing that I didn’t really understand when seeing someone else’s motion sim platform was setting up different “profiles” for car and track combinations. Now I get it ! Some cars can be absolutely violent to the point of unpleasant driving. So you do need to play with settings to tune the platform to your liking.
What I did find a little odd with the default AC profiles that I changed. Again this is my personal preference. YMMV :
Needed to reduce the -ve surge axes. It was too much (particularly in ACC) and I was actually getting jolts on downshifts under hard braking which doesn’t happen in real life.2020 Update: This was a bug in ACC, resolved.- Reverse the sway effect as it was backwards (at least for non VR user)
- I turned off the traction loss effect
- Increased the pitch and roll axes slightly
That got a good baseline I then tweak up/down depending on mood and car/track combination.
2020 Update: Within Simfeedback Acceleration/Min/Max speeds make a mahooosive difference. I use these settings constantly to tweak profiles how I like them. Running aggressive acceleration and motor speeds you get crazy amounts of detail, even down to ABS/traction control vibrating through the rig. Hit a wet patch of track and feel the ABS coming on you’ll feel it… drop the min/max speeds down, the motors won’t react fast enough and you’ll get a smoother experience in the rig. I started getting known for “oh oh, an @steely” profile on the discord server… well.. yeah, I like it turned up.
After 2 weeks of running I suddenly thought to myself, if I was running the 3kw heat pump this much our power bill might be crazy. I found a cheap plugin power meter that allowed me to breath a sigh of relief.
- At idle 30 watts
- Holding the rig at ‘static’ ride height 50 watts
- Normal track running 60-110 watts
- Violent crash peaking around 260-300 watts tops
Your mileage may vary of course, it draws powers the harder the servos need to work – so a heavier rig, heavier human, higher intensity levels all will contribute to bigger power draw.
As an aside I measured my PC + OSW + Screen and that’s more like 700-800 watts.
You probably should for safety sake look at high quality power boards and I chose to put my Servo drives behind an isolating transformer on a separate power circuit/outlet than my main PC.
Servos: 3000rpm Intensity : 1 Max Speed: 170 Pitch modified to +/- 64
Note this is the maximum I’d to run it at; the F1 chassis seriously shakes the rig – don’t know how long the Ultrawide would last….. Servos: 3000rpm Intensity : 1 Max Speed: 200 Acceleration: 1 Smoothness: 0 Pitch modified to +/- 64
2020 Update: It took about 4-5 months before I took the ultrawide off (not before the vibrations damaged the display port) and went to an off rig, triple screen setup.
Look the inputs to the sim games aren’t changing. Just as if someone with a used 2nd hand G25 wheel for $100 lap faster than someone with a $2000 OSW direct drive wheel, same rules apply here. A motion platform doesn’t change your inputs.
What it will do is let you know you’re untidy. It will let you know where the track surface is rougher. It *might* give you more queues through motion you’re going to loose traction. So you should in theory learn faster through the platform than if you had no platform.
At a certain intensity level you will get slower as it will be harder to concentrate/see/keep precise control inputs as you’re being bounced around.
What it will do?
It's all about immersion
The more queues your body/mind gets, the more immersion you have the better the experience is. Just like an OSW wheel that suddenly gives you real feedback of the car loading up in corners. The same way the SFX gives you queues what the car and track are doing.
Rocketing through the green hell is something else on this rig. Here’s my first video after getting the rig running, in a seriously janky state, but you get the idea…
Umm 18 months later
Things got seriously out of hand
Pros:
- Unbelievable performance
- Great value
- Awesome learning process
- Quiet operation
- Low power consumption
- Many, many people before you
- Joining the Discord community of nutters
- *Now* you get why laser scanning is a thing
Cons
- No IEC connectors on servo drives means mains wiring
- Sourcing some parts a little bit time consuming
- Lots of cabling/boxes with the 4 separate servo drives & controller
- Once your mates get in your rig, it will be even harder to get them out.
- You won’t want to drive anything that’s not laser scanned anymore.
In closing
”A laser scanned track, with a good physics engine is seriously eye opening experience - one that you'll want to repeat over, and over, and over.
This system has brought a high performance platform mover design, into something that doesn't cost that much more than a single RTX 2080 TI*. Do you want 30% better graphics performance, or do you want to feel the road surface ? I know which one I'd pick..
It's brought high end professional equipment down to prosumer level pricing in the same way the OSW movement has. Judging by the activity in only a few months since the designs were released I think we all should shout Saxxon66 a few beers!.
18 months on
Well, I’ve tortured my rig on and off over the past 18 months. The actuators have stood up to repeated abuse (meaning max speeds, harsh tracks), people of various different sizes in the rig and had to have no maintenance whatsoever. The only problem I’ve had is bolts coming loose from vibrations – I had 1 actuator the bottom bolts had come loose and a couple of loose brackets connecting the actuators to the rig.
I took one actuator apart about a month ago just to see what it was like internally – there was a fine dust on the sider but not noticeable wear marks which just is outstanding (remembering this is just cheap/basic PLA they’re made out of). You could still make out some of the original layer lines which I really wouldn’t have even guessed you’d be able to.
So there’s no grounds for concern on longevity. And hey – if you do need to change/replace anything, you just order a new part, or print a new part and you’re done.
SimFeedback has been working great; it’s had a few updates and helped me get the G-Seat project done. Game support has come along way too with lots of options now.
To top it off the simfeedback discord has a bunch of like minded folks who’re all engineering up various different additions, and sharing them which is great to see.
* RTX 2080 Ti is approx $2300NZD right now. Lets say 1.4 cards and you’ve got all your components purchased


Thanks for the review, and all the info ….still saving for this maybe 3 to 4 months to go Regards Denis
You’re welcome ! Good luck !
Great review Rowan, i have been running the SFX100 for over 3 months and i still feel like a kid in candy store everytime i drive in my rig.
Thanks for writing this. The way you documented the build and the review are just what I need to see. I bought a 3d printer just before Xmas and are about to start printing this project and purchase the extrusion.
Great to see NZD and a kiwi building this project. : )
@Chris You’re welcome ! Sounds like you’re the 4th Kiwi we know of building one 🙂 Hint for extrusion, don’t use Youshop to ship it.. I thought I would try to avoid expensive shipping fees going Germany -> Youshop -> NZ. It landed at $406NZD, customs apparently don’t have a tolerance for being $6 over the $400 mark….
Well written and extensive review! You put into words what takes 60 pages on Racedepartment 🙂 I agreee with each and every point. I was dreaming of a D-Box system for years, it really hurt thinking about the costs and probably even if I would ever have bought it, I would feel pretty guilty towards my family, it just doesn’t make sense to pay the amount of a new car for some hobby of mine. But now… once I heard of this system, my hopes surged, could this be real? I immediately jumped aboard, even though there where only 3 or 4 people that had made it yet, they had proof of concept. Some beta testers testified that it was better than anything they had felt up till then. I think this is mostly up to the software. SimFeedback has been confirmed to be quite brilliant actually, in that it is simple to use and customize, yet at the same time it is able to do anything you want. There is almost nothing you can’t do. The only limitation being the telemetry data it gets from the sim. With this data you can mould any effect you like, it is very powerful. Because the actuators are so fast and so strong, there is hardly a physical limitation, rather, you as a user will probably be pushing the emergency stop before the actuators even get warmed up. Well, your review says it all and your videos show the speed. For anyone reading this, I’d say it’s the steal of the century.
Probably it will be causing quite a ripple in the sim racing community, it already has, making it possible for many more people to enjoy full blown motion and for that we can thank Saxxon66, who has spent months of development and with his team of beta testers and co-developers has made a ready-cut ‘ikea style’ guide and easy to use software that if followed carefully is pretty fool proof. So be generous with your donation (to get the great ‘expert mode’ and support channel at Discord). Your simulation experience will step up to a whole new level, it’s like going from a gamepad to a steering wheel, addiction guaranteed 😉
Nice Rowan, thank you for sharing your thoughts. Looking forward to seeing your SimFeedback walk-through should you find time to put one together!
Thanks for this do you a link to the discord please?
Hi.. download SimFeedback run it and on one of the tabs you’ll find a link to the donation paypal. Make a donation and link will get sent to you…
Is it a calculated choice to use PLA for 3D-printing, or does ABS work as well? Thinking on investing in this now. 🙂 Currently ordered a P1 Rig from Simlabs. 🙂
Welcome to the party. No choice other than (a) what everyone else is doing for the most part (b) and so far in my month 1 torture test has held up well (c) convenience factor of printing (easy, not terribly smelly, starting out printing….) I’m sure you could use a variety of different plastics and achieve same results. I’ve really hammered the rig with some 90’s F1 cars and Laser scanned tracks, and it’s all holding up. Rubber isolating feet, not so much !
What a motivational review! Wondering what one actuator cost to make. Have you tried a 3 DOF machine? I’m trying to decide between a 2 or 3 DOF. The 3 DOF would be cheaper but much more complicated to make. How well does your rig simulate oversteer?
I’ve been looking into sim rigs, I have seen good reviews on the prosimu t1000 3dof model, it’s about $3000. This looks cool too, seems like a lot more work, but if I follow correctly it’s probably about $2000 (and a lot of time). I’m curious how much added immersion the yaw/3dof piece adds. This one has 4 actuators which is cool, probably adds more to the “ride” than the t1000 2dof model with only 2 actuators. Also I plan to use with VR so monitor stands etc doesn’t matter.
Anyways, thanks for the info! I’ll keep looking into things.
Thank you so much for sharing. I’ve only just discovered this today. I will digest with much interest! I too am a kiwi (Auckland based), CxO of software business. P1 sim rig just assembled, with small MiGE DD wheel. Looking for the next step, and this looks like a very fun and worthwhile project! Now how to find the time…!
You’re welcome Warren!
Hi Rowan, thanks for this site, extremely helpful for us first-timers!
I’m just starting to build my first actuator, and I notice that the o-ring just sits on the bearing, and can (could) easily pop off. Is that right, or should it be fixed in there somehow?
You’re welcome Roger! You should be fine with the o ring like that. Mines gone for a year solid 🙂
Awesome, thanks. Just wonder how effective it is like that, at whatever it’s meant to be doing!
Hi Rowan, love the site, very helpful thanks and intrigued by your g-seat! I’m based in UK and as we are on Covid-19 lockdown have started to build a set of SFX-100 actuators for my homebuilt sim chassis. I’ve got a Caterham 270R by the way but the sim will be the only thing I can practice on as all track days and racing are cancelled for months. One question: couldn’t find any link to donate to the project do you know if this is still available?
Hey James I bet there are a bunch of frustrated track racers in their garages at the moment on their sim rigs. Nice on the 270R 🙂 The donate link is for Simfeedback only, to get expert mode/discord access. Download SimFeedback and when you run it you’ll find the donate link in the actual application. Cheers !
Thanks Rowan, downloaded and donated. Oh yes I’m really glad I built the sim now, last weekend we were supposed to have first race of season at Silverstone, seems like a very long time ago now. I think you’re using Assetto Corsa do you also use VBOX with your car? That sounds like a a real beast I’ve got a mere 135hp! Cheers
Hi Rowan, I got my SFX-100 actuators fully working on my sim rig at the weekend. First time driving it with VR headset was hilarious, what a great addition
Nicely done good sir ! Welcome to the club
This blog is the reason I am building my sfx100 right now!!!!!
Hi Rowen, Yup I am another moth to your immersion flame. It has been a while collecting the parts for the SFX. Not in any rush, spreading the costs over time. Also I don’t have a place to put the rig until the Kids are out the house!!
I currently have a modified desk/office chair rig, a chair loaded with 4 transducers permanently strapped on one side to the desk with webbing straps(including the wiring for the transducers) on the other side the webbing has a quick connect buckle (this is so I can use the desk as its original purpose. In the desk foot well is the angled pedal platform with 2 more transducers. All this is acceptable in the corner of the living room however a motion rig will be pushing the limits.
No! No! I am not kicking the kids out the house they are / will be leaving on their own free will. One is now in Uni the other is contemplating a move to the Netherlands.
I have already built the “brains” using the shield, what a step forward compared to all the wiring, sooo! much cleaner.
At the moment I am putting the actuators together. I have all the parts other than the servos themselves , I am about half way in printing the parts. Once these actuators are complete the next sub project is to build a seat, it will be made out of plywood, stitched, filleted and fiberglass seam construction similar to a system used for boat construction, light, rigid and strong. Then the upholstery this will be testing my old leather stitching skill from my days working on yachts.
The final thing (that is relative …sway! belt tensioners!! Who knows) will be the profile rig as that will go together relatively quickly.
I fired up SimFeedback and tried it with just my existing transducers. I wanted to get the plugin for the Stream Deck going but found it needs SF to have a licence unfortunately finding that this has been put on hold for the moment, any idea when the licence issue will be up and running again?
Anyway your work is an absolute inspiration, mind you your G-Seat is on another level of DIY. I can’t see myself squeezing in a lathe in my 5m² shed that is full already with your regular DIY tools and the printer.
Hi Rowan, thank you for taking the time to put this together! I built the actuators and got it working on my rig as well, but looks like you have to be invited to the discord now? Any chance you’re willing to sponsor a fellow Canadian? No worries either way and really appreciate what you’ve done here. Cheers.