About 10 months prior to this trip we’d gone to a Bike Film Night in Rotorua where a movie Muscle and Dreams was shown. All about the making of Old Ghost Road. My mate and I muttered “pwhooarrr” under our breaths the whole time – got to the end of the night; looked and did the “yeah, so maybe should do it?” “yep!” “yep!” “done!”.
The Plan
First #tip on Old Ghost road – book it early. We decided to do two parties, 3 MTBing x 1 night, and 2 Hiking x 4 nights. We booked one of the sleepouts at Ghost Lake Hut about 8months or so prior (trip was December) and a couple of months later everything else was fully booked ! One of the mtb’ers left it a bit late and instead of getting the two sleepouts at Ghost Lake, we had to cram all in one sleepout + a tent site.
Second #trip logisitics to get to OGR isn’t quite as straight forward as you’d think. We setup Nelson as our homebase as we wanted to go off and do other riding/helibiking while the hikers were finishing. After a lot of ringing around we found the best option was to rent a Hilux which could fit 3 of the bikes in the back; drive to the trail head at Lyell – then a company (Buller Adventures) would relocate the truck for you to the other end of the trail at the Rough and Tumble Bush lodge. All up it’s a little bit of driving approx 2hrs from Nelson to Lyell, and then 4 on the way back.
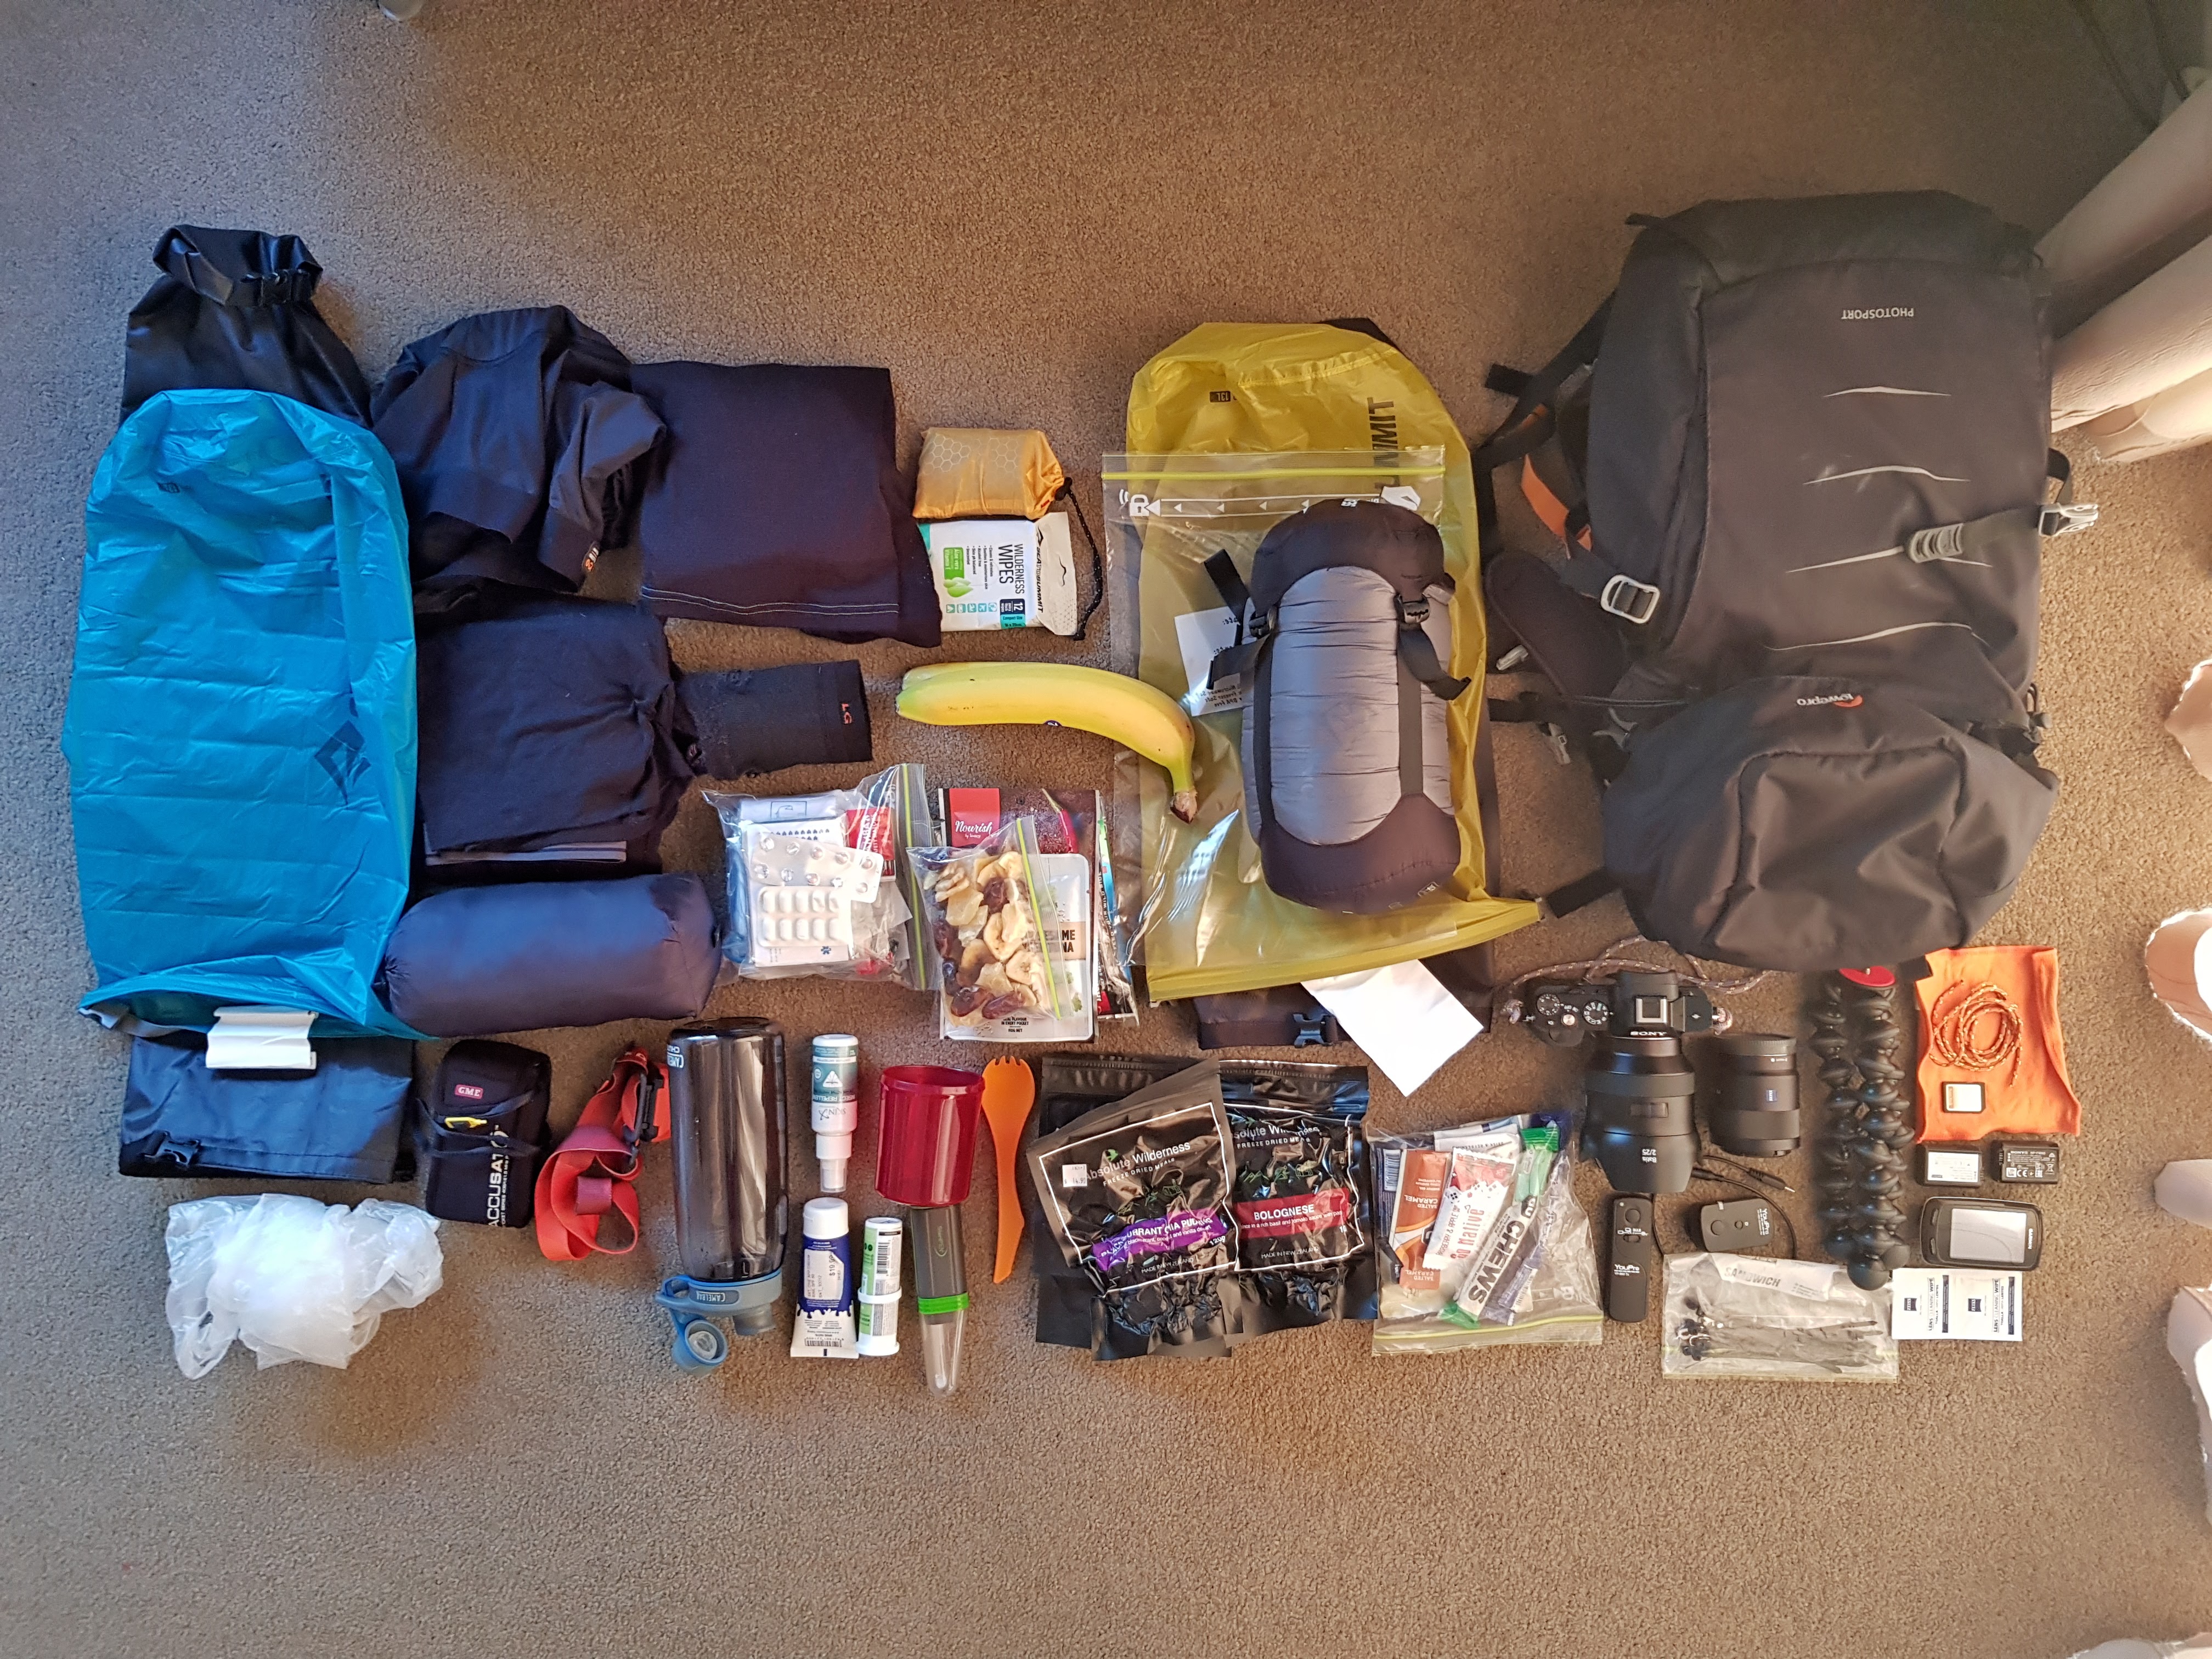
2 weeks before the trip, the word “grams” started floating about with increasing loudness – the first real overnight trip for us we were starting to count the grams. As you start tallying everything up weight starts getting interesting! Given this was the first bikepacking trip and I was carrying some of my proper camera gear (approx 1.5kg), I was on a weight saving mission. You can see the kit below. Basically get some digital scales and count the grams – are you going to use it? If not biff it. Even things like the first aid kit, the pouch it came in was something around 50g, changed that to a ziplock bag. Used pretty much everything except the Personal Locator Beacon #tip – you can pick one up from www.rollos.co.nz in Nelson for a reasonable price, and they have the good outdoor meals there as well.
The Ride – Day 1, Lyell to Ghost Lake Hut
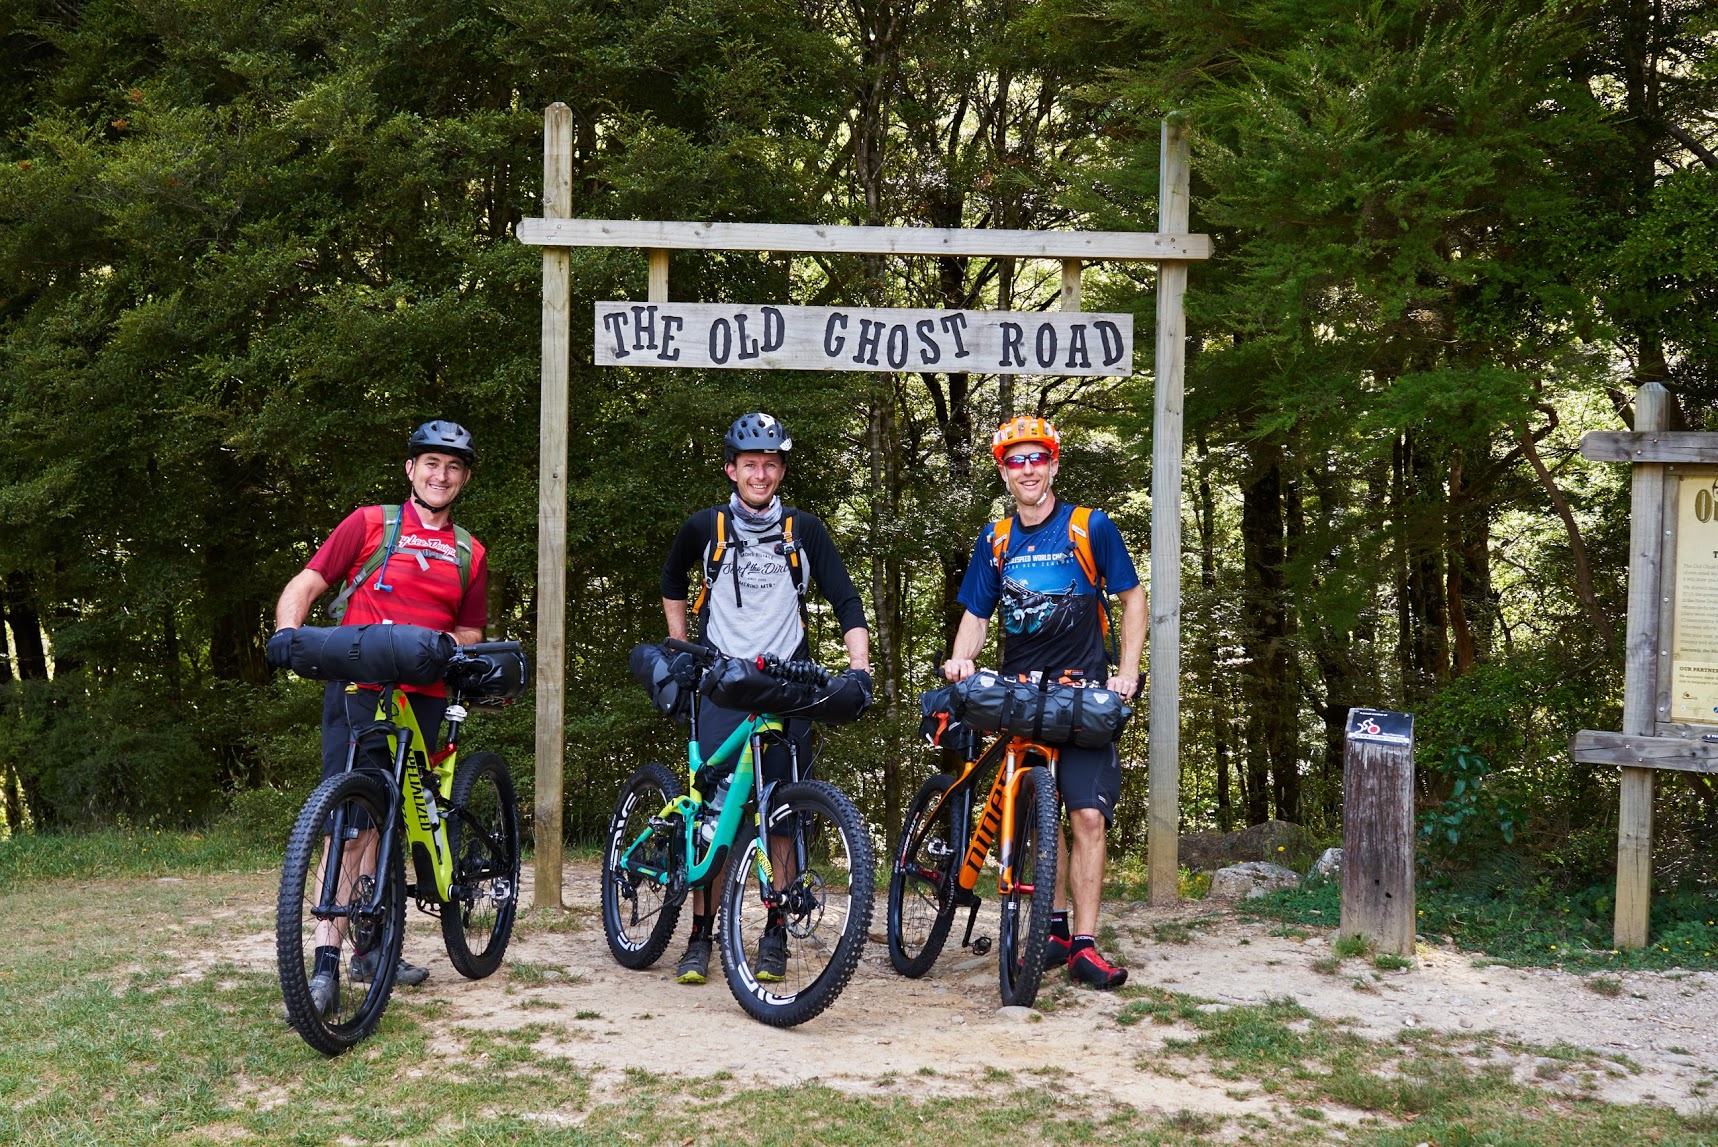
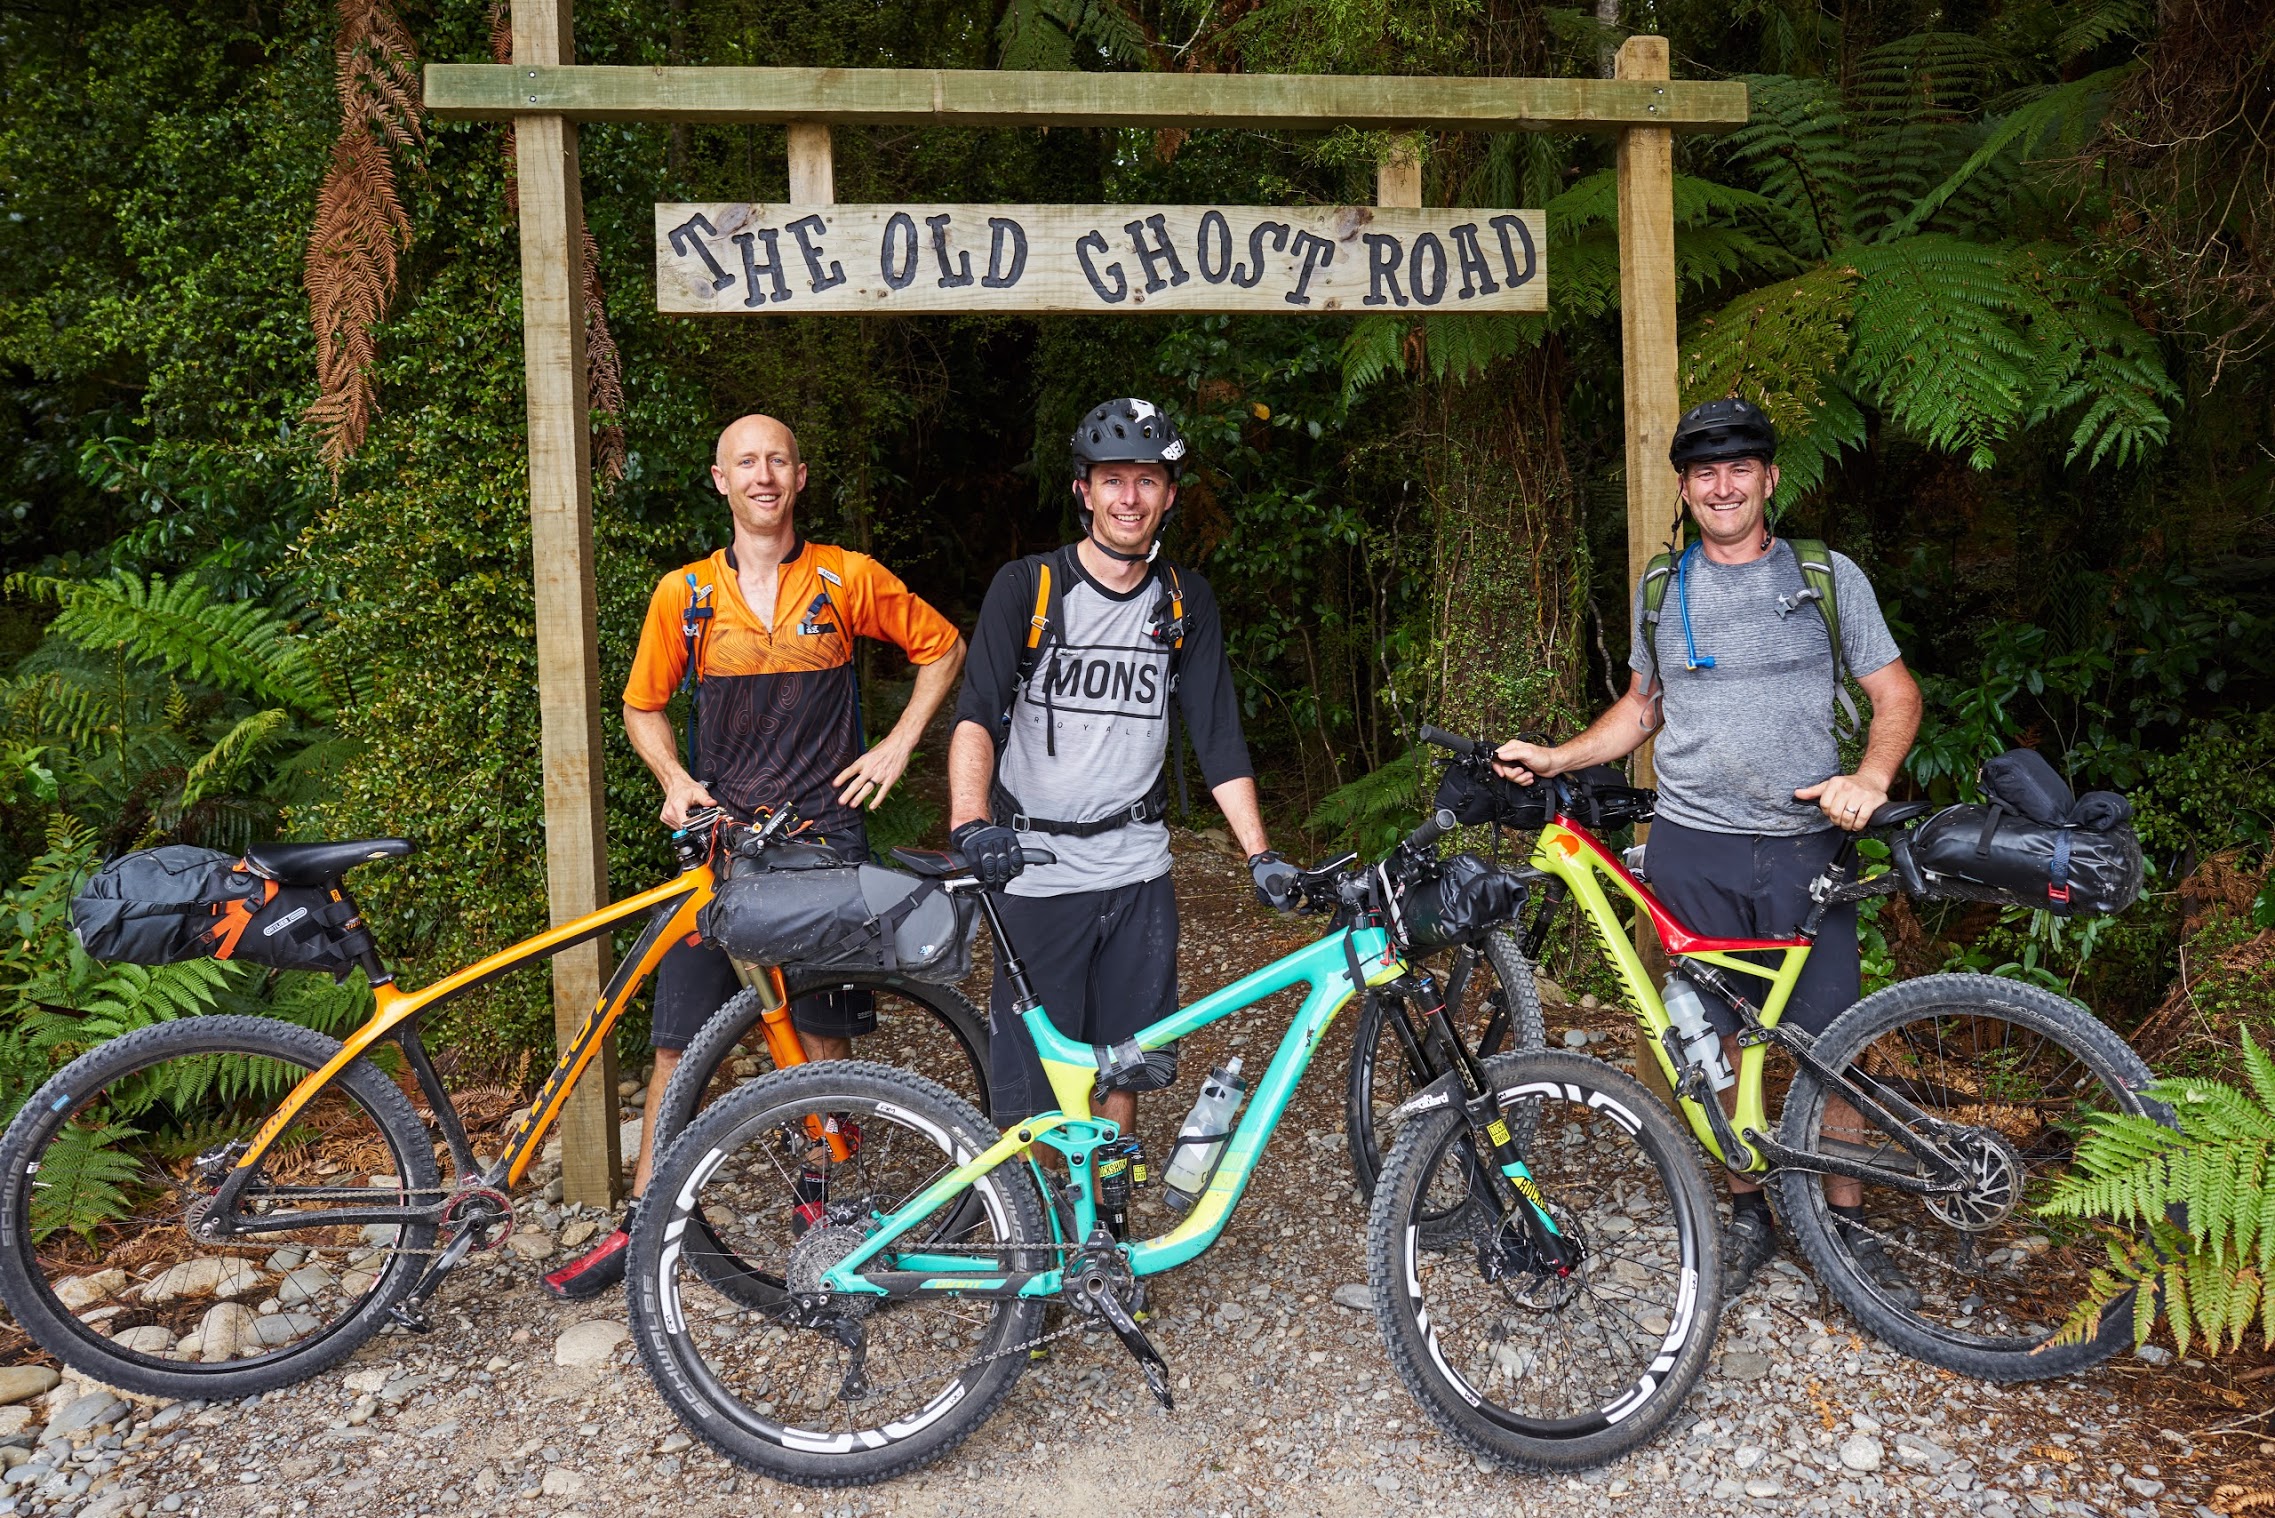
Finally the day arrived and we made the early morning run from Nelson to Lyell, with an obligatory coffee stop at the bakery in Murchison. At Lyell creek campground you get the reminder about West Coast Sandflies – an impatient gear up “cmon boys lets go” pervades the air, unspoken but definitely on my mind. We get the obligatory start point photo – more than a couple of souls around who also were doing OGR that weekend so one kindly volunteered shutter button duties (say no to the selfie).
So the best way to describe it – You climb and climb and climb – it’s all fairly gentle stuff for the first half of the day upto the first hut Lyell Saddle hut. We began leapfrogging with a hardy crew from all over the North Island, some old guys in their 60s through to a moustache wielding dude from Wellington that had a fair amount of hipster influence. Swapping stories at rest points with strangers reminded me why I like the outdoorsy bunch.
As the day wore on the legs started to get rougher and rougher. With a surface that’s for the most party very rocky the constant jarring starts taking it’s toll if you’re not used to it (I wasn’t); us Auckland boys are used to the super smooth race track of Woodhill or grippy clay surface of riverhead. This chipped loose rock was definitely a new challenge.
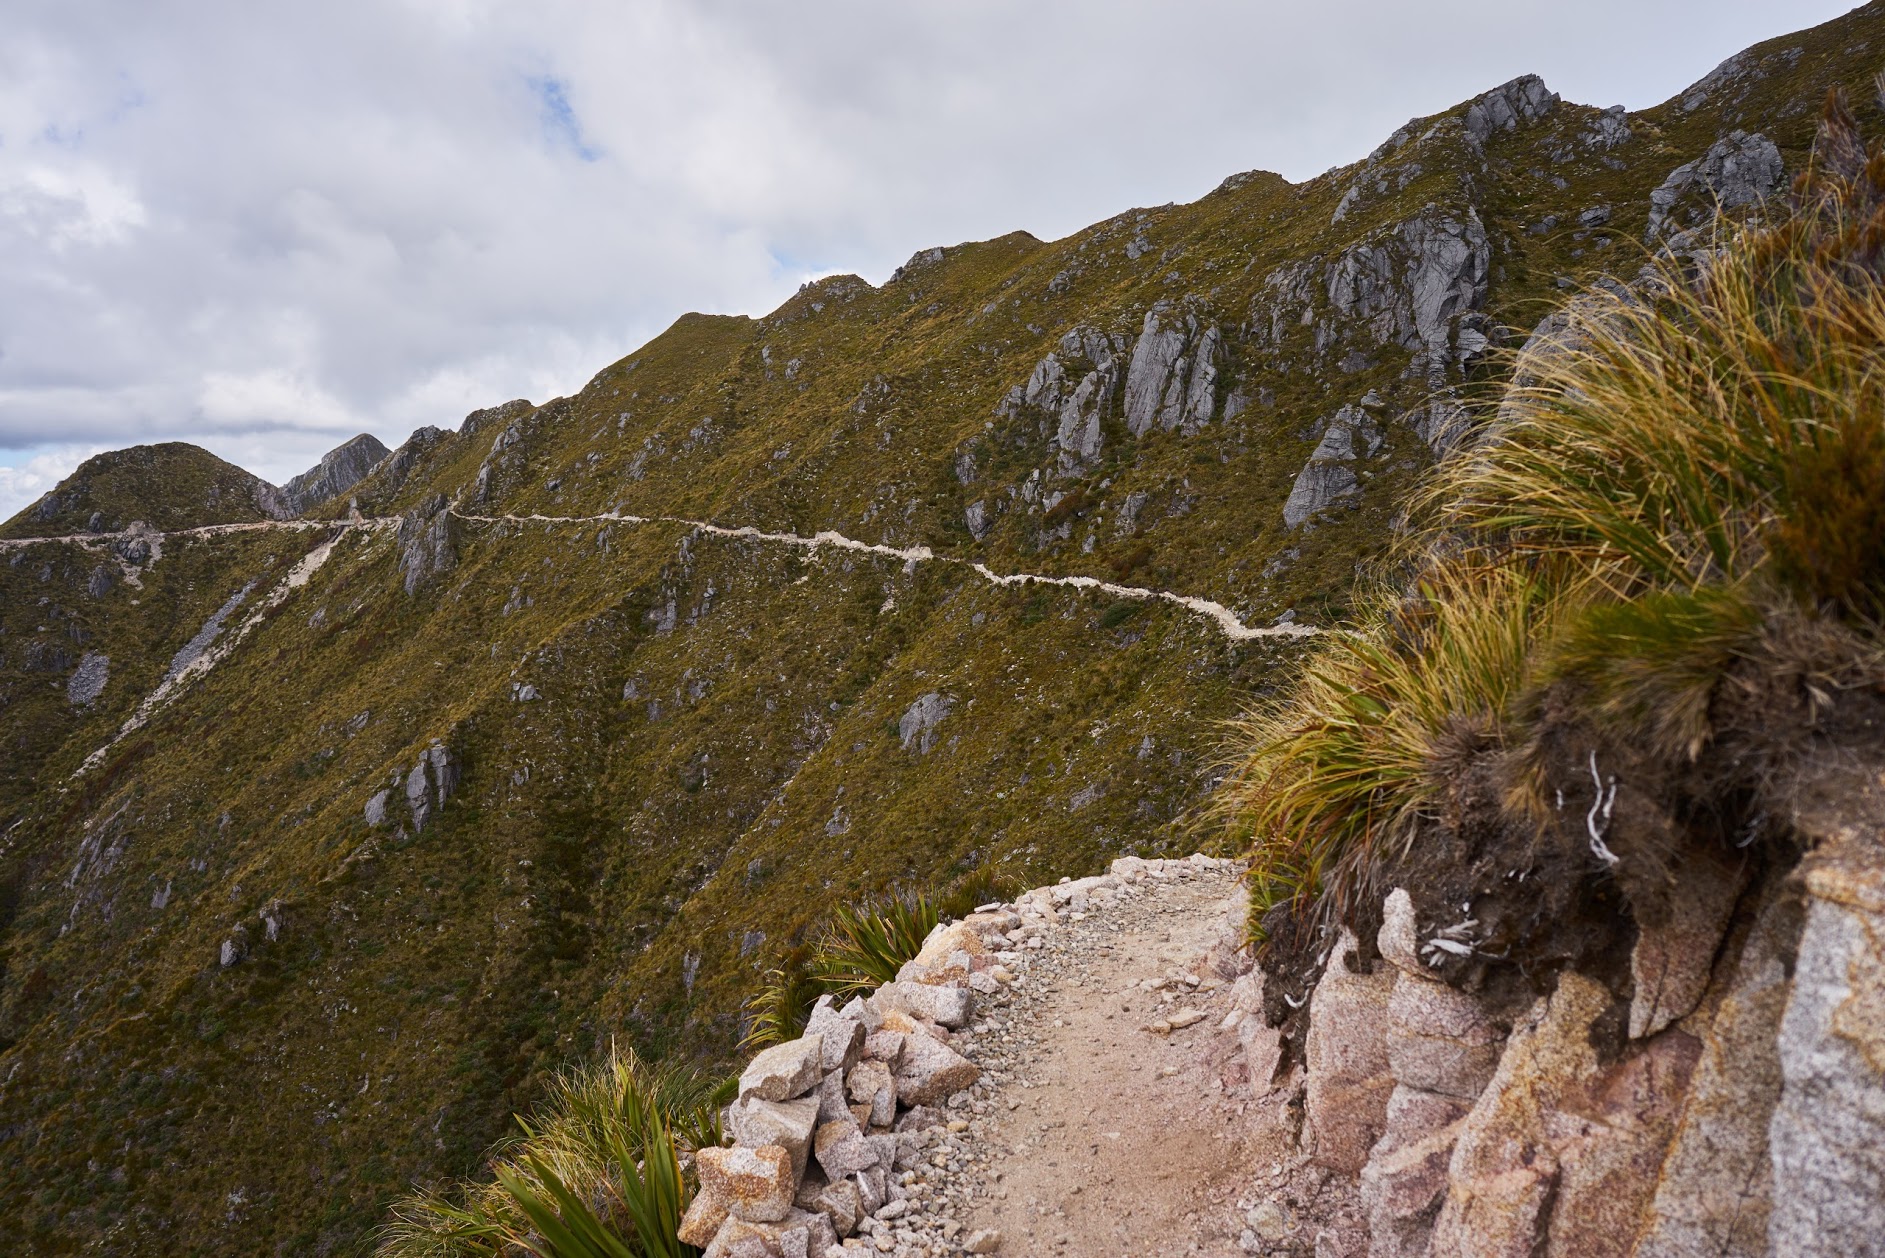
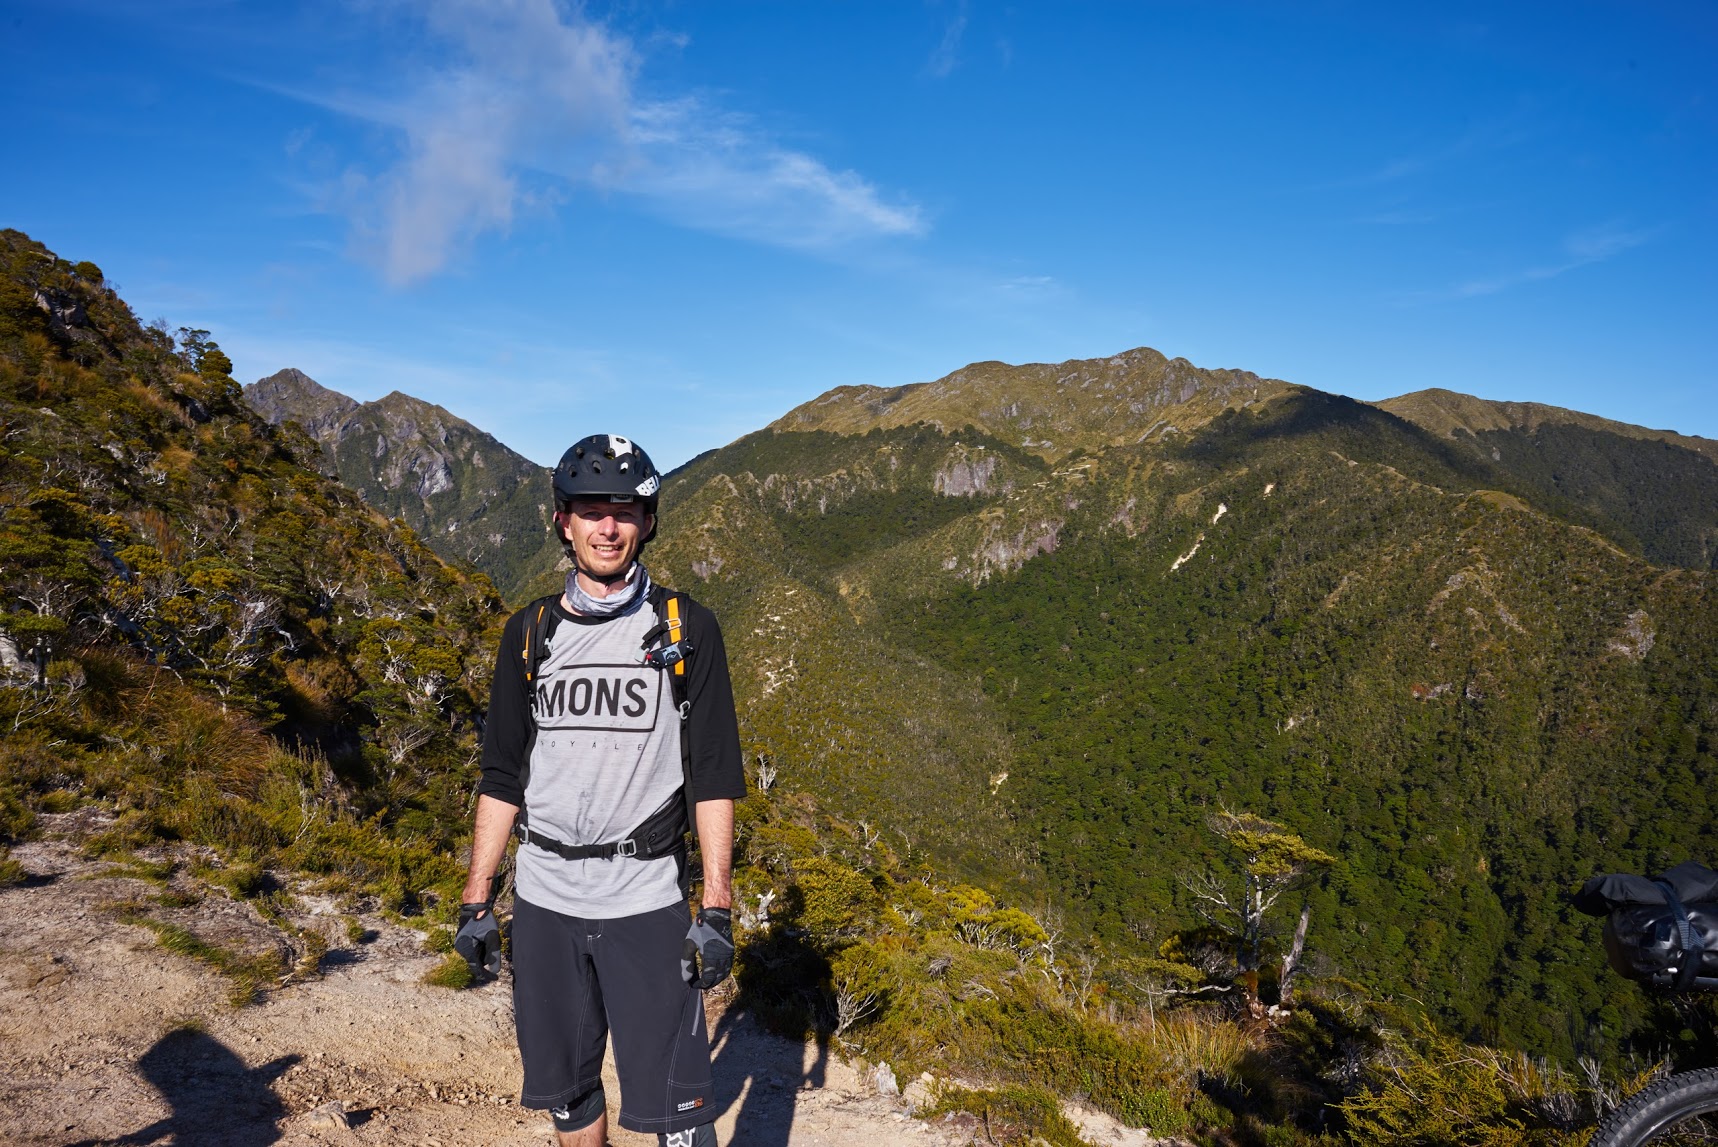
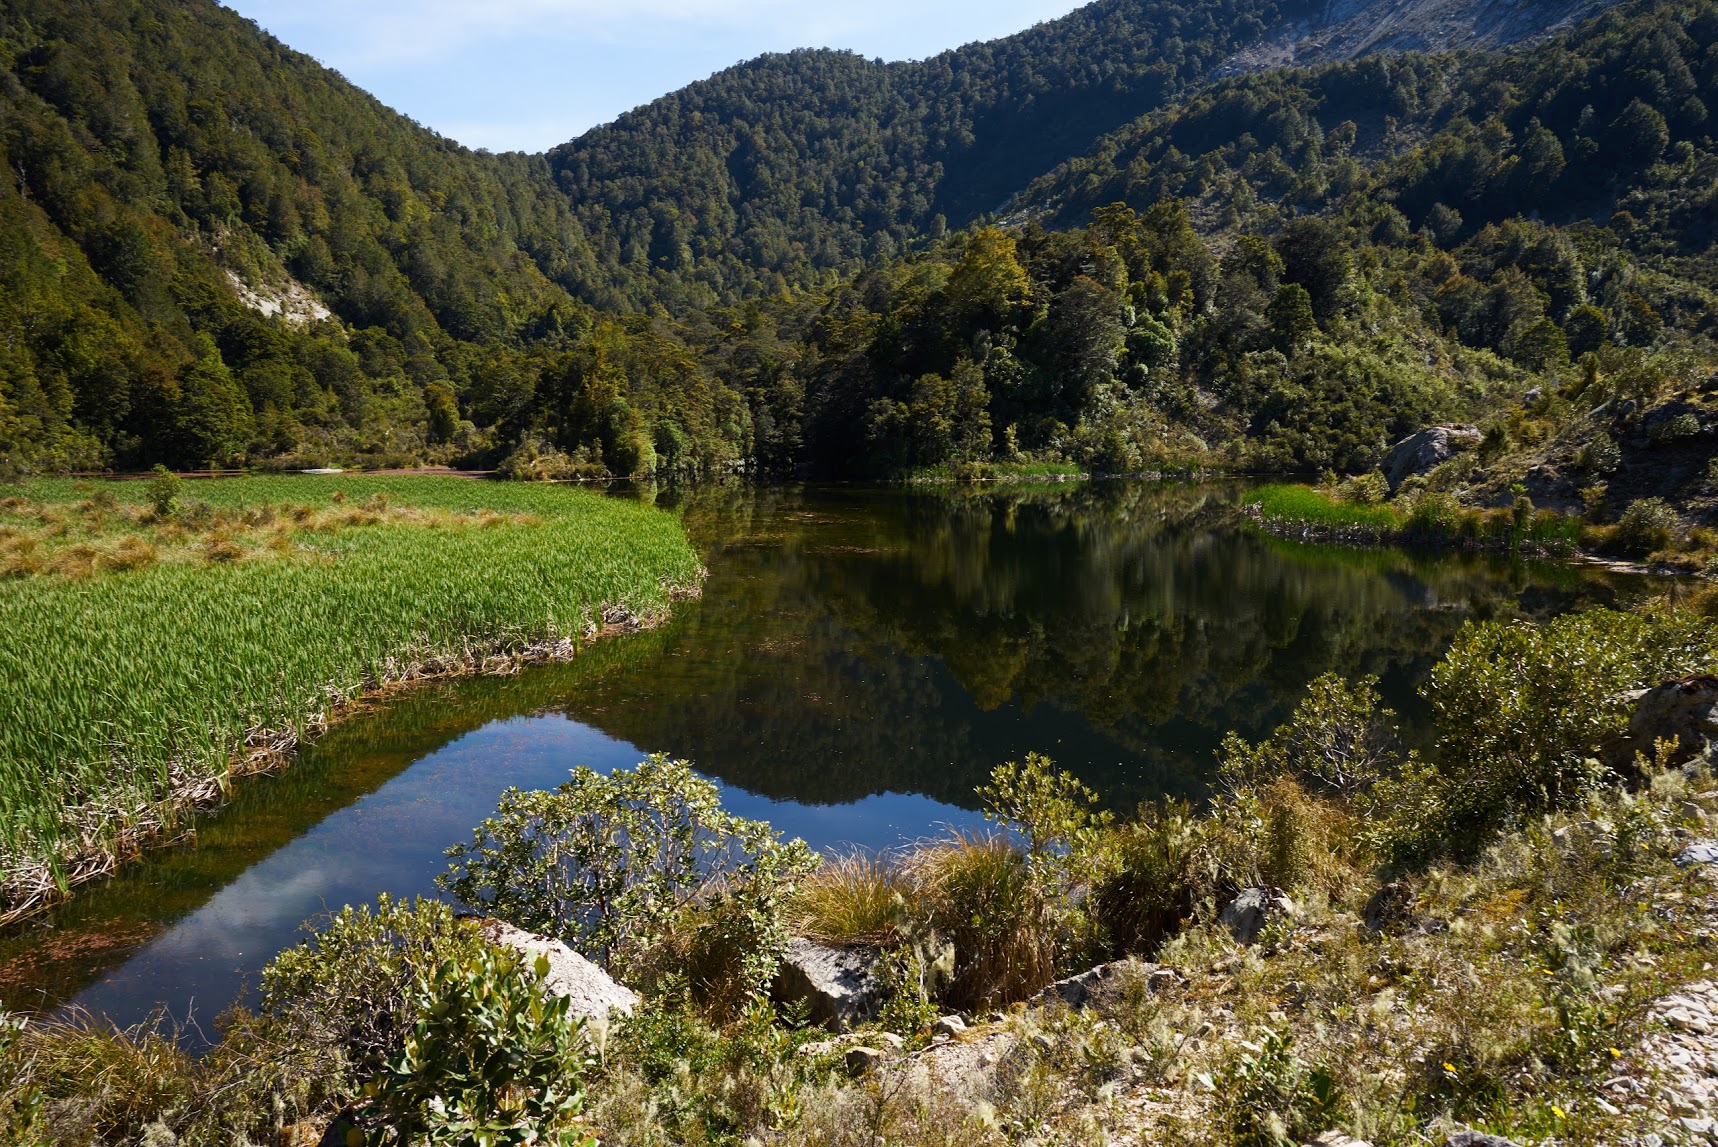
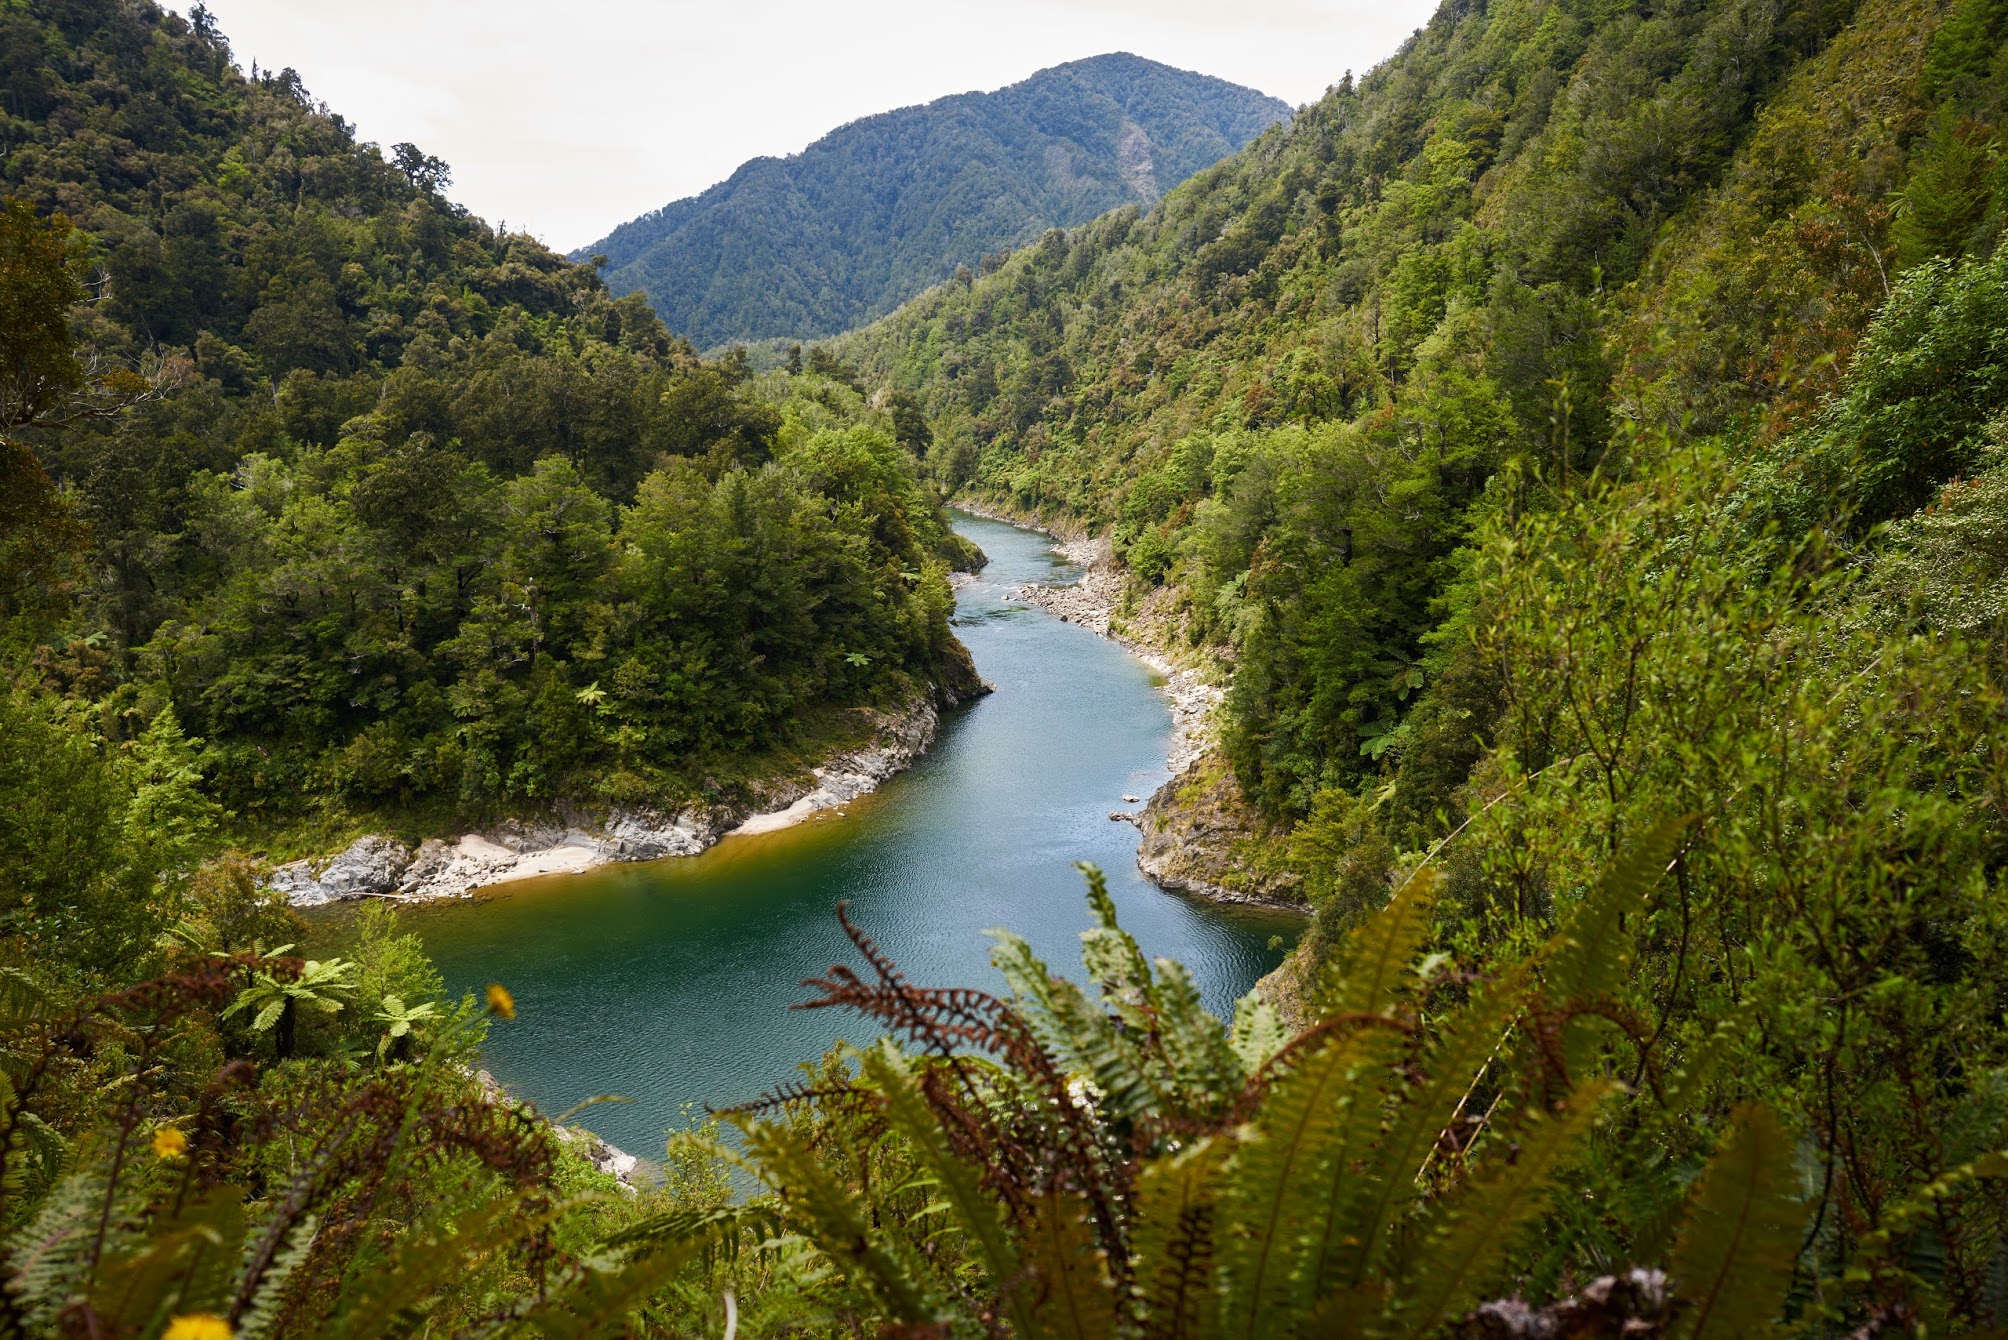
For me the climb to ghost lake had a demarkation point once you popped out on the ridgeline; you’ll know it when you get there – everyone had the same reaction. Being for the most part covered by bush for a few hours, with the odd glimpse of the mountains, to suddenly being onto of a ridge and looking out over said mountains was spectacular. The North Island crew were just behind us and when the came round ‘the’ corner, you could hear all the “look at that!” “amazing” “heck yeah”. Everyone dropped (placed gently) their bikes and took in the surrounding scenery.
I was in between one mate on the SingleSpeed who literally had only one speed and my other mate who’d only gotten one climb in the previous month. Suffice to say tail end charlie had gone to a very dark place by the time the ridgeline appeared. Sir SingleSpeed was gone not to be seen till we got to Ghost Lake.
The ridgeline through to Ghost Lake would have to be some of the most visually stunning riding I’ve done, with a fairly high amount of consequence. I did have a close call trying to get to cocky on a rock ramp, and thankfully fell right instead of left. Had it been left, this story would have been continuing in a Westpac chopper!
Day 1 in summary netting around 1600-1700m worth of climbing (Strava/GPS is not exactly accurate to say how much). With all up nearly 4hrs of moving time.

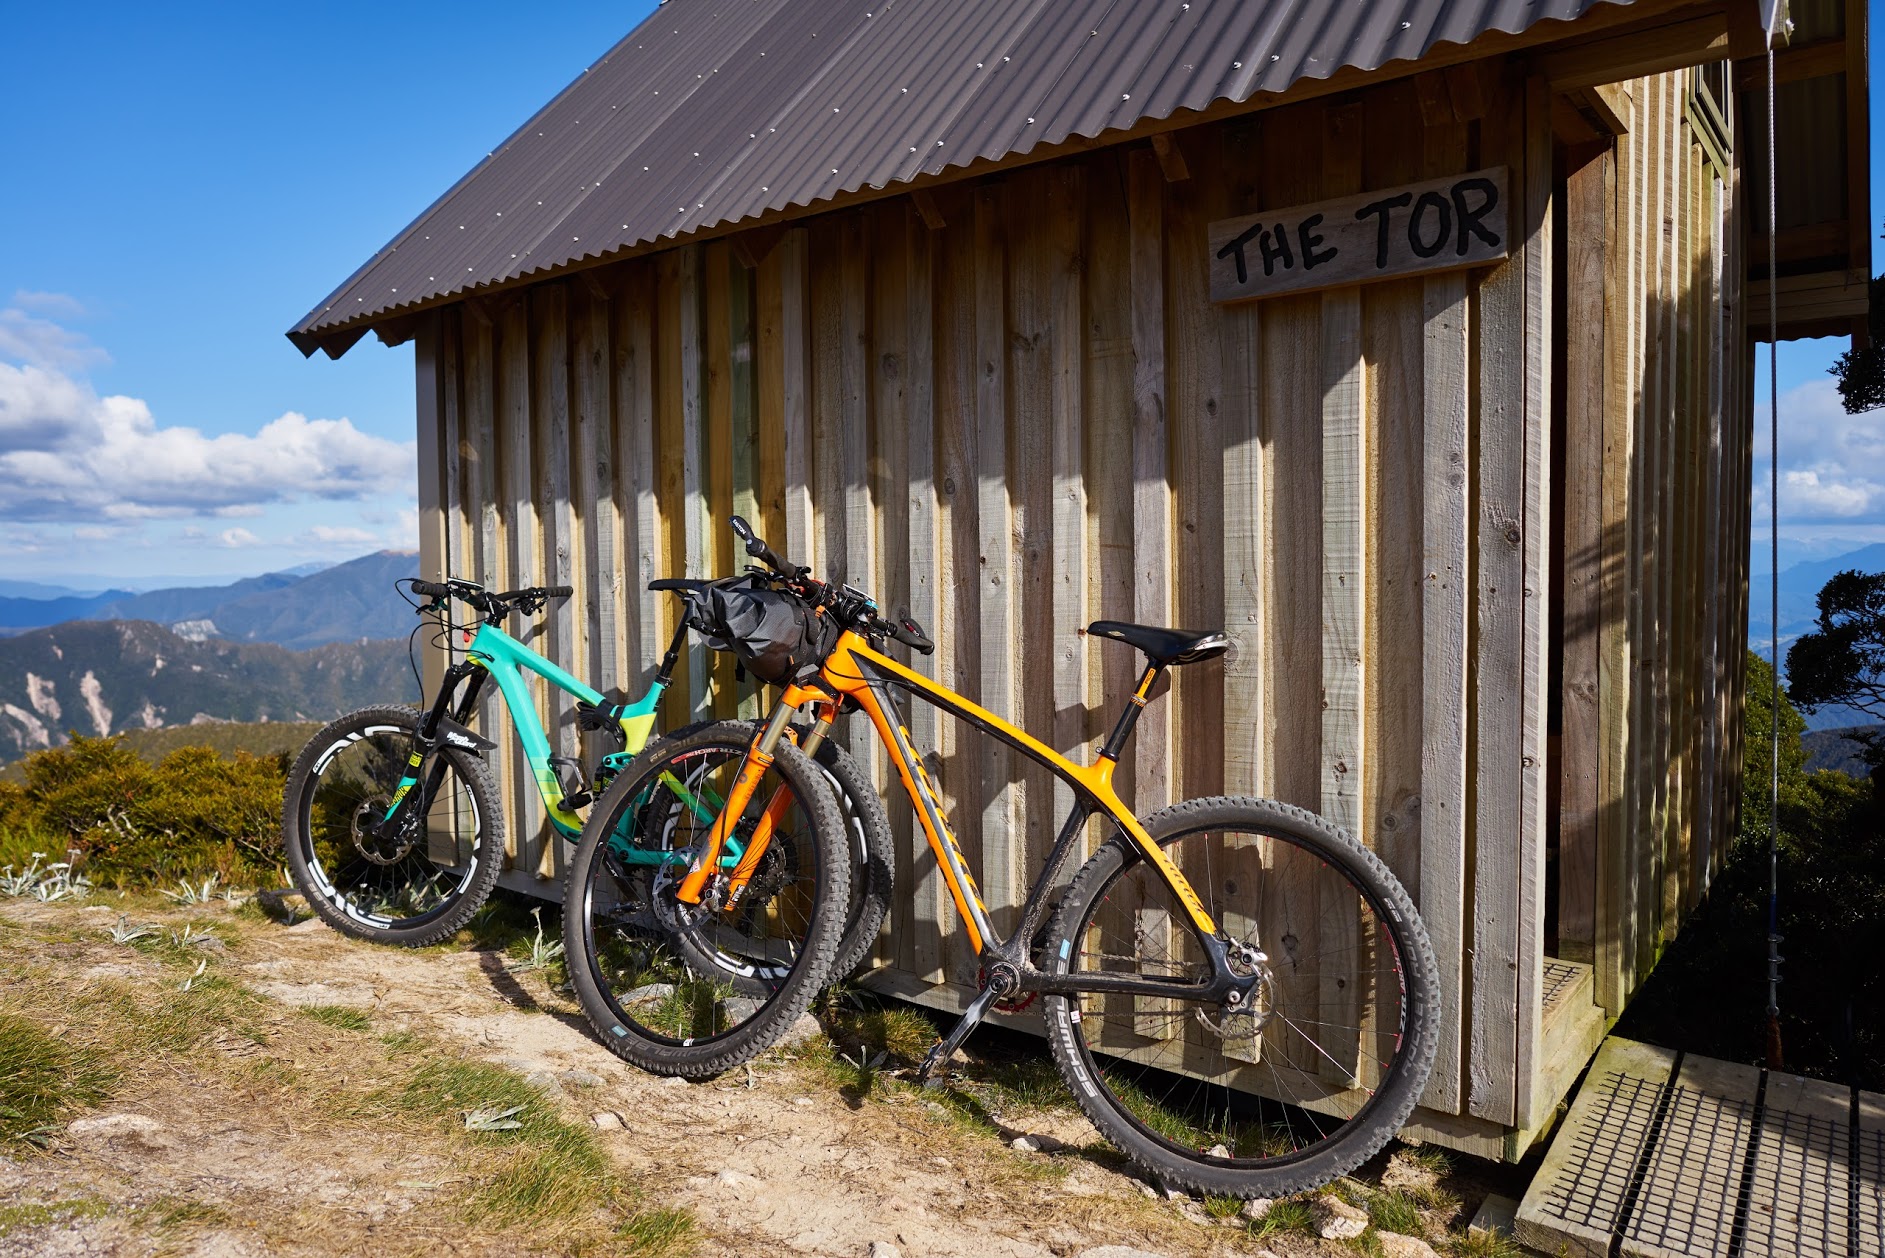
Popping up and over the ridge gives way to the run down to Ghost Lake hut; in no time I heard voices and then my better half yelling out. Day 1 done. The afternoon settles in to some well earned snacks, checking out our accommodation at the illustrious Tor Sleepout, checking the bikes over and some good old fashion trash talking around a hot cup of tea / electrolyte recovery drink.
#tip I’d read somewhere a blog saying the sleepouts weren’t they great. They can’t have been referring to the Tor sleepout that’s for sure – it was pretty well insulated, and even had a double glazed window. It was definitely warm and comfy for the night. It would be cooler than the main hut (no fireplace..) so on a cold night would be a little different. I was keeping my sleeping bag open however in our early December evening. For me, absolutely would do sleepouts again, bit more privacy, less snoring and go to bed/wake up when you want.
Originally I’d brought my Gorillapod to get some night time shots, but with the clouds rolling in I decided some rest would be the better idea. I set the alarm to get up before the sun, and go for the sunrise shots.
The Ride Day 2 – Ghost Lake to Seddonville
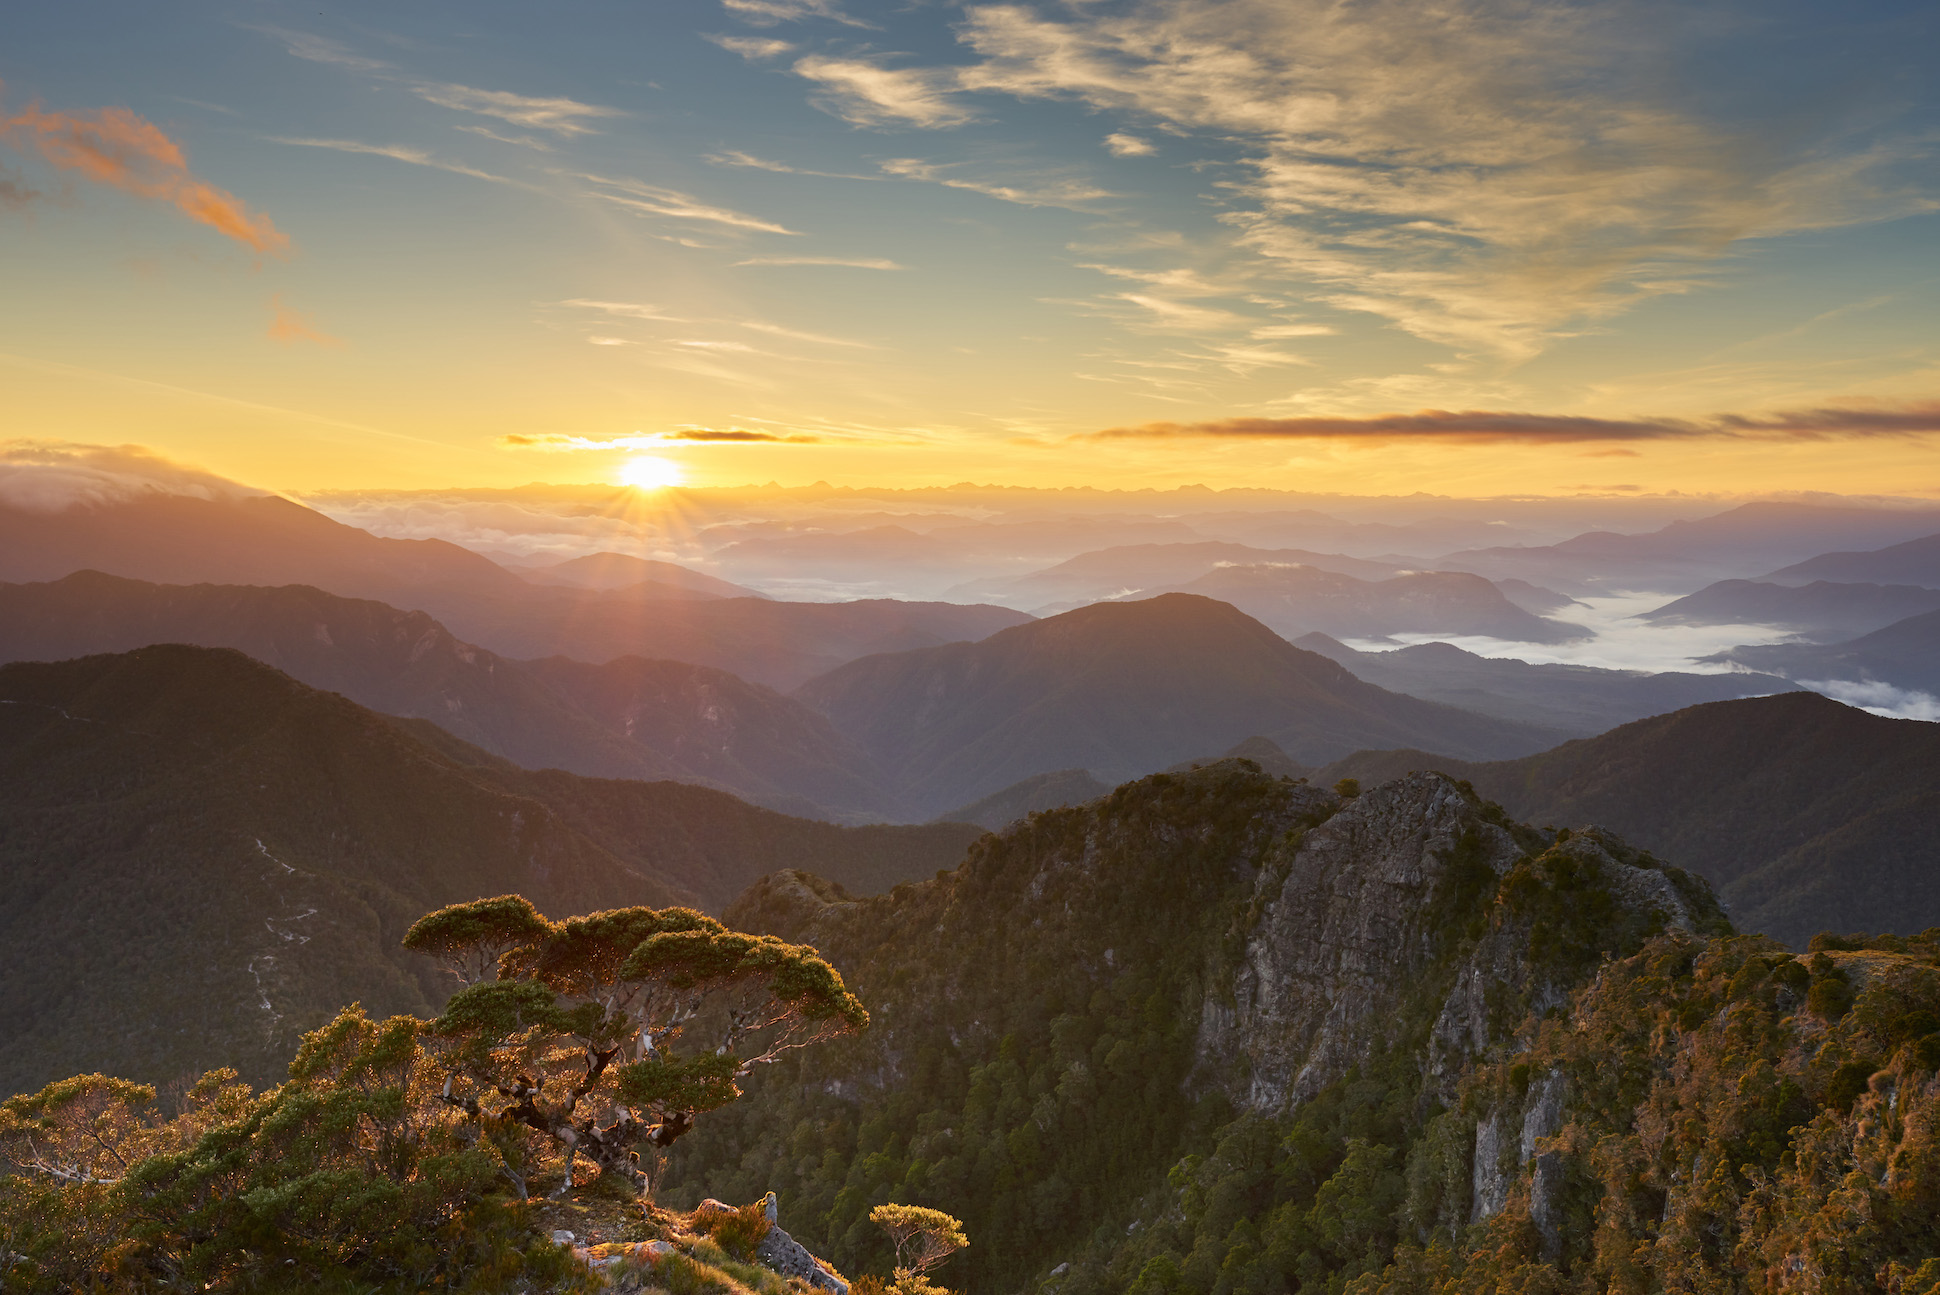
Waking up at a sparrows fart (or maybe a Kea’s cry?) well ahead of everyone else, I quietly changed lenses on the camera, put my puffy jacket on and headed outside to have a quiet moment watching the sun come up. To say it was anything less than spectacular would be doing it a disservice. For the first half an hour or so not a soul around, the punters over at the main hut kept to themselves and I had my little rocky tor all to myself. Or so I thought – a noisey Kea decided to check things out and had a few strafing runs which I caught on camera, and (you guessed it) someone dragged a drone up…. I love technology but FFS. After I got over the drone hate I went about setting up the gorillapod and taking many varied sunrise shots- there was so much to see, mist in the valley floor, clouds draping mountains, the giants in shadows and in the light. I ended up with one shot I was particularly proud of (shot at a 25mm focal length)
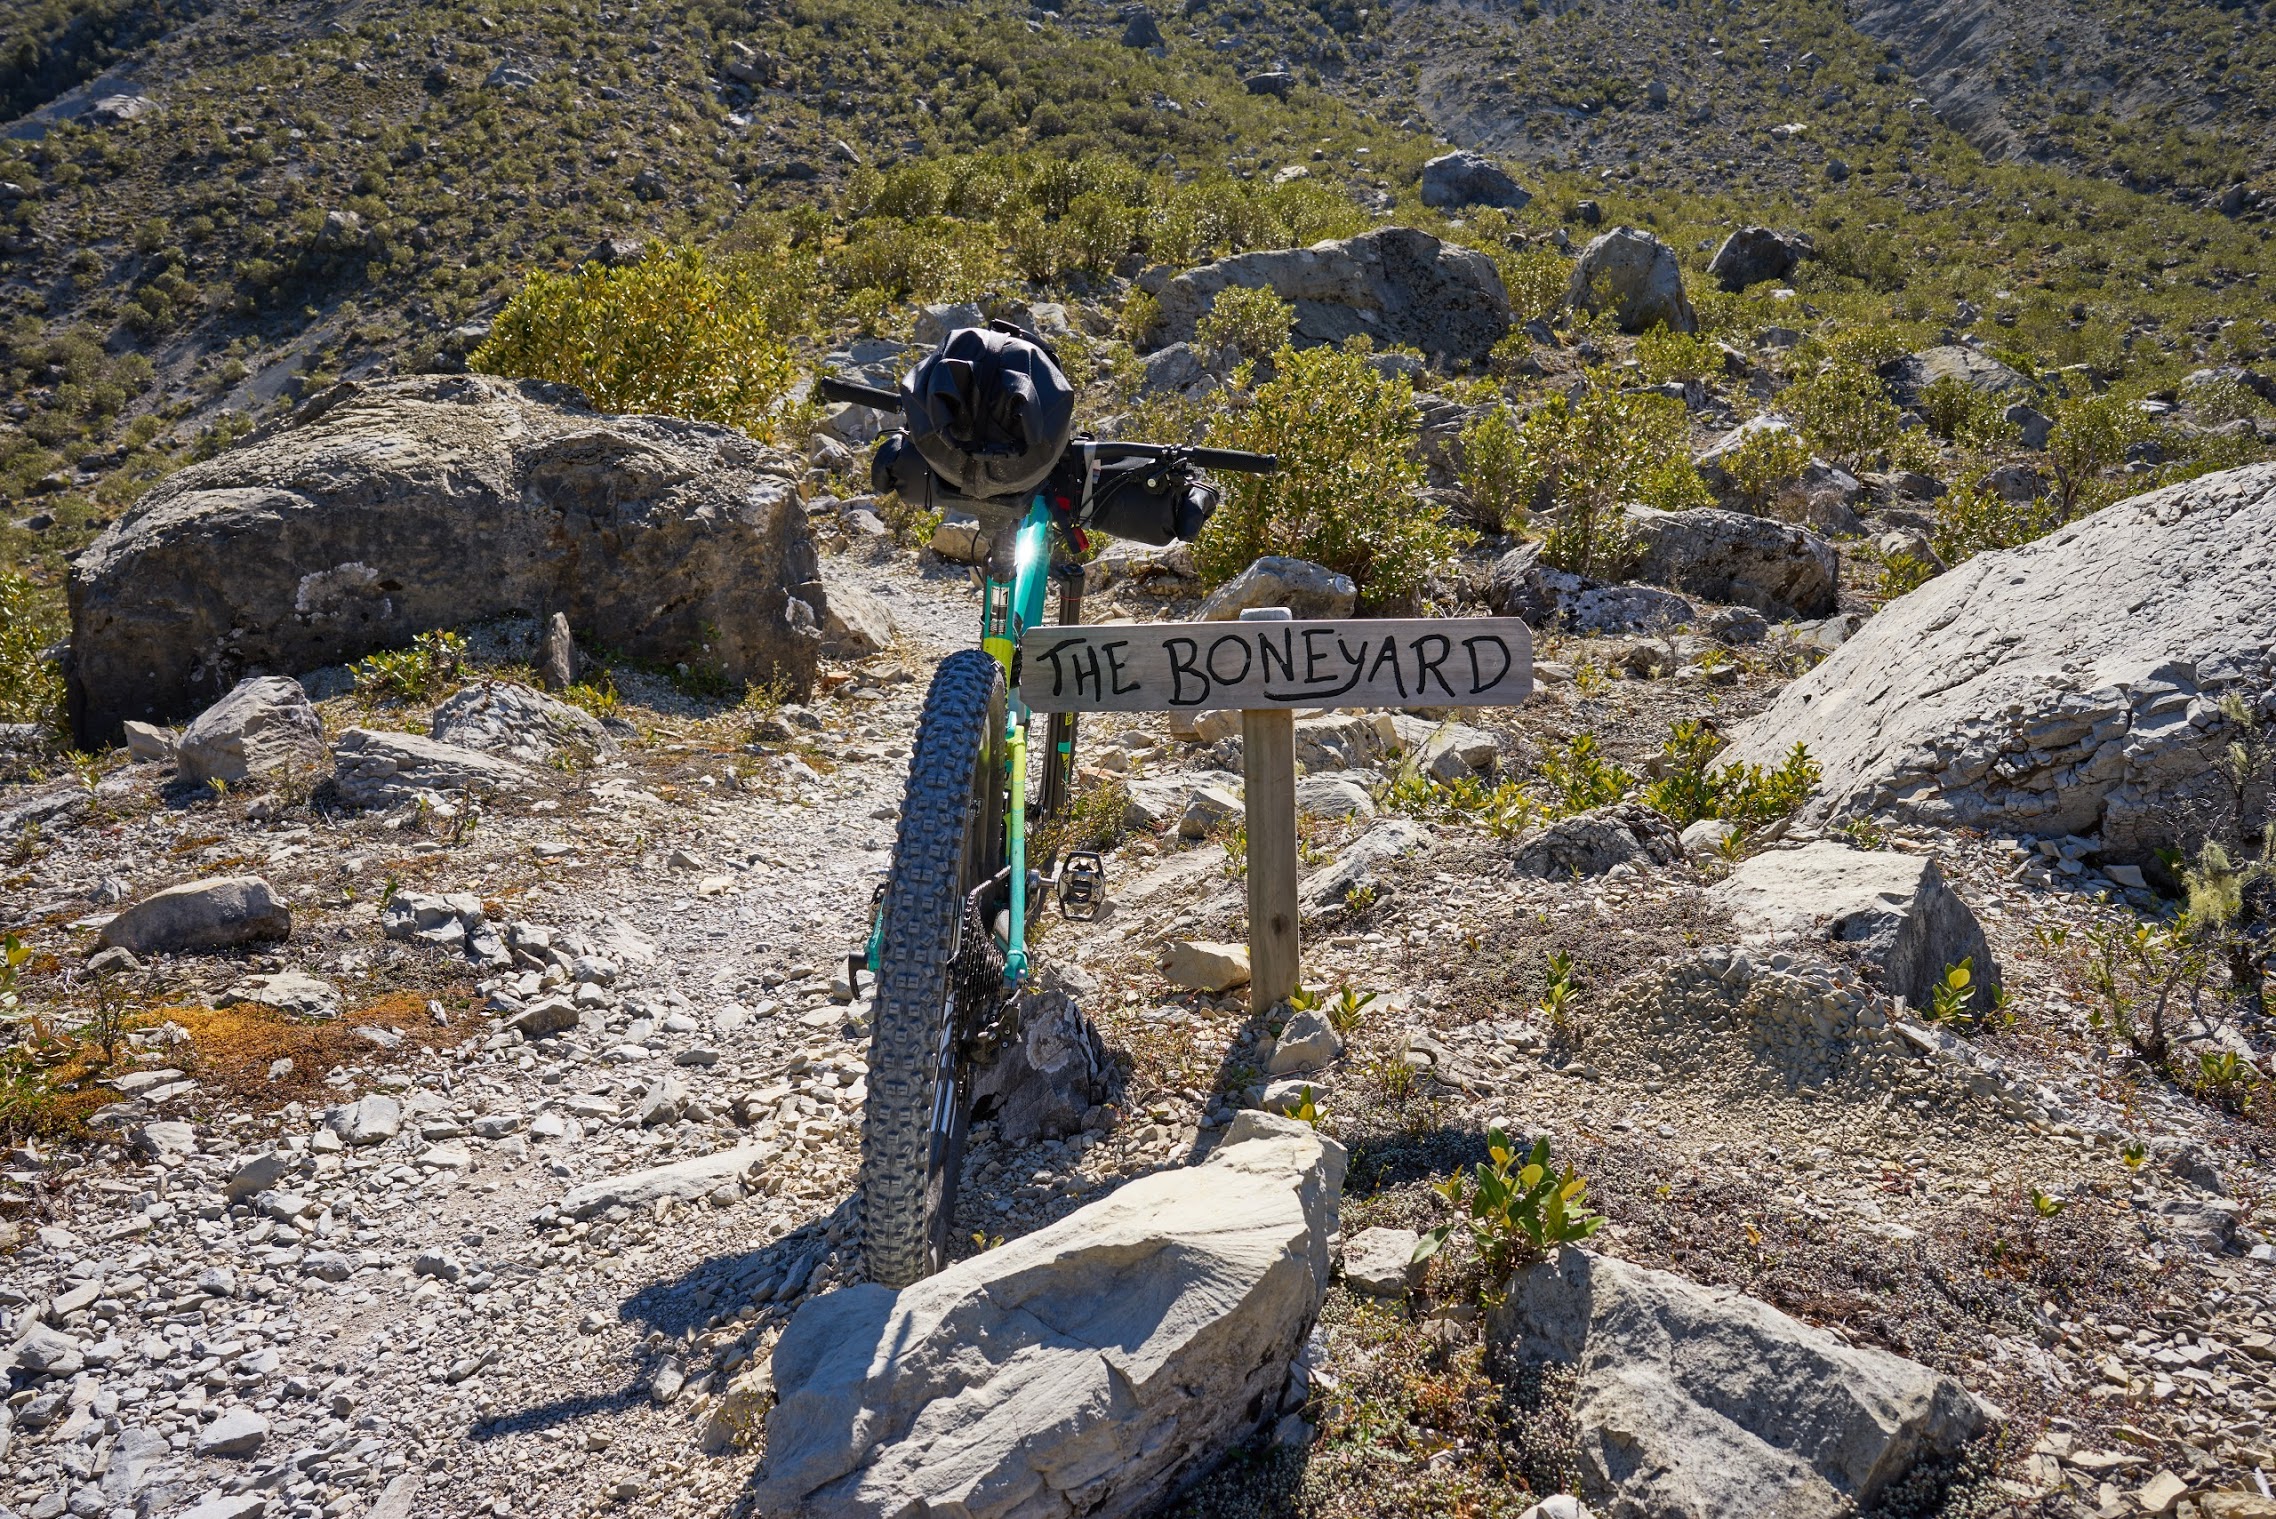
Setting off on Day 2 was the usual rag tag bunch of super organised souls meets dissarray – namely it was the opportune time for one party to have removed his valve cores while trying to inflate tyres. I heard the words of wisdom ringing in my head “get away early, you don’t want to be a the boneyard in the baking hot sun” and playing the game of trying to be helpful, while the tension in the air rises as the life is squeezed out of a crappy hand pump. Thankfully disaster did not strike, and the tyre was re-inflated.
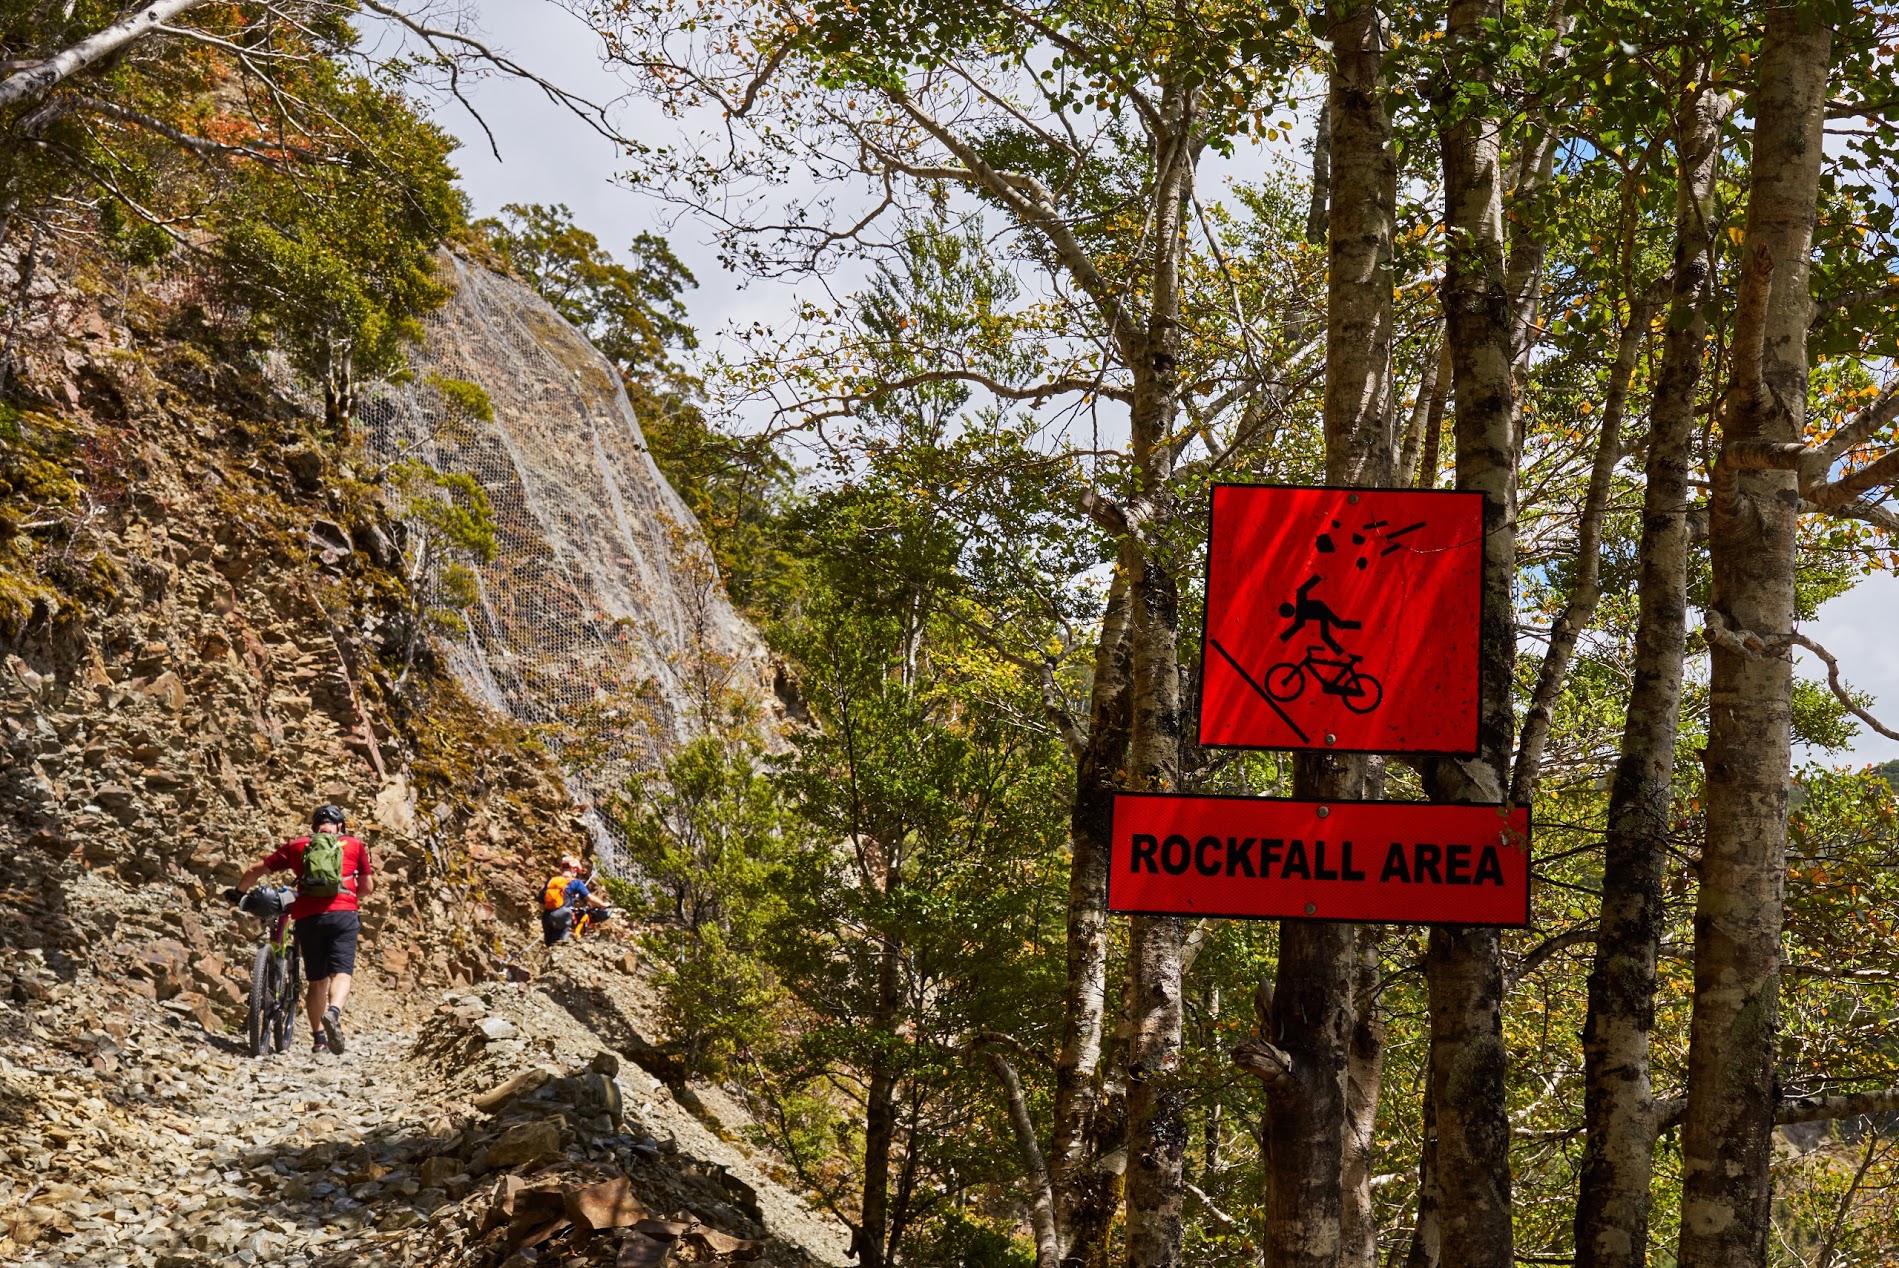
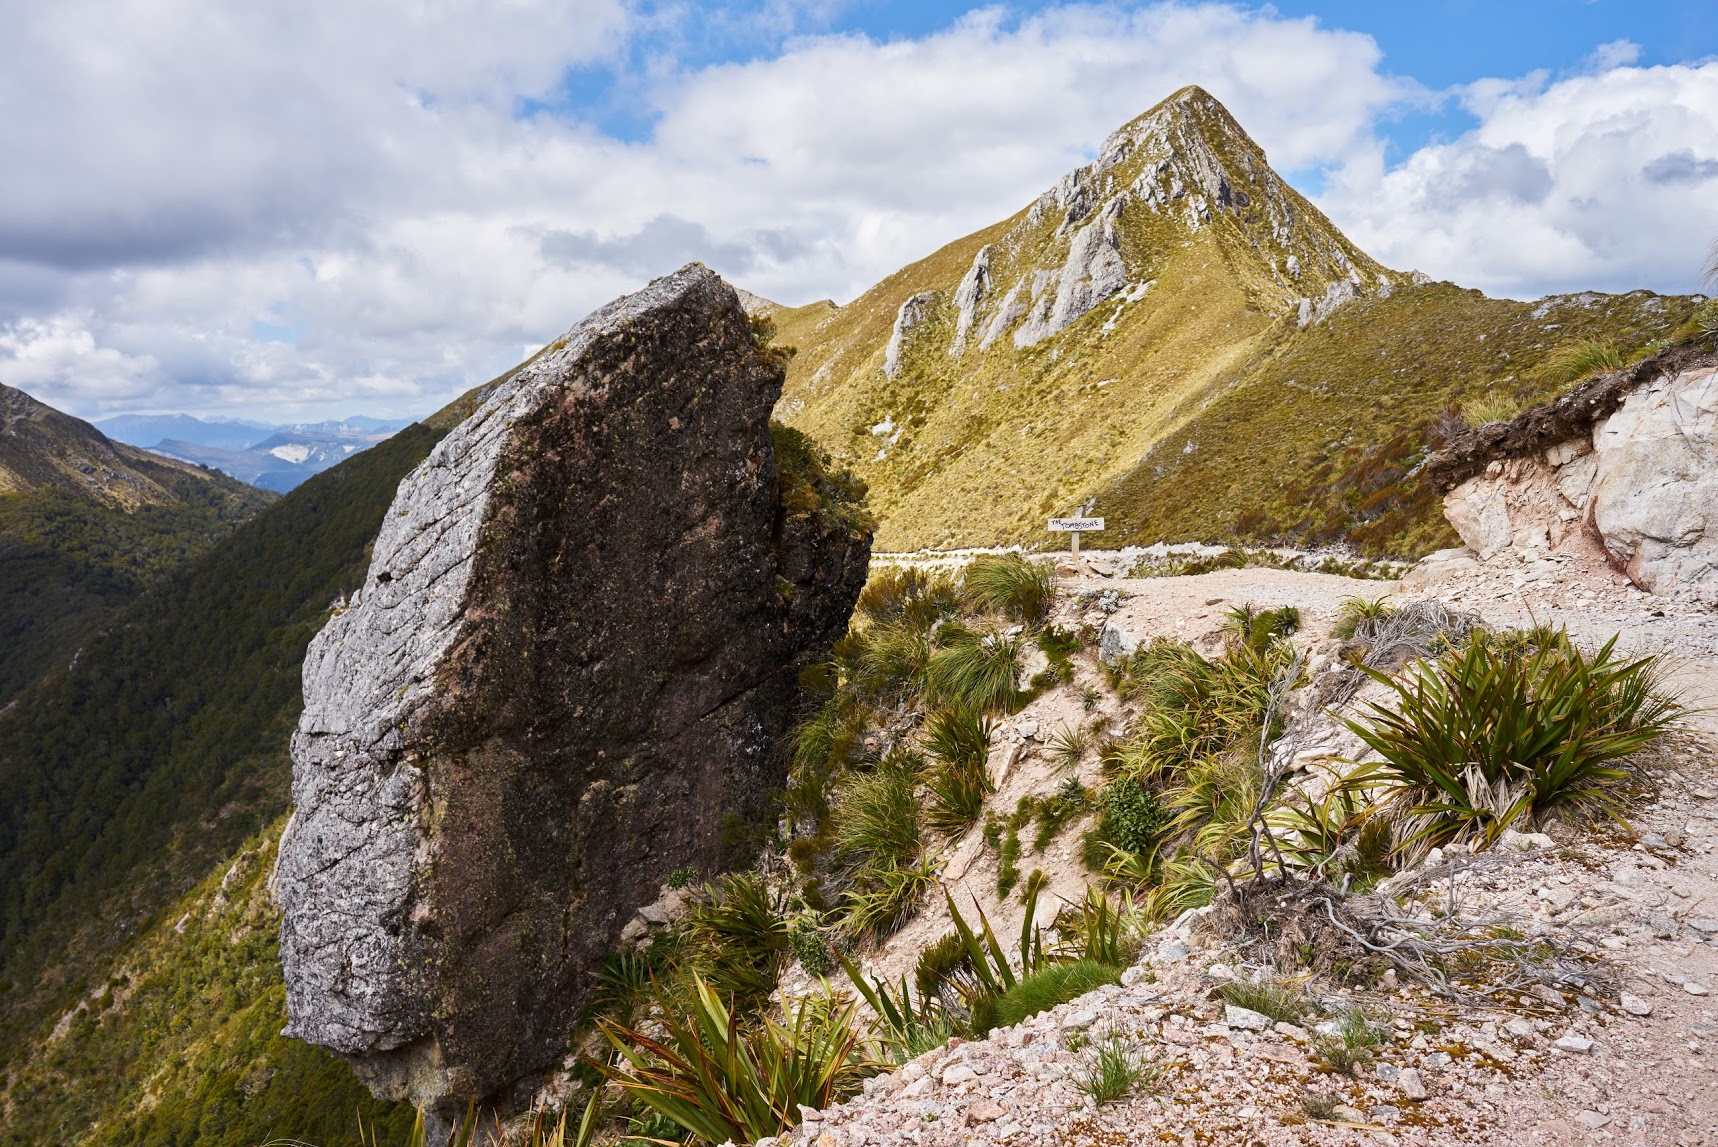
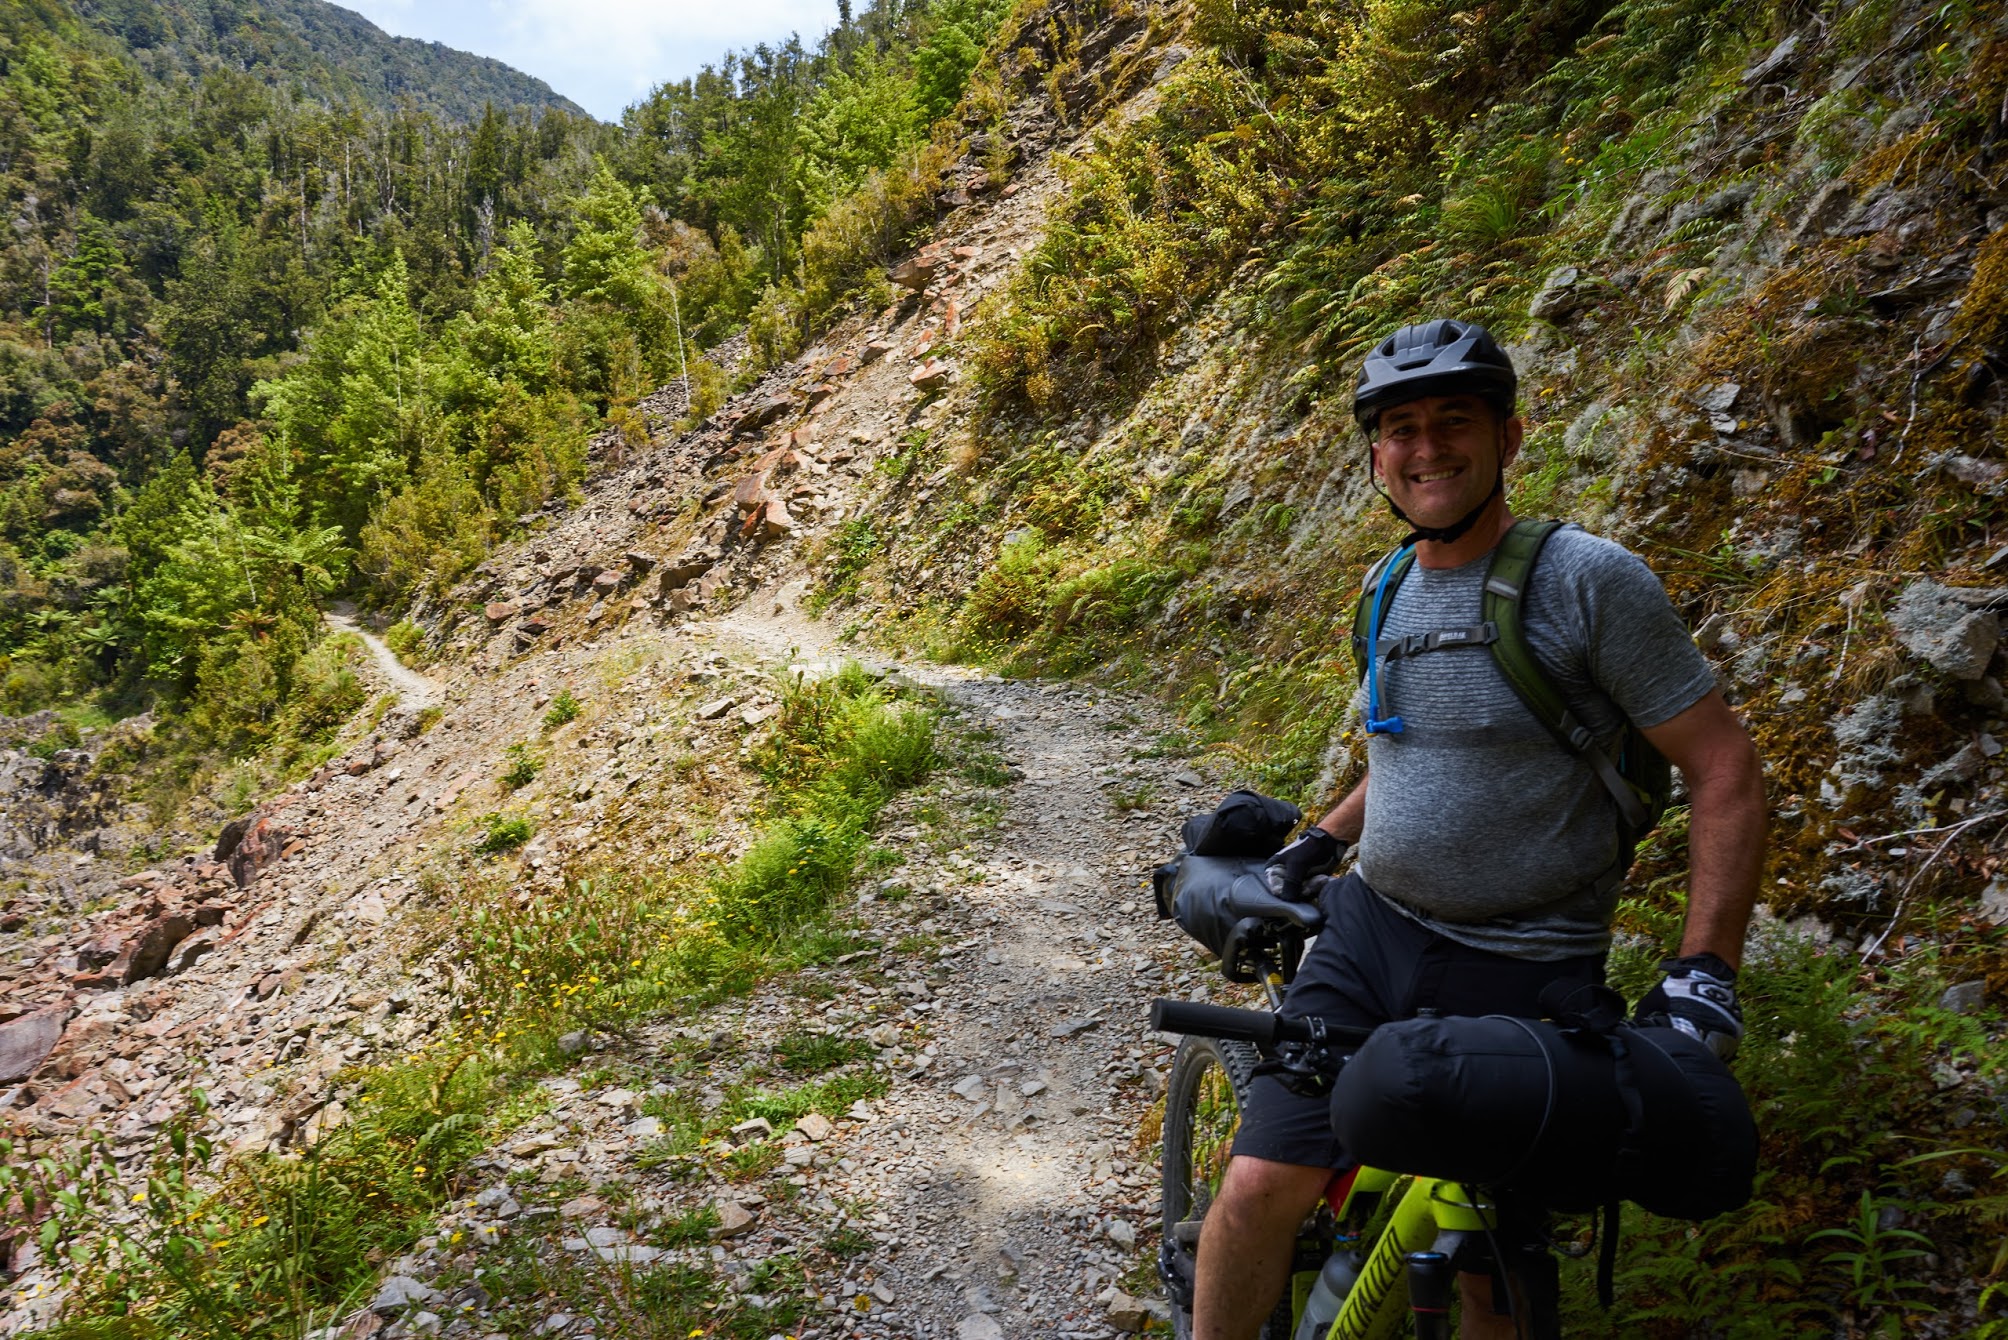
The next hour or so is tough; the grade 4-5 super techy switch back infested downhill, which on a long wheelbase enduro bike was less pleasurable and causing me to seriously revaluate my skill level. After completing this section, hopefully intact, you pop out along another ridgeline with epic views (spotting a trend here..) that leads to the ‘the’ skyline steps. #protip savour the ridge, it’s amazing. As for the stairs – Hope you’ve done your hike a bike training ! You’ll need to become pretty inventive pretty quick of the best way to carry your bike down an obscenely large number of stairs.
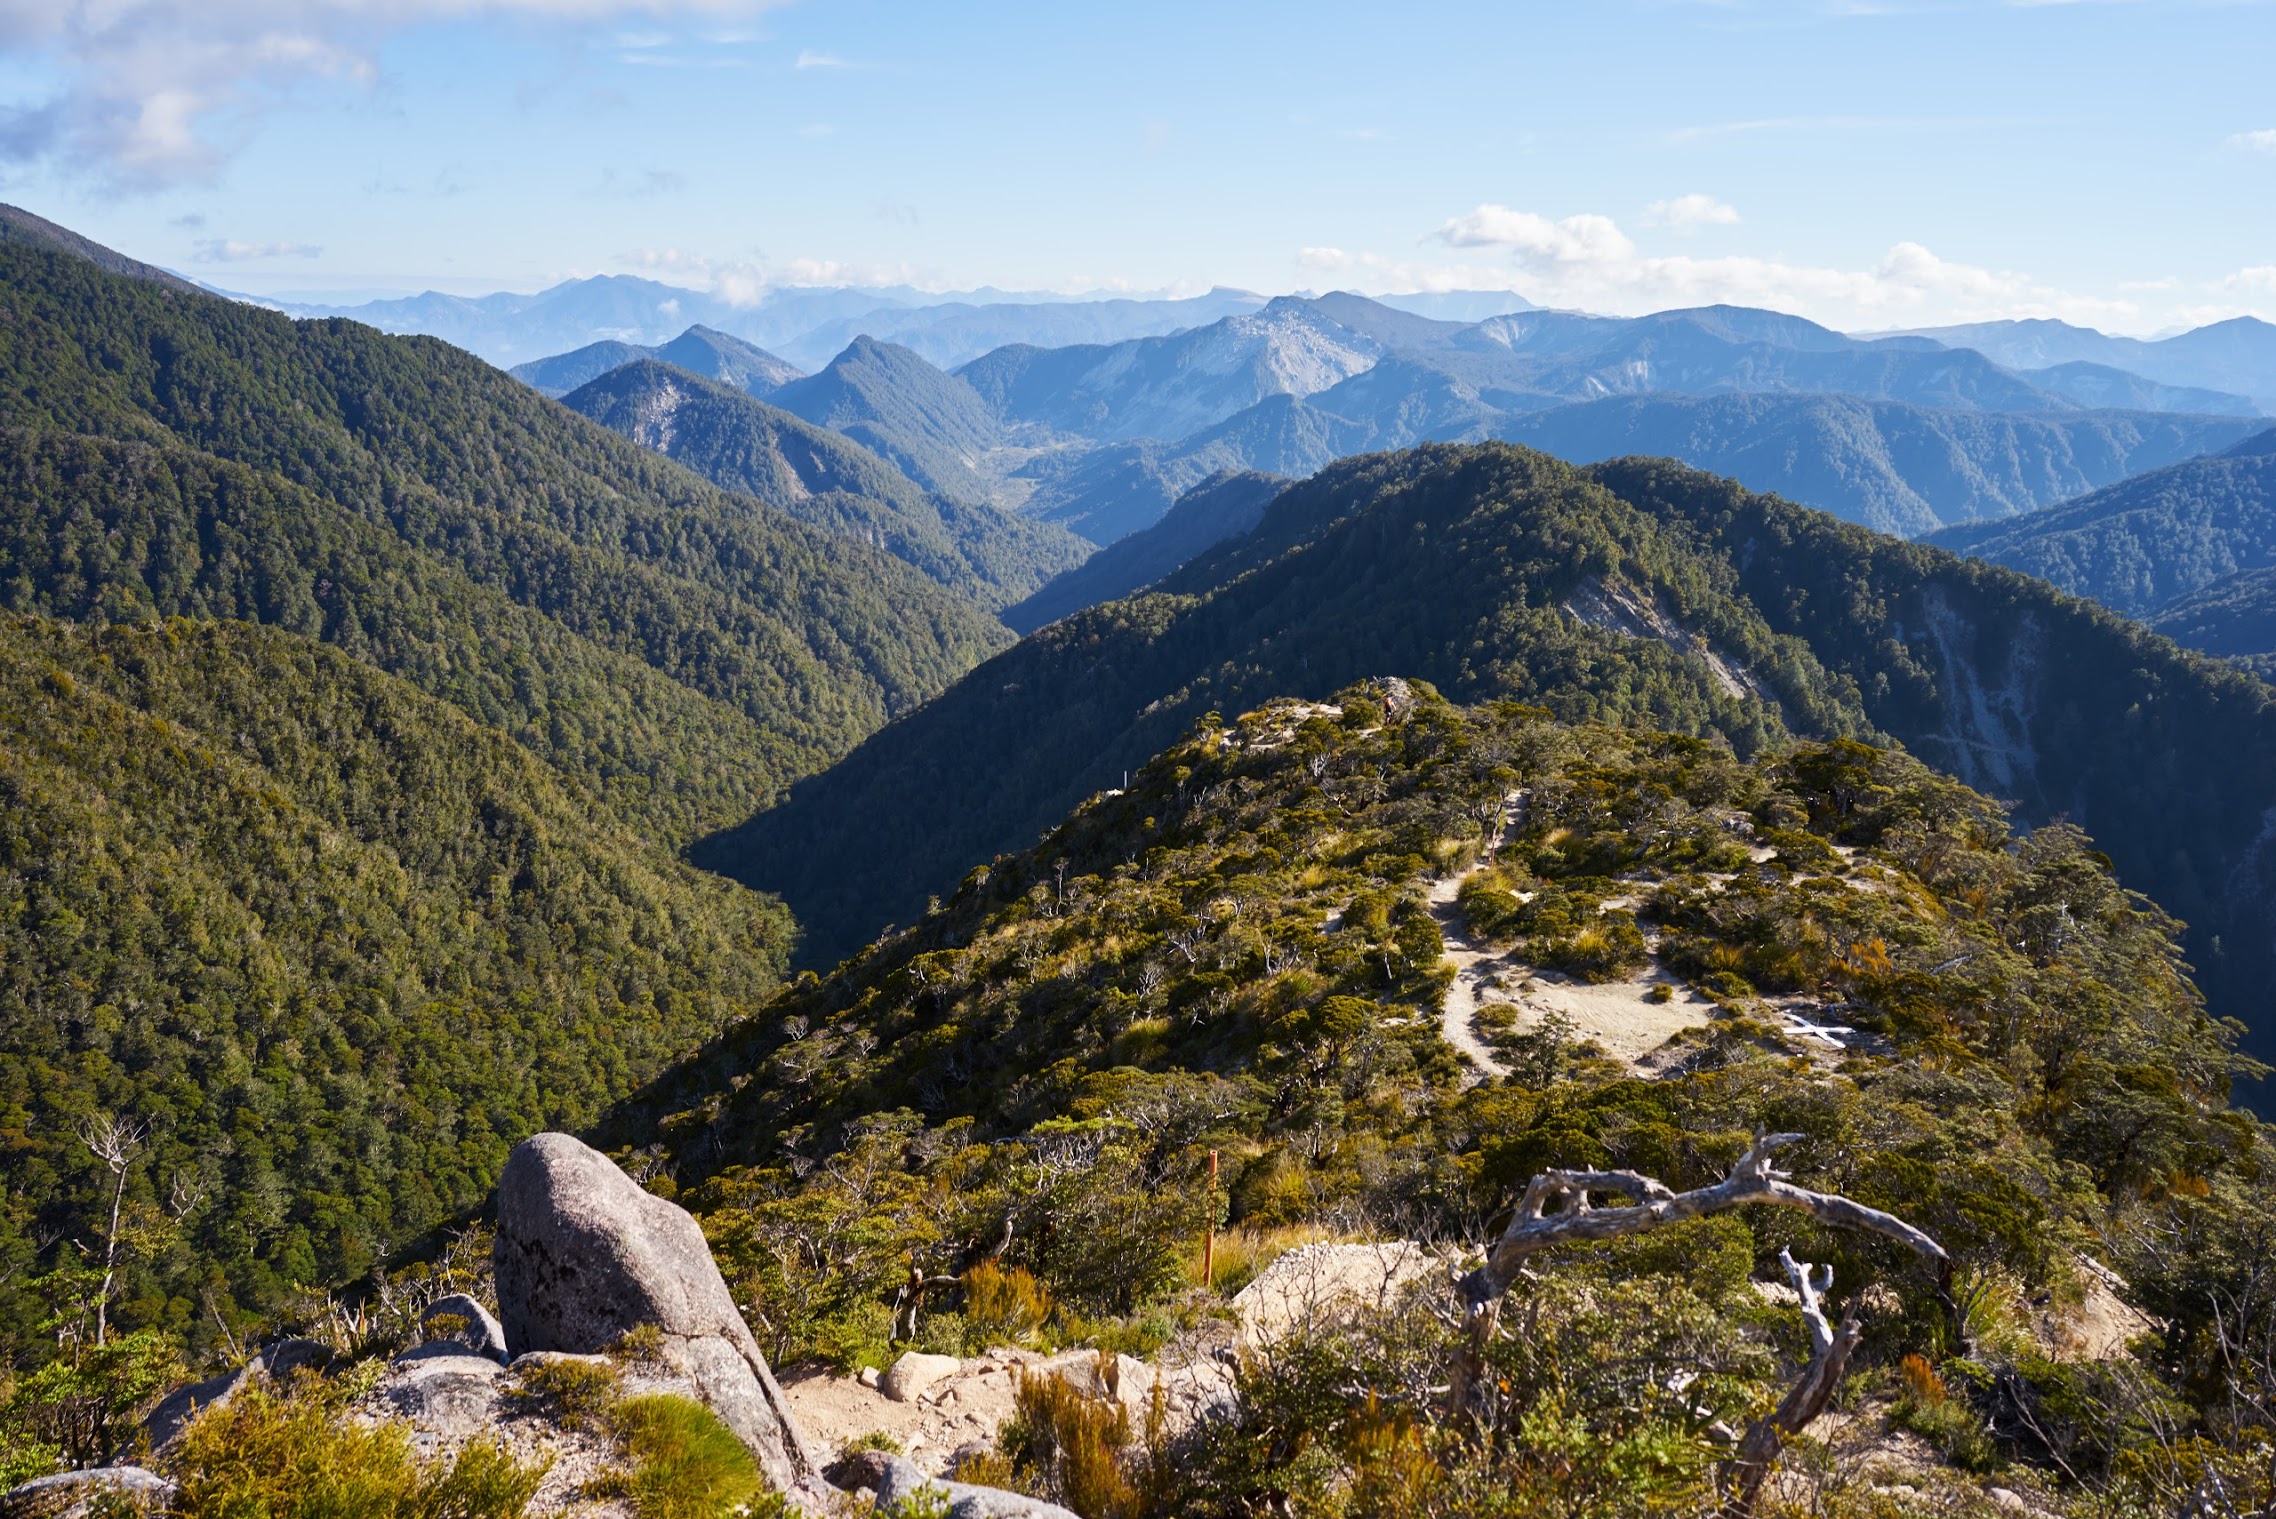
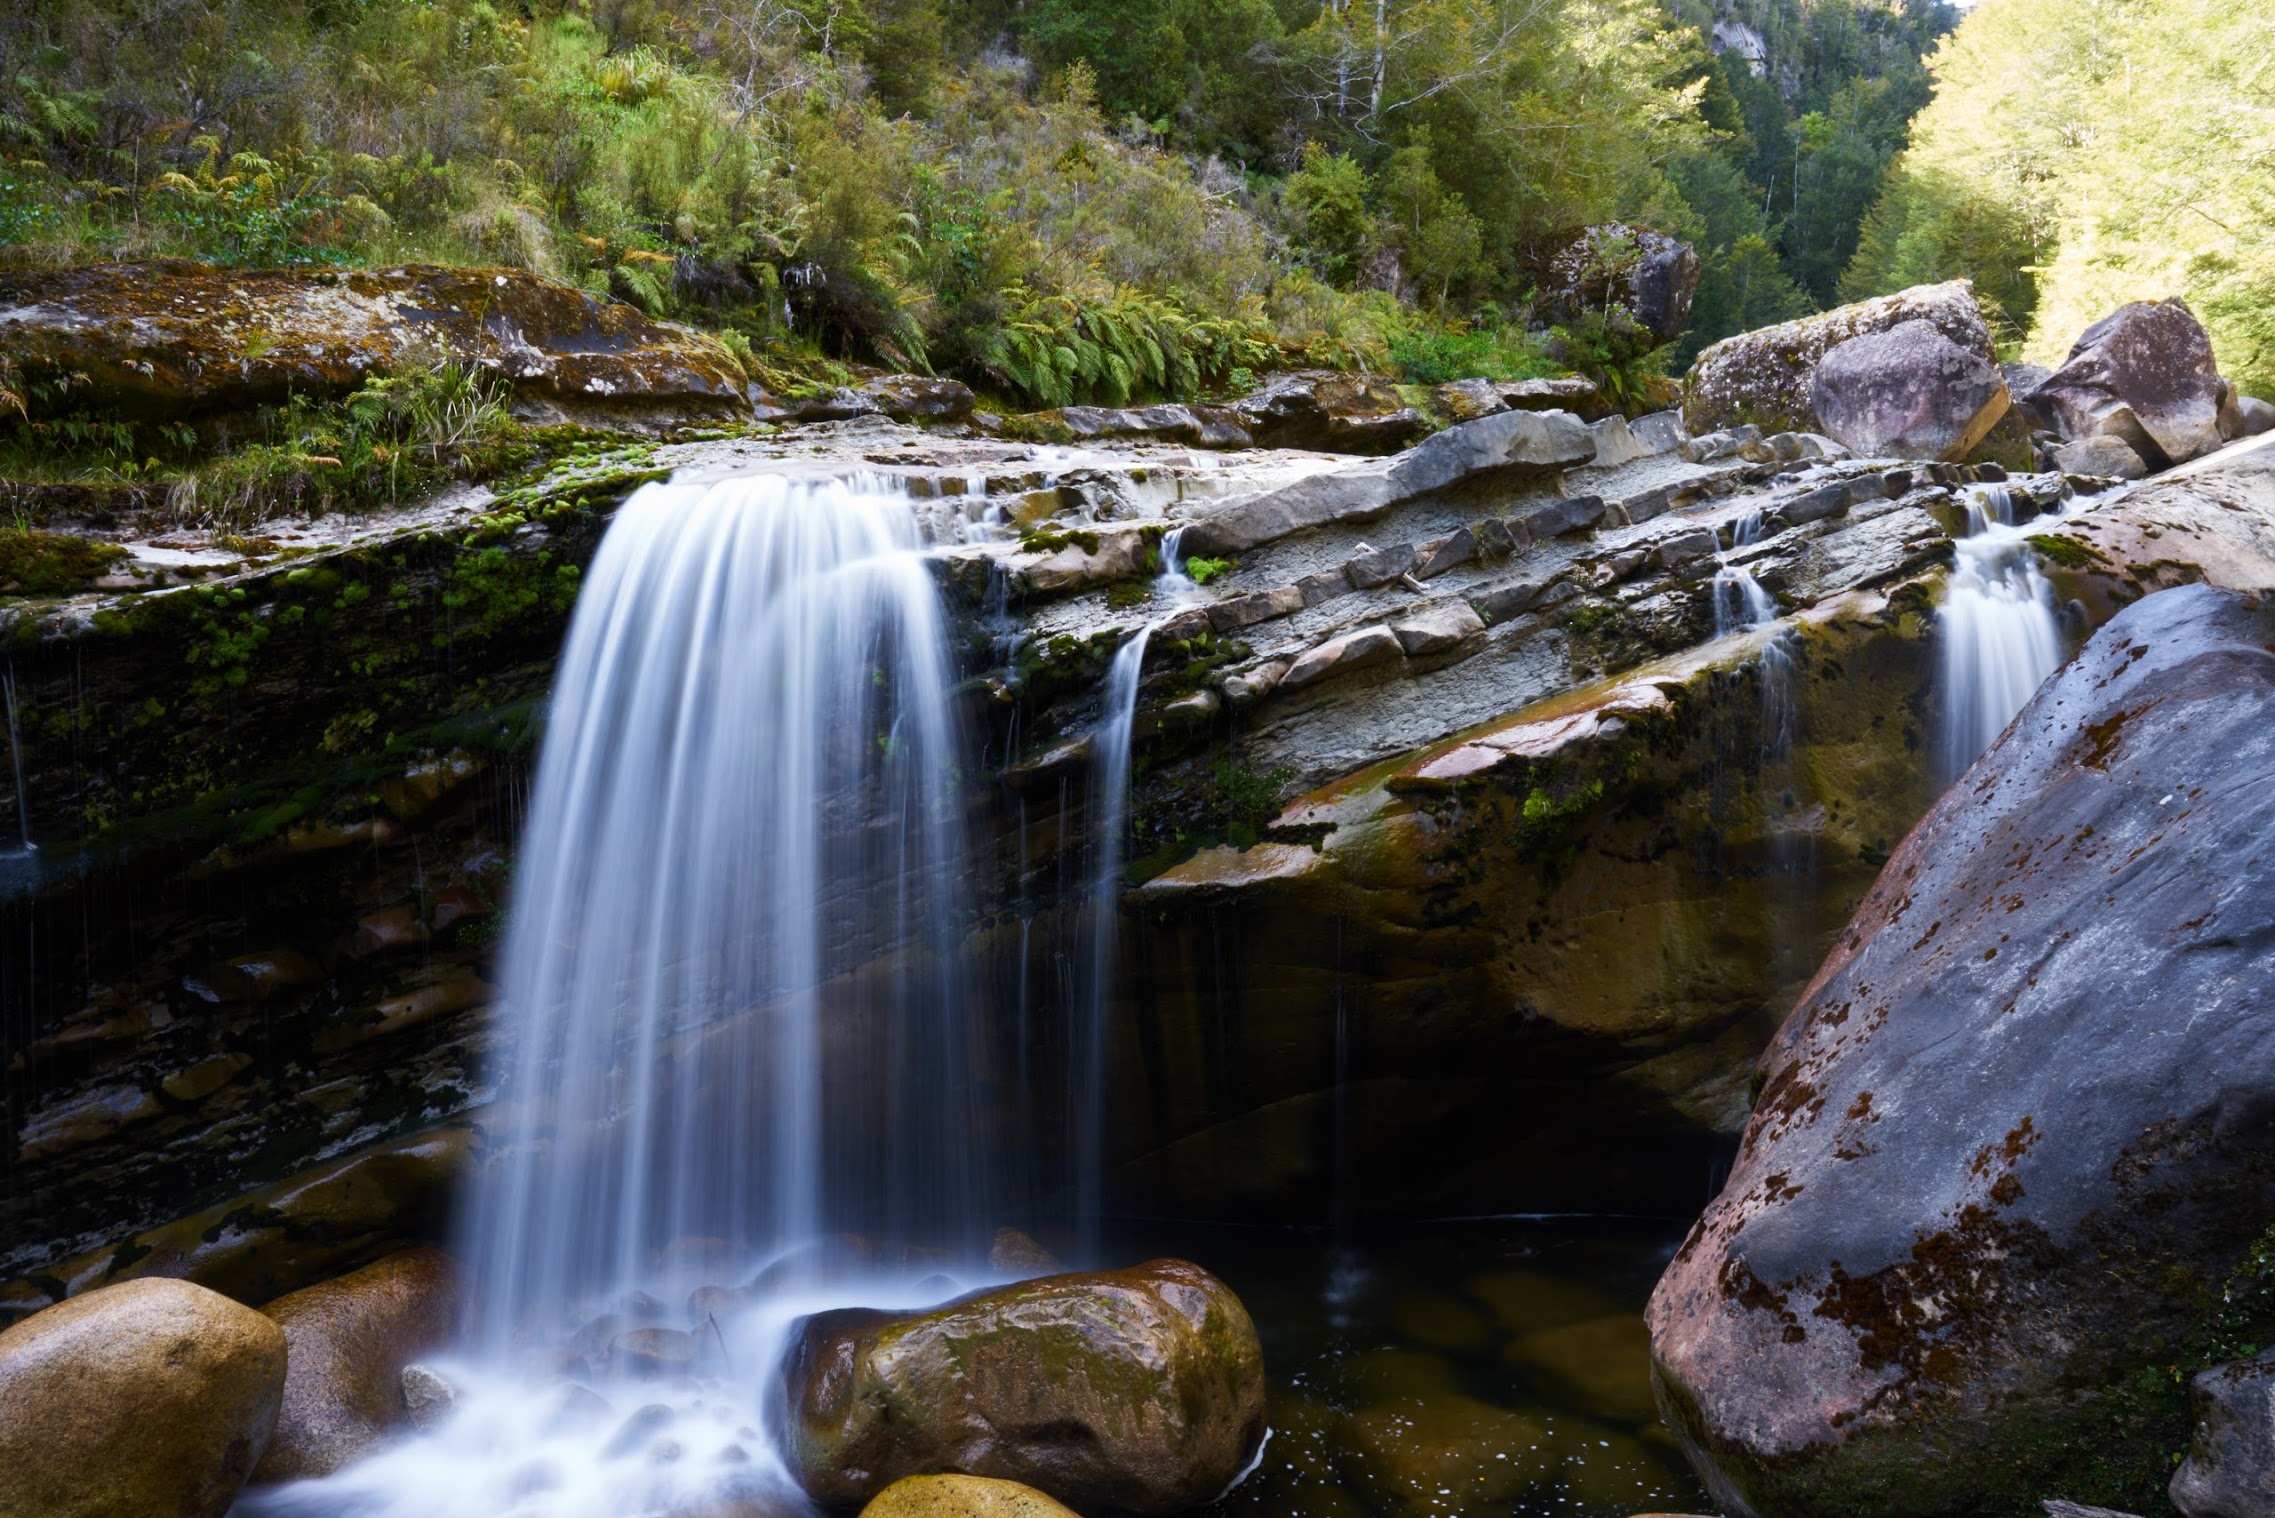
Once exiting Skyline steps gets into arguably the most fun riding section of the entire Old Ghost Road experience. About 20-30mins of beautiful flowing grade 3 single track – in the forest, low consequence (ie no scary drops), reasonable gradient, smoother surface. Various noises emanated from the various parties, you could of sworn were 8 year olds, flying down this section. The handlebar/seat bags had definitely upset the balance of the enduro rig, and made for the odd questionable over/under correction.
Coming to the end of it is a Waterfall that some weary and smelly mtbers decided was a good thing to freshen up in. I immediately wondered where the shuttle bus/chopper was to get us back up to the top of that section and do it all again – it was that damn good. Naturally a waterfall and a camera had to meet for a photo.
After the single track and an obligatory rest stop at the next hut the next big section is a valley floor and climb through the boneyard. Now the three people I’d spoken to all mentioned the boneyard for very good reason.
That was tough. Sweat dripping into your eyes – the whole time I was thinking a) I wish I was not doing this in the sun and b) should have done more riding before hand. A slow granny gear/push a bike up a few hundred meters of elevation – on rocky shaley slopes with little/no shade. I couldn’t tell what was worse – trying to push the pedals, or the harshness of walking on the even/hard surface in shoes that had hard plastic soles. The lack of elevation had meant temperatures were up and I really struggle with temperatures. Suffice to say I was very glad to see the bush at the end of this section. I am pretty sure I was at Max HR with the weird pounding noise behind my ears in my head..
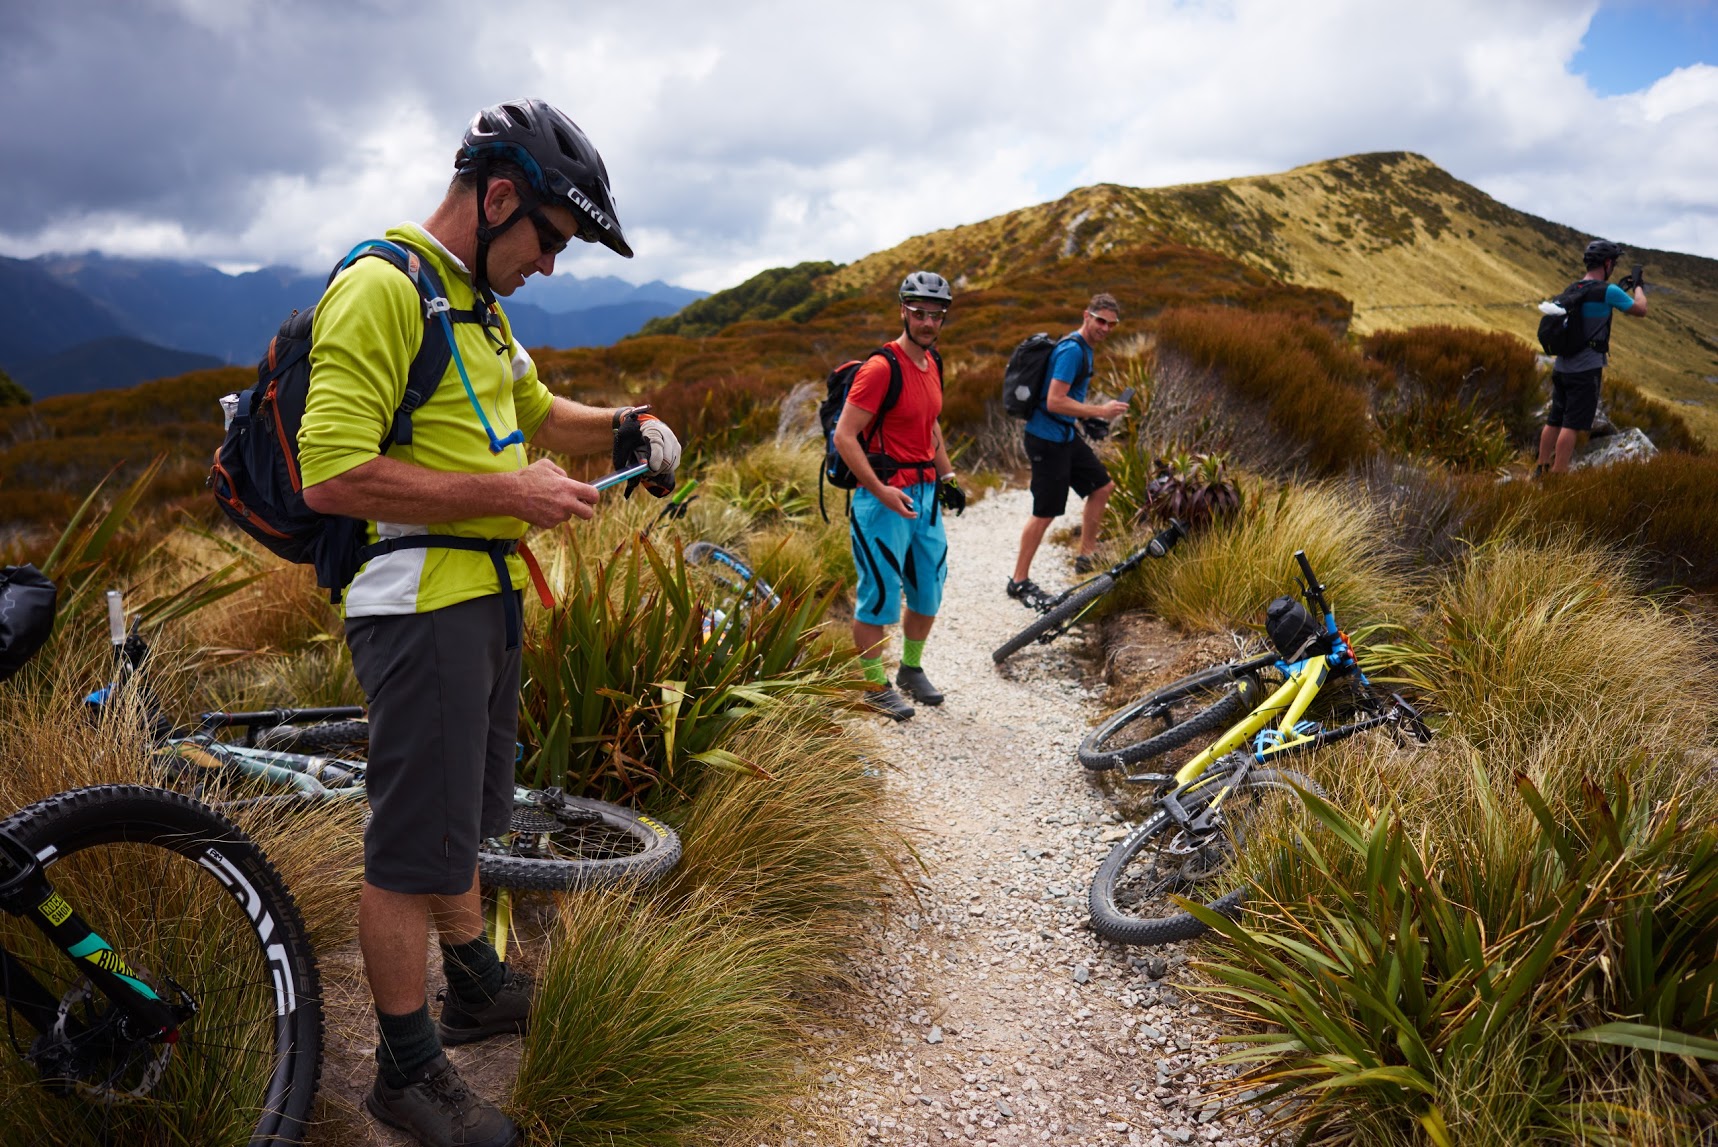
We caught up with Mr SingleSpeeder. The three musketeers regrouped and tucked into our various sugary energy hits. I felt the Bonk Monster lurking, so joyously tucked into a Wilderness Banana Smoothie. I subsequently discovered the freeze dried sensation I had been saving for just this moment wasn’t as appealing as it initially sounded – controlling my gag reflex I wolfed it down (the dry bits, uggggghhh) knowing that 100’s of calories would make a dent. The next few hours the photos were less frequent as the tiredness set in – the trail follows the river through another couple of huts on a more even grade 2-3 gentle descent.
One thing our walking companions would have been able to do was enjoy the view – rolling on two wheels we spent the majority of the time concentrating didn’t take a header off the side. You knew if you started admiring the view too much you would become one with the scenery.
It would be fair to say the last 10-20km dragged a little bit (/lot). You go through various little trail side streams and drop into the bush.
One of the last streams was after a good 4-5 hrs riding, I had a mind blowing idea of just putting my hands into the stream, the cold water was welcome relief to my wrists. I don’t think I’ve ever had cold water feel that good on my wrists before. Being used to a diet of soft groomed sand & clay trails the rocky ghost road was taking it’s toll.
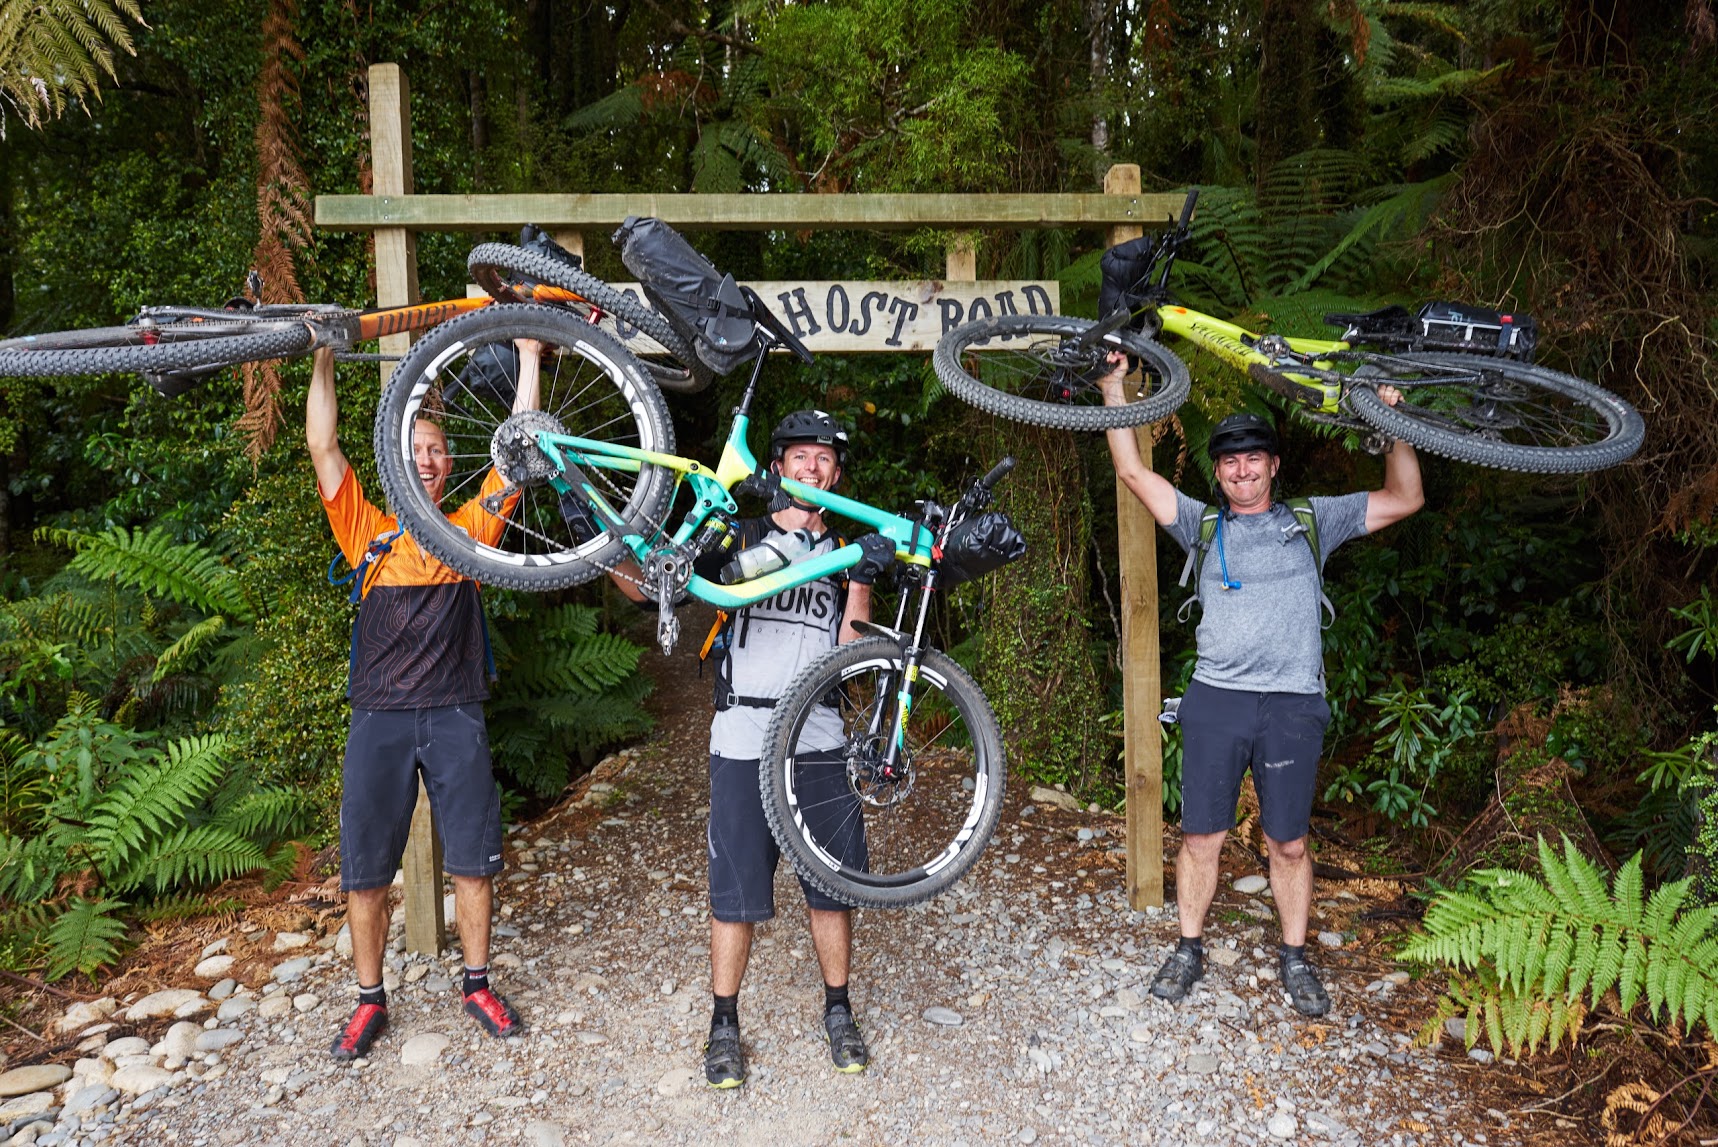
You think you’re near the end when this dead straight section of trail appears. Don’t get too excited, you’ve still got another hill climb ahead ! After a hill climb and a number of members of the public out for their (very friendly) Sunday walks we knew the end was nigh, following signage we get to the end. Tired. Worn out. Bikes making a few more noises than they did at the start. Most importantly a high amount of stoke and sense of accomplishment.
On reflection
5/5 Stokage factor.
5/5 Epic scenery factor.
5/5 Sense of Accomplishment factor.
80% of the trail low 15% moderate, and a good 5% has high consequence factor.
(No shame in walking)
Would I recommend it? Absolutely. Is it for beginners? No. I’d say you’ve got to have a good degree of confidence in tech trails and awareness of your own mortality on a bike before doing the OGR. There’s a handful of sections that could go very wrong very quick – (infact apparently a couple of weekends before we went someone was choppered out with a shoulder injury). There two distinct sections that are Grade 4-5. I can see OGR ending up being classed as “the Milford Track of Mountain Biking”. Which might give them impression it’s Milford style easy, which it isn’t.
For someone who’s rides regularly and grins like a made idiot on technical lines you’re going to love it. It has fast sections, slow sections, picturesque sections. It’s a challenge. You feel like you earn your dinner on Day 1, and your beer at the end. I love showing people the picture of the ridgeline over to the valley and saying “see this little dot, yes that’s a human, see over here, we went down there, round that mountain, into that valley, up the side, round the corner…”. It truly feels like an accomplishment.
Tips and tricks
- Have wicked fun – You’ll be part of a select club who live for the stoke. It’s awesome. Get out and take in the scenery outside the huts.
- Bike maintenance – before – You do *not* want to be stranded with a mechanical out there. I had a pedal fail on my next ride, half an hour into my next ride, and I thanked my lucky stars it didn’t happen on the OGR. If you’ve got any dubious components get them checked/replaced.
- Bike maintenance – after. Get things checked out, 80km of rock surface with extra weight than normal will be hell on your bike. I’m pretty sure my XT pedals weren’t that long in the tooth, but constant rock strikes took their toll and hurtling down the Whakamarina two days later one pedal failed spectacularly with a completely collapsed bearing.
- Train train train train. Needs no explanation
- Take a PLB. Doesn’t matter about the weight, doesn’t matter if you don’t think you’ll ever use it. Don’t rely on one wholeheartedly but if you’ve run out of options, you’ll want it with you. I’d also have it in a Camelbak and not on the bike; if you crash, and crash big enough on one of the gnarly high consequence sections, good chance you won’t be with your bike …
- Be prepared. There’s various websites with good guides on what you need to bring with you, look them up and research what you need.
- Take a smartphone/camera. The views are epic.
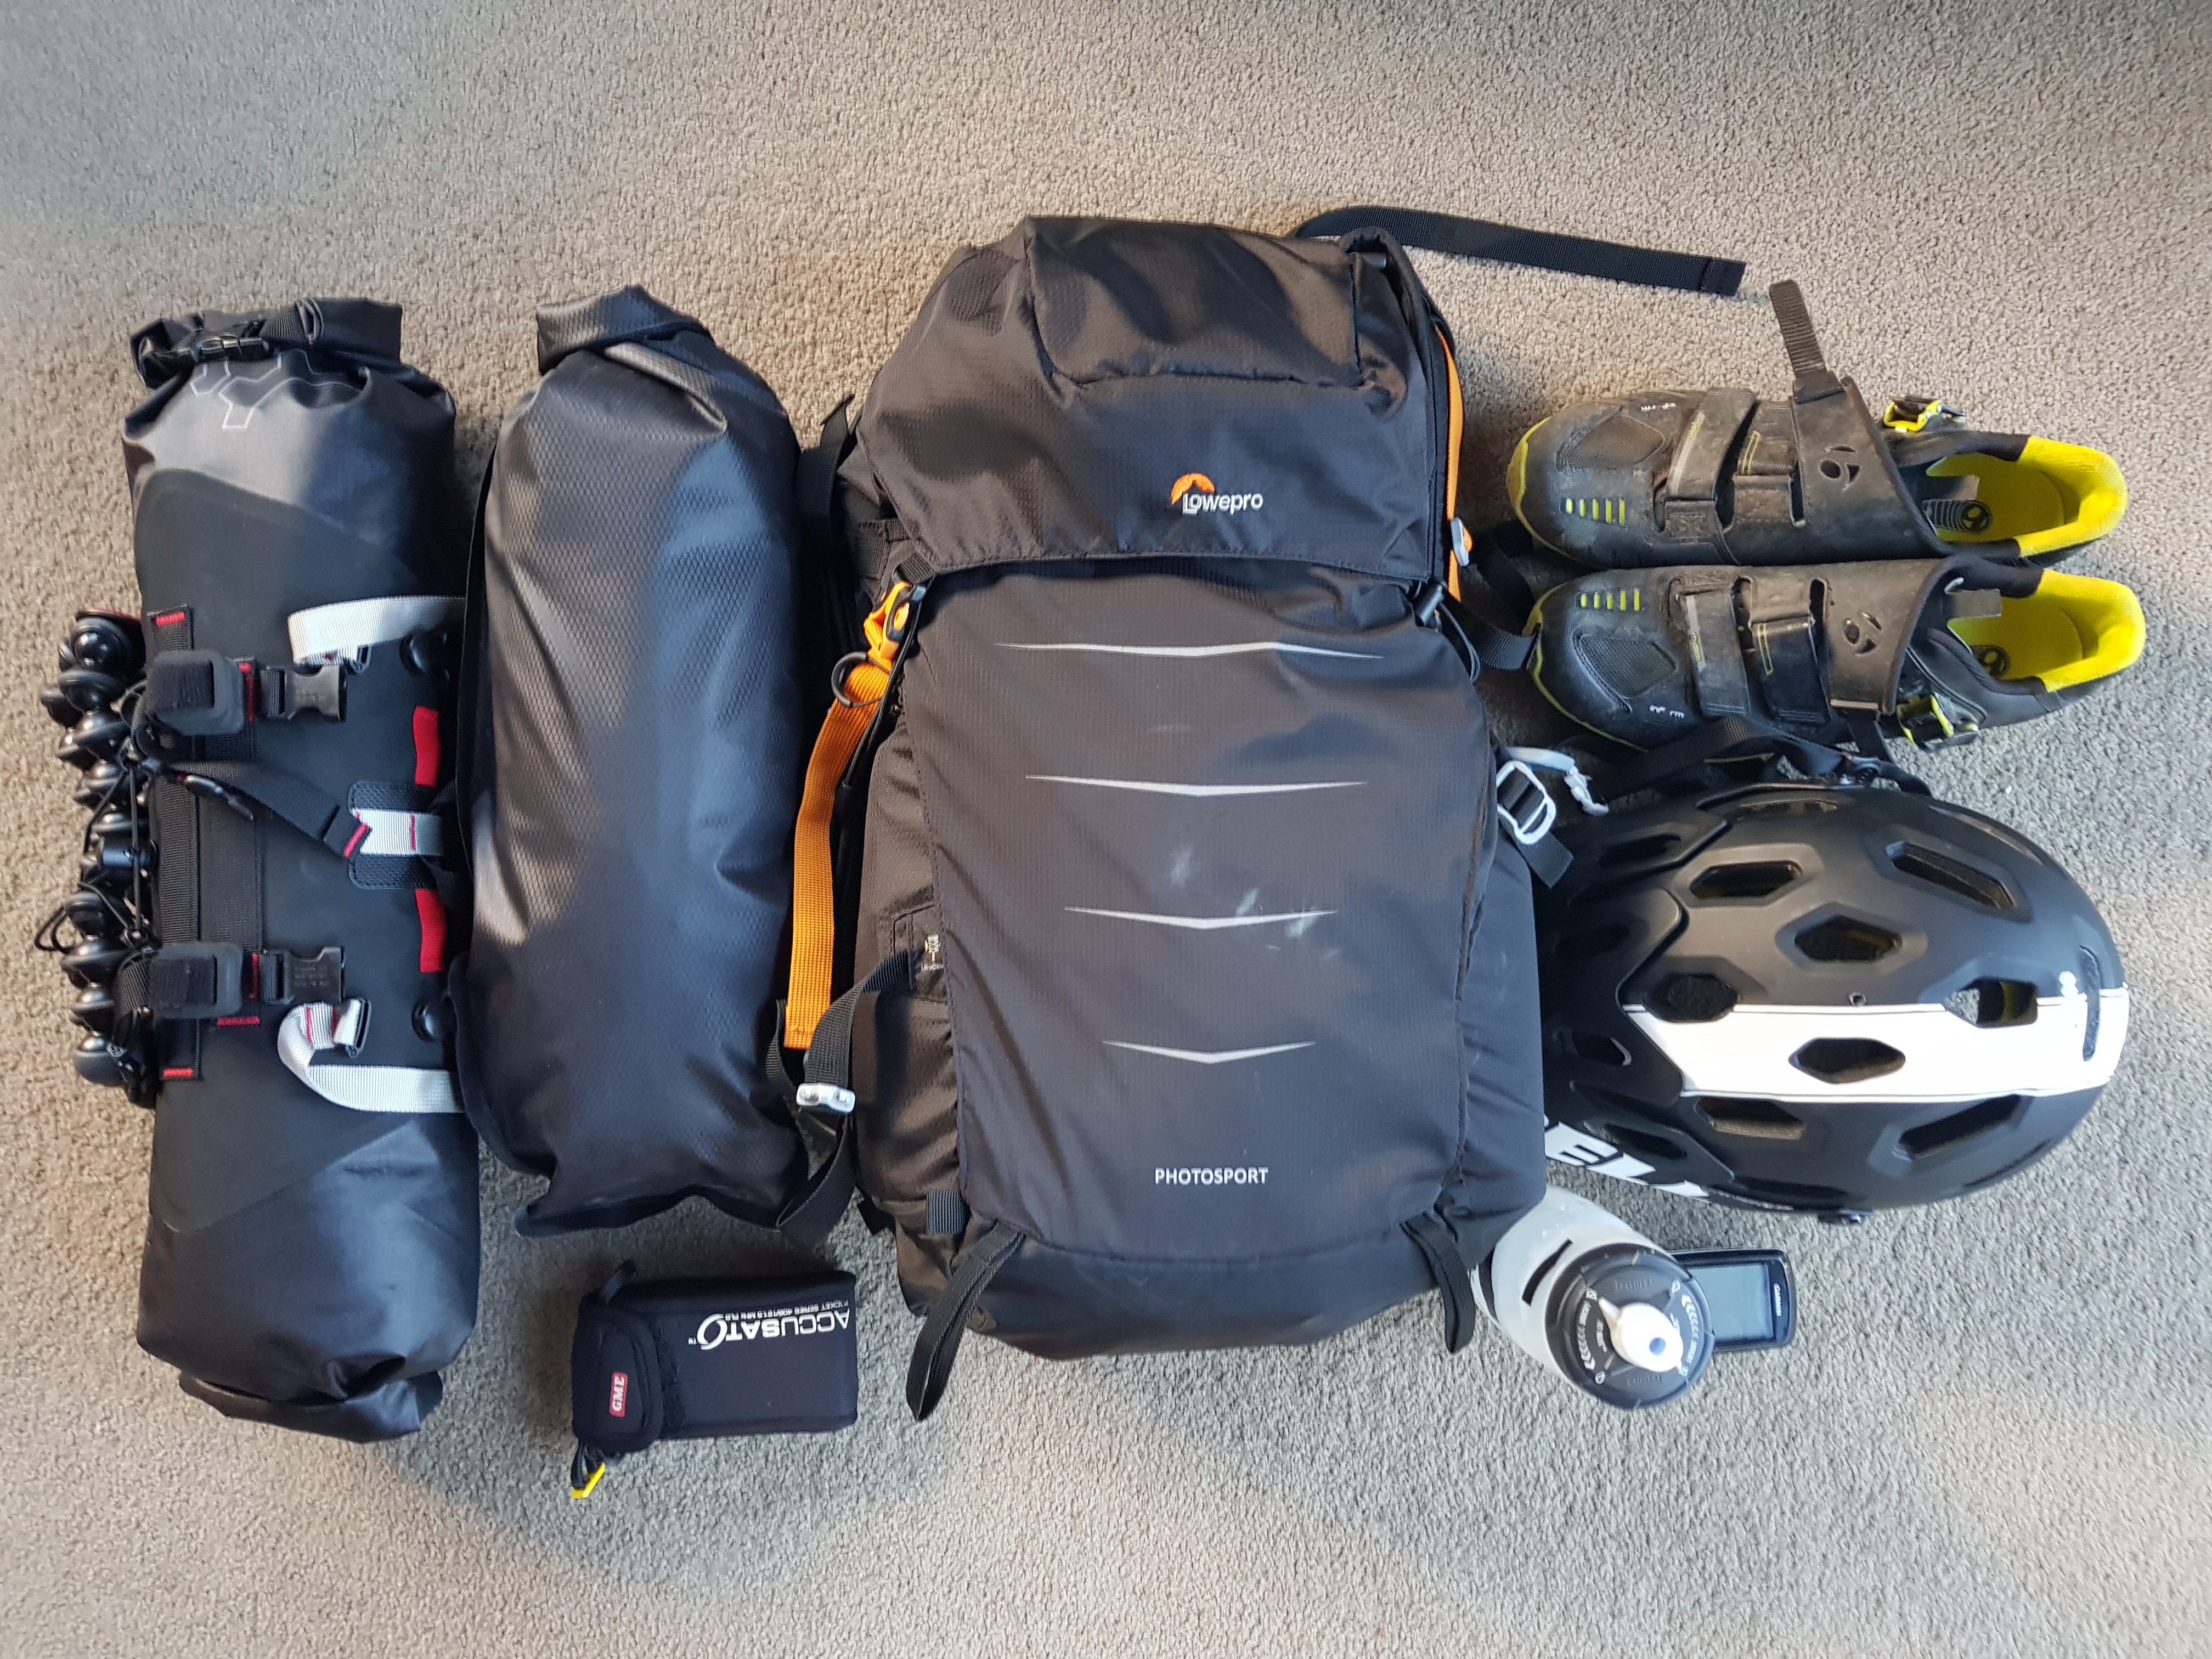
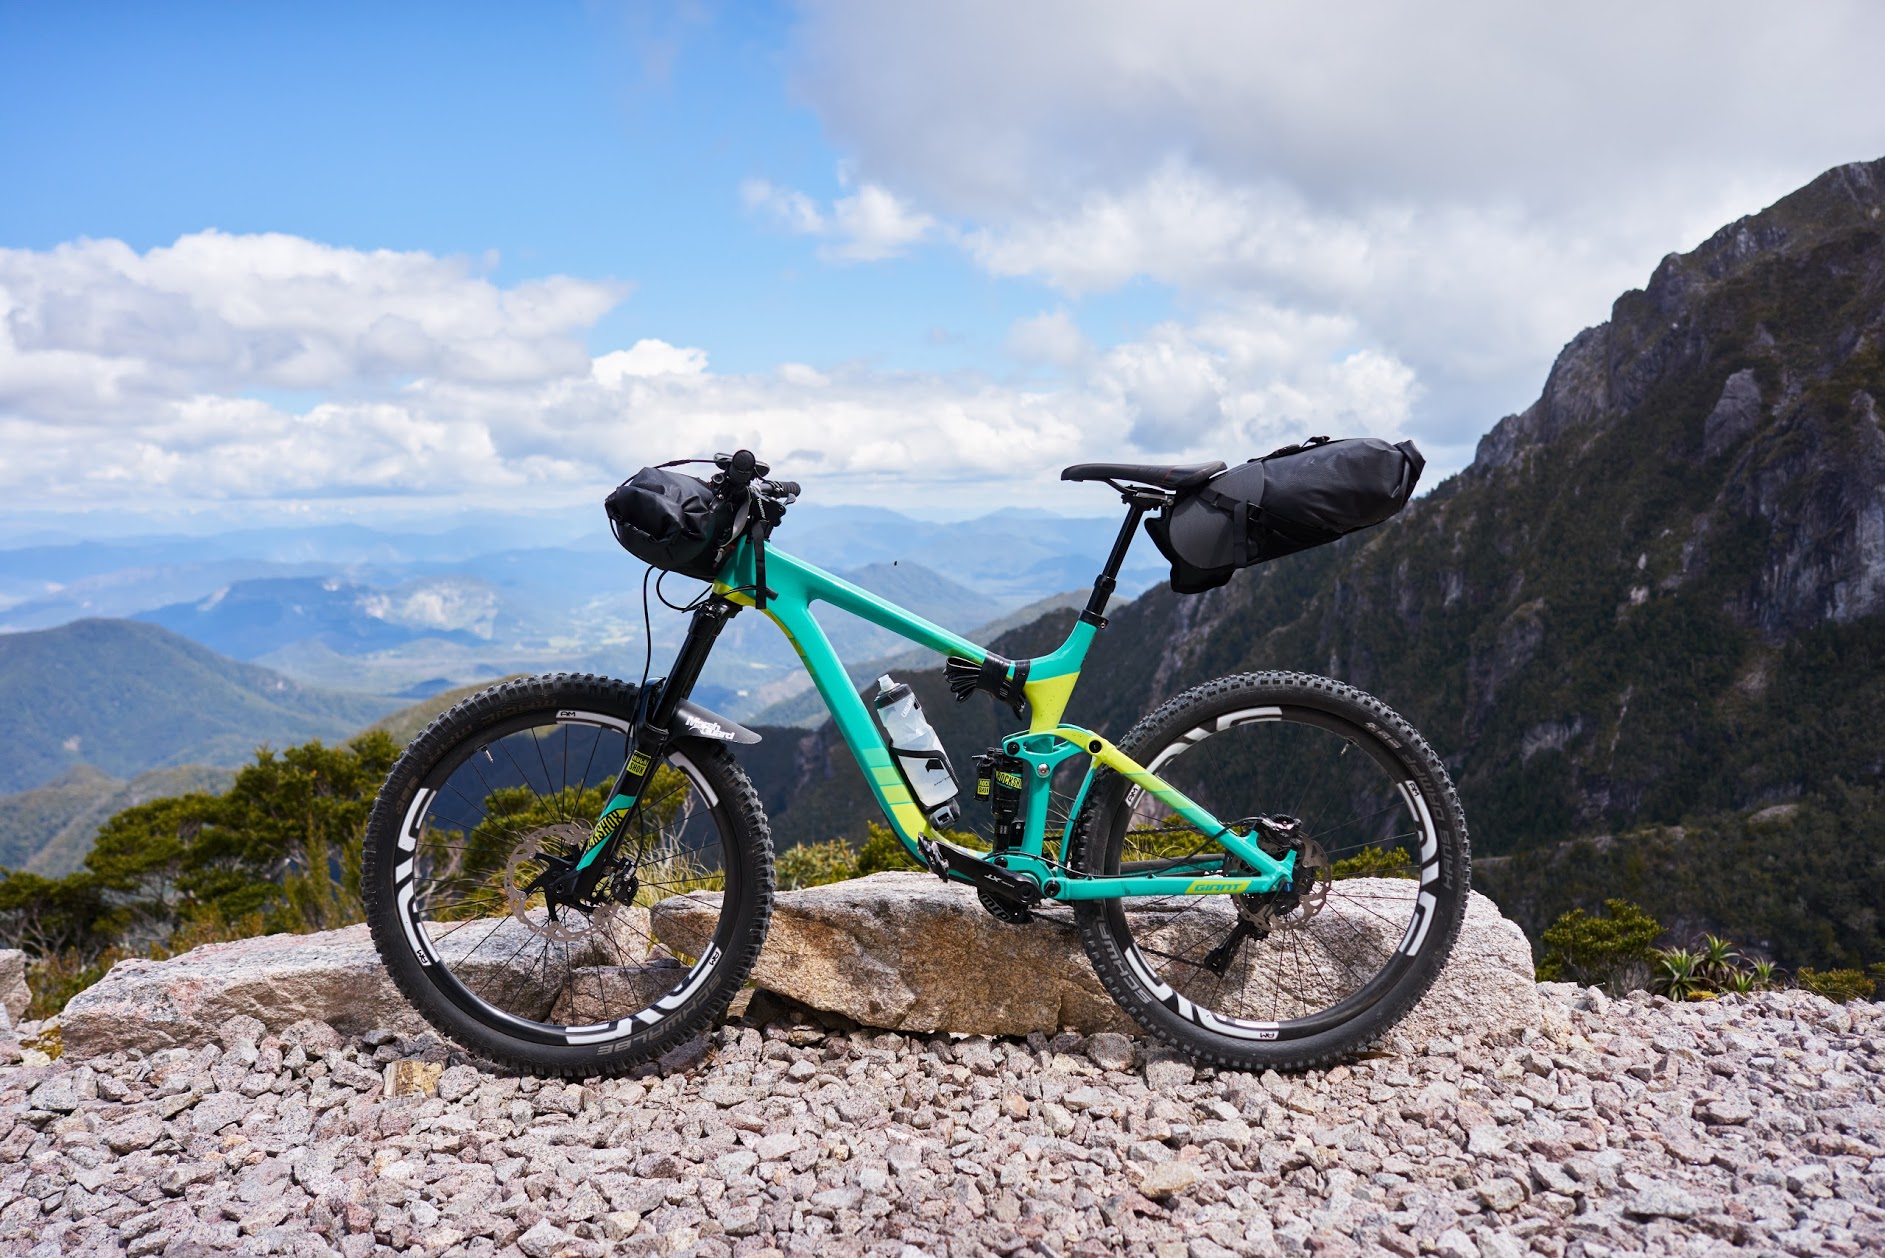
- Test your bike bags fully weighted. If you’re like us and the first time you’ve strapped 6-8 extra kilos on you want to make sure your bikepacking gear works. Was really lucky we did as I had some fettling to do on my seat bag. Fully load everything up and hit your local trails/bike parks. Do some reasonable drops/roots/rough sections. People might look at you sideways while you’re fanging down a grade 4 downhill at your local bikepark, it’s easier to fix any problems then and realise your dropper is next to worthless 🙂
- Fill up water at each hut. You’ll get into the groove of doing this. None of us got sick. You can check with the OGR people before you go as to the state of water in the huts – ghost lake was getting really low when we went. I took a steripen and used it half heartedly on some river water… if I did it again I’d just leave the steripen behind. Unnecessary grams.
- Consider hike a bike friendly shoes if you’re not well trained you’re going to be hiking your bike. I’d wished the grippy/sole bits on my shoes were less XC racer like and more flexible adventure like.
- You are at elevation at Ghost Lake, it will be cold, we were high 20’s close to sea level (Nelson was hot as hell that weekend). Single digits over night at the hut.
Packlist
Clothes
- Buff #tip don’t get a cotton one, get a merino one.
- NZO Sifters (Best bike shorts ever)
- NZO Liners x 2; wore one riding, clean for next day
- 2x Merino tops; wore one riding, kept clean one in bag for hut/next day
- 2x Thick socks, wore pair riding, kept clean pair for hut/next day
- Merino boxers – if you haven’t tried these out yet, you haven’t lived
- Small puffy jacket, the kind you can wear under your riding jacket if need be.
- Merino leggings, for hut and if it was cold the next day over liners
- Gloves
- Rain/riding Jacket (actually wore it once up to elevation, got a hole in it, nudging a rock…)
- Sleeping bag, mines rated to -2, was well warm enough.
- Blow up pillow (I’m a princess)
Food
- Various freeze dried sugary things
- Gels
- Electrolyte tabs (look at how much you can have a day/caffeine content, unlike someone on our trip)
- Bananas
- Absolute Wildnerness Meals. #tip The blackcurrent and chia desert was very, very tasty. There might have been some envy.
- Lunch food could eat without heating things up
- One of our party took a Nanopress and freshly ground espresso. This is the way forward. #tip if you’re carrying the camera gear you’ve earned the right to barter weight with other people.
Misc
- Wilderness wipes. See princess comment.
- Toothpaste/brush. C’mon you are civilised aren’t you?
- Sunscreen
- Insect repellent #tip stow it for immediate access at Lyell campground and at the end.
- Headlamp
- Cup
- Spork
- Drybags. #tip Don’t trust stuff that is meant to keep you warm and dry (eg your sleeping bag) to your “waterproof” bike bags. Get the super light weight sea to summit dry bags and make sure your sleeping bag/clothes are inside them.
The fun stuff
- Sony A7R body
- 25mm and 55mm lenses
- 2x batteries
- Lense wipes
- The most cheapest, budget, paracord camera sling. Worked a treat, weighed nothing.
- Peak Designs Capture Pro clip.
- Remote shutter (had grandiose visions of using, didn’t use, waste of grams)
- Gorillapod
- Garmin
- Microfibre cloth
The bike stuff (shared around)
- Pump
- Tool
- Zip ties
- Chain links
The emergency stuff
- PLB
- First Aid Kit